

Wondering how to add or remove the Manage item on the File Explorer Content menu?
The Window’s context menu appears when you right-click a shortcut, an icon, or an element of the interface. The menu is called this because the options within it are based on context and aren’t always the same.
File Explorer’s context menu contains a Manage item that opens the tool window for Computer Management. For users, this shortcut allows them to open the Computer Management tool without having to search for it in the Windows search box. However, this shortcut is typically used by administrators, and thus might not be as useful for the standard users.
In this guide, we will walk you through ways of adding or removing the Manage item on the File Explorer context menu on Windows. All the methods are easy to execute, and should not take much of your time.
Let’s get started!
1. Use the Local Group Policy Editor.
Group Policy Editor (GPE) is a built-in utility provided to help users customize the behavior of their operating systems from an administrative level. The information in GPE is stored in the form of policies, and by modifying the relevant policies, you can make the desired changes.
Here is how you can use the Group Policy Editor to add or remove the Manage item on the File Explorer Content menu:
- Press Windows + R keys simultaneously on your keyboard to open a Run dialogue box.
- Inside the text field of the dialogue box, type gpedit.msc and hit Enter to launch Group Policy Editor.

- Once you are inside the Group Policy Editor, navigate to the location mentioned below.
User Configuration\ Administrative Templates\ Windows Components\ File Explorer\
- Now locate and double-click on Hide the Manage item on the File Explorer context menu in the right pane.
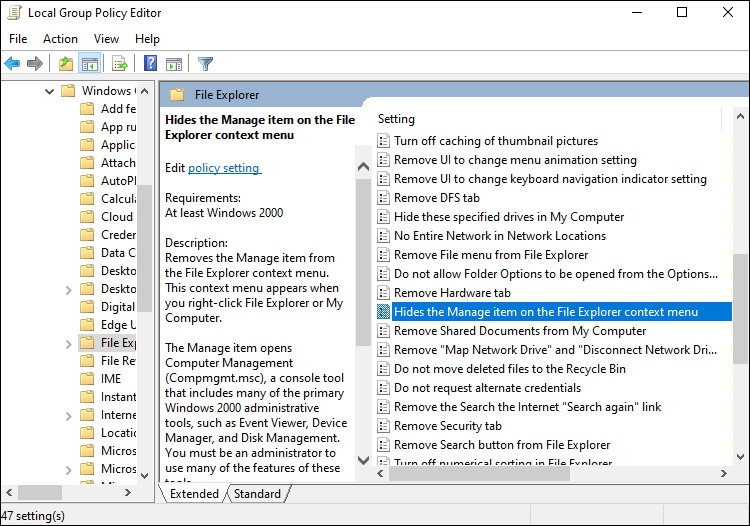
- Select Enabled or Disabled according to your preferences and hit Apply to save the changes.
Note: Now check if the desired changes are made. If not, then this means that you need to force the changes and for that, continue with the 6th step.
- Type cmd in the search bar and click on Run as administrator to launch Command Prompt with administrative privileges.
- Inside the Command Prompt window, type the command mentioned below and hit Enter to execute it.
gpupdate /force
This should make the changes without any issues.
2. Try Using CleanMyPC.
If after following both of the steps in this guide you are still unable to complete the desired action, your system may have become corrupt.
To ensure that your PC is free of bugs and corruption errors, perform a deep cleaning before following this guide. It can be beneficial to use a good PC cleaner in this scenario since manual cleaning can take a lot of time and effort.
In case you’ve never used a PC cleaner before, we recommend CleanMyPC.

CleanMyPC helps you solve all PC problems fast and efficiently. It comes with a wide range of tools that include (but are not limited to) a multi-uninstaller, speed boost, and registry cleaner. These tools can optimize your system and fix most problems.
If this looks like something your PC desperately needs, install CleanMyPC now and get your PC up and running like new.
3. Use Windows Registry.
The Registry is a database used by Windows to store low-level information about an operating system’s processes and applications. Windows relies on the Registry Editor for important information while performing relevant operations, which makes it an important component of our operating system.
In this method, we will modify Windows Registry to make the required changes. However, log into your system as an administrator before proceeding with the steps mentioned below.
- Press Windows + R keys simultaneously on your keyboard to open a Run dialogue box.
- Inside the text field of the dialogue box, type regedit and hit Enter to launch Windows Registry.

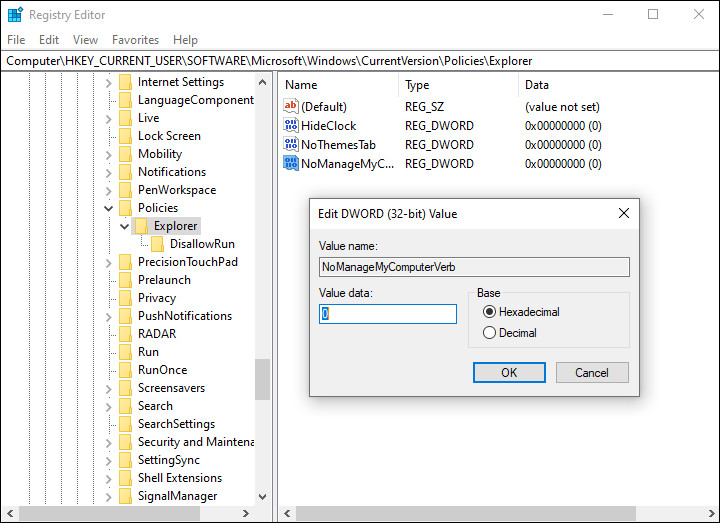
- Once you are inside the Windows Registry, navigate to the location mentioned below.
HKEY_CURRENT_USER\Software\Microsoft\Windows\CurrentVersion\Policies\Explorer
- Now right-click in the right pane and select the New > DWORD (32-bit) Value option.
- Rename this value as NoManageMyComputerVerb.
- Double-click on NoManageMyComputerVerb and under Value data, type 1 to remove the Manage Item.
- To add the Manage Item, type 0 under Value data and hit Enter to save the changes.
You can now close the Registry and restart your PC to save the changes.
This brings us to the end of our guide on ways to add or remove the Manage item on the File Explorer Content menu. We tried walking you through all the steps in detail and hope that one of the methods mentioned in this post did the trick for you. In case you still have any confusion about the steps, please let us know in the comment section below!
If this guide helped you, please share it. 🙂
