

Can’t share desktop screen on Microsoft Teams on Windows 10?
The screen-sharing feature of Microsoft Teams is a great way to improve your communication, making it ideal for scenarios like online presentations or meetings. It saves both the time and energy that would have been wasted while sharing documents and explaining all of them individually.
However, recently several users reported that they could not share their desktop screen on Microsoft teams, which has been affecting their work performance. If you use Microsoft Teams for professional purposes, not being able to share the screen in a meeting can cost you a lot, and we understand this.
We have compiled a few easy and quick solutions you can try to get the screen-sharing feature back on Microsoft Teams, and this guide will walk you through them in detail.
Let’s get started.
1 . Enable the Screen Sharing Mode.
If you can’t share the desktop screen on Microsoft Teams on Windows 10, then the first thing you should check is if the screen sharing mode on your account is enabled.
There are times when you are unable to share the screen just because the screen sharing mode is disabled.
Here is how you can enable the screen sharing mode on Microsoft Teams:
- Go to the Microsoft Team’s Admin center and click on Meetings.
- Select Meeting policies and click on Add New policy.
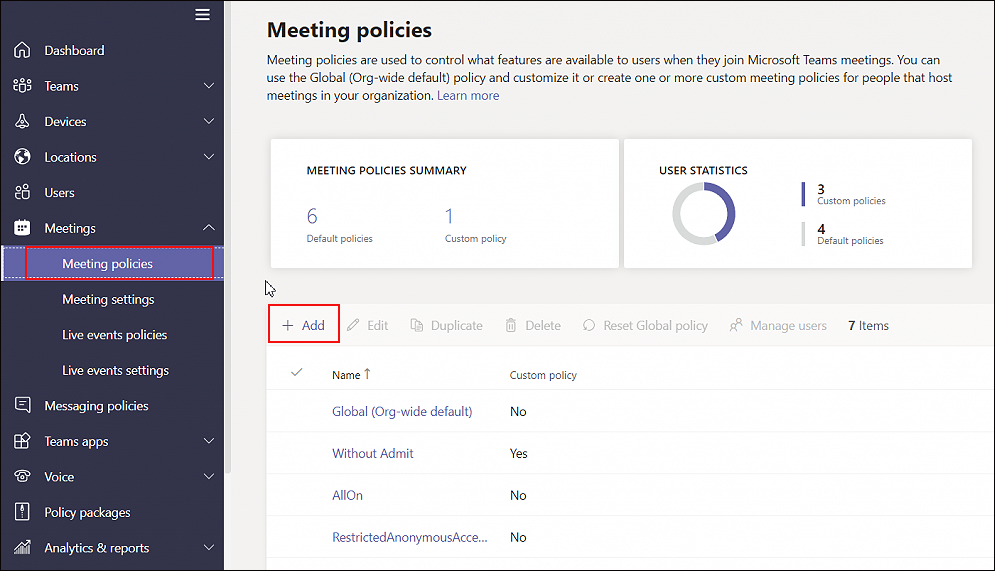
- Provide a unique name and description for your policy and select Next.
- Now, locate the Content sharing option and click on the drop-down menu against Screen sharing mode.
- Select Entire screen and then try sharing the desktop screen on Microsoft Teams.
Hopefully, doing so will resolve the issue.
2. Clear Microsoft Teams Cache.
When we visit a web page or open an application for the first time on our devices, our system automatically stores relevant information for later use. This stored data is known as cached files, and it helps the system retrieve data quickly when you revisit the source.
However, it is common for cached files to get corrupt and cause issues within the application. But since these files are temporary, it is safe to delete them to eliminate the problems.
In case method 1 did not help you resolve the issue at hand, try clearing Microsoft Teams cache on your PC.
Here is what you need to do:
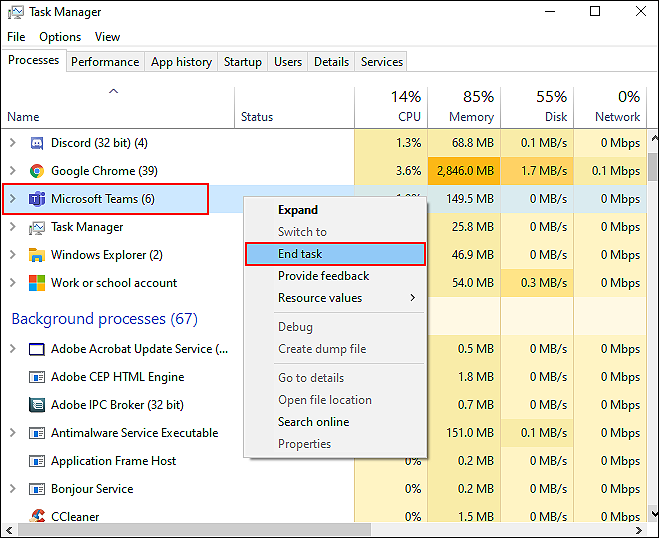
- Type Task Manager in the search bar and click Open.
- Locate Microsoft Teams in the list of apps available on your screen and right-click on it.
- Click on End task to close Microsoft Teams and its related process.
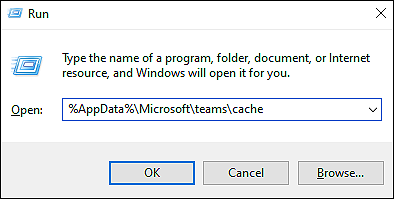
- Next, open the Run dialogue box by pressing Windows + R keys simultaneously.
- Type the location mentioned below in the text field and hit Enter.
%AppData%\Microsoft\teams\cache
- Delete all the contents of the Cache folder.
- Now repeat the fourth step, and this time, delete the contents inside the folder locations mentioned below one by one.
%AppData%\Microsoft\teams\blob_storage
%AppData%\Microsoft\teams\databases
%AppData%\Microsoft\teams\application cache\cache
%AppData%\Microsoft\teams\gpucache
%AppData%\Microsoft\teams\Indexeddb
%AppData%\Microsoft\teams\Local Storage
%AppData%\Microsoft\teams\tmp
%LocalAppData%\Google\Chrome\User Data\Default\Cache
%LocalAppData%\Google\Chrome\User Data\Default\Cookies
%LocalAppData%\Google\Chrome\User Data\Default\Web Data
- Once done, check if you can now share the desktop screen.
If corrupt cached files were causing the issue, removing them will resolve it. You should now be able to share the desktop screen without any problems.
3. Try Using CleanMyPC.
If you haven’t deep cleaned your system in a long time, then now might be the right time to do it, as your system’s junk files can be causing the issue at hand. Not just this, but these files can also be the reason behind your PC’s slow speed and sluggish performance.
The best way to deep clean your system is by using a reliable and efficient PC cleaner. You can also do it manually, but we wouldn’t suggest it unless you have a lot of free time on your hands, and by free time, we mean countless hours.
If you are looking for a PC cleaner, we suggest using CleanMyPC.

The tool will take care of all your PC-related problems such as privacy issues, slow speed, viruses, and corrupt system files. All you need to do is run a scan using CleanMyPC, and the rest will be taken care of.
Install CleanMyPC now to get your PC up and running like brand new.
4. Update Microsoft Teams App.
If your Microsoft Teams app is outdated, it is most likely causing issues like the one at hand.
The solution is simple, as all that you need to do is update your Microsoft Teams app to its latest build. The latest updates are packed with new features and bug fixes that promote a seamless user experience.
Here is all that you need to do:
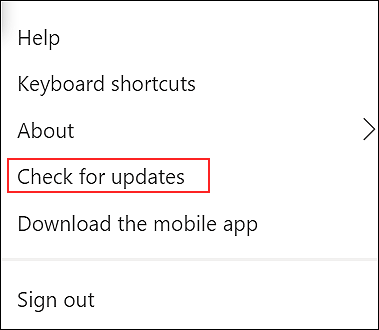
- Open the Microsoft Teams app and click on your user icon at the top-right of the window.
- Locate Check for updates and click on it. Doing so will connect you to Microsoft servers. If any pending updates are found, follow the on-screen instructions to install them.
- Once all the updates are downloaded, reopen the Microsoft Teams app and try sharing the desktop screen.
If the outdated Microsoft Teams application was causing the issue, installing the latest updates will fix it. You can also try installing the latest Windows updates, as if your operating system is outdated, you will frequently face issues while working on it.
This brings us to the end of our guide on fixing the screen-sharing error on Microsoft Teams on Windows 10. We tried walking you through all the steps in detail and hope that one of the methods helped did the trick. If you have any questions regarding the troubleshooting steps, please let us know in the comment section below!
If this guide helped you, please share it. 🙂
