

Looking for ways to check your CPU temperature on Windows 11?
Most electronic devices perform optimally under a specific range of temperatures. As soon as the limit exceeds, the systems usually fail. One such example is the computer CPU. Under standard conditions, its internal temperature should be around 30 degrees Celsius.
It’s important to keep track of your CPU’s internal temperature to prevent your computer from any risk. Unfortunately, the new Windows 11 doesn’t include any direct method to let you monitor the CPU temperature.
Lucky for you, we have compiled a list of methods you can follow. It will help you take the required measures at the right time before the system crashes or its performance deteriorates.
So without further delay, let’s get started!
1. Check CPU Temperature Using BIOS.
If you just want to know at what temperature your computer is operating, checking BIOS is the fastest and easiest way. You can enter the BIOS screen by pressing a hotkey on reboot. From there, you’ll immediately come across the CPU thermal status on the BIOS screen.
Here are the steps you need to follow:
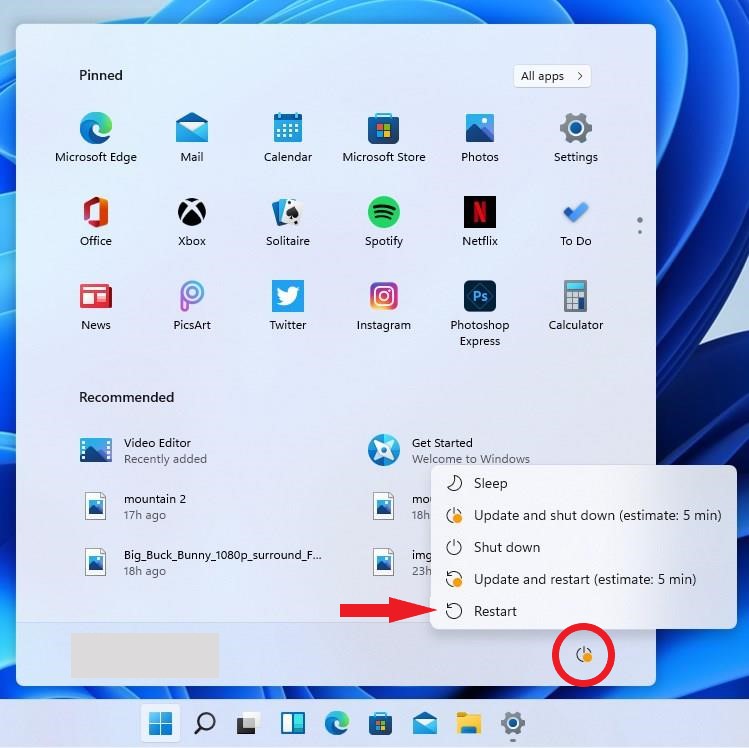
- Start by closing all current programs and tasks on your computer. Then, click the Start menu.
- From there, click on the Power button and select Restart.
- Your computer will start rebooting. As soon as the logo appears, repeatedly press the dedicated system hotkey. Most commonly, these keys are F2, F12, Esc, or Del.
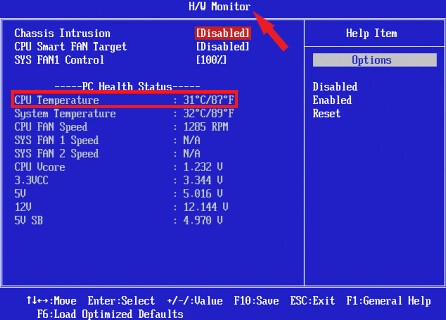
- Your system will then take you to the BIOS screen. Use the arrow keys to select Hardware Monitor or PC Status and hit Enter.
- Check for your current CPU temperature in the CPU temperature field.
You can then reboot your computer the usual way to start using it again.
2. Check CPU Temperature Using UEFI.
The Unified Extensible Firmware Interface (UEFI) is another setting you can check the CPU temperature from. This approach only gives you the temperature when you were performing the check and not the status over time. Nonetheless, UEFI can be pretty useful when you don’t have access to other third-party apps to run system diagnostics.
To enter the UEFI screen, here’s what you need to do:
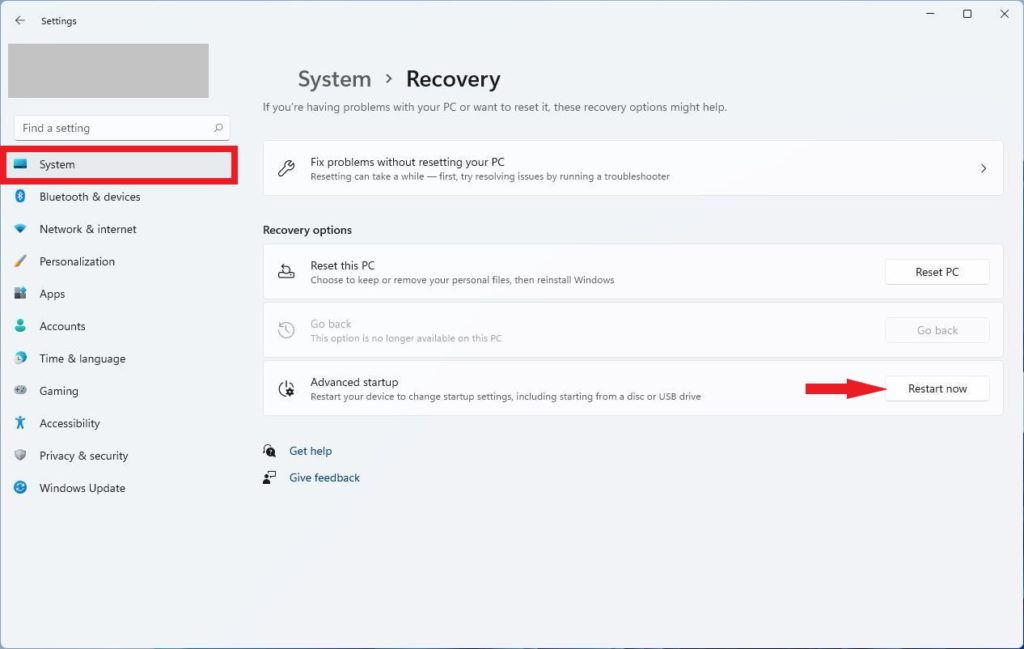
- Open Settings on Windows 11 by pressing Windows key + I.
- Next, click on the System tab on the left side of the window.
- Now, scroll down until you find Recovery and click on it.
- This will open Recovery options. Click the Restart button next to the Advanced startup.
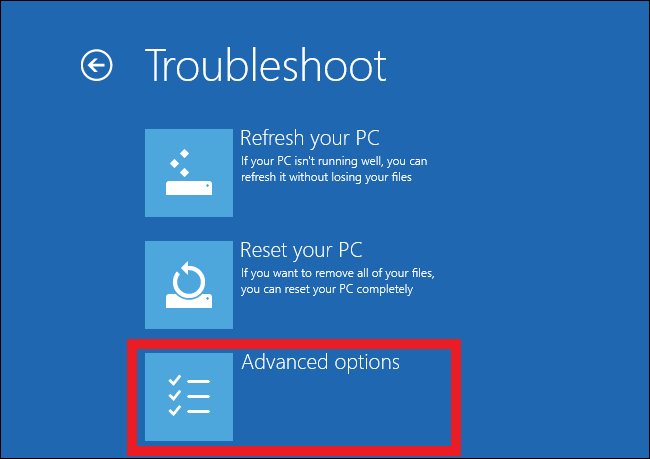
- Your PC will then restart and display the advanced startup menu on the screen. Select Troubleshoot.
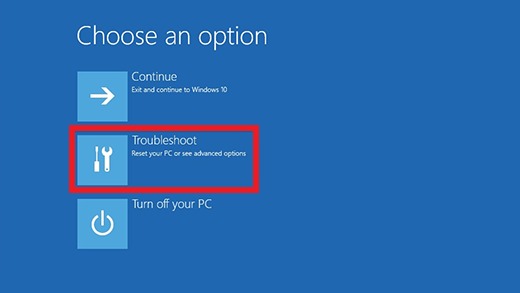
- From there, go to Advanced Options.
- Finally, click on UEFI Firmware Settings.
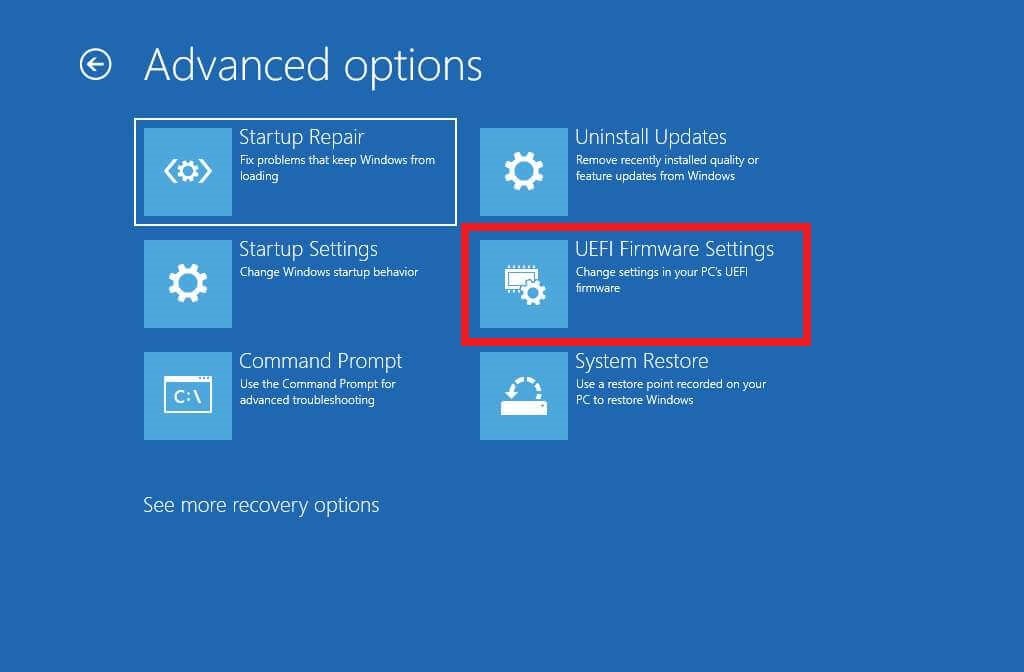
Following the above steps will take you to a window with all information about your PC status. You will also be allowed to run system diagnostics, which includes the CPU temperature checks.
A quicker way to enter the advanced startup menu is by restarting your computer while holding down the Shift key.
3. Use CoreTemp App.
While the previous methods required you to put your current tasks on hold and restart your computer, there are more flexible options available. One of them is using a third-party app like CoreTemp.
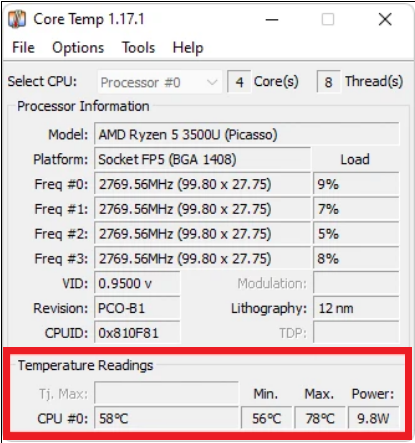
The well-known app not only gives you a static temperature reading but also real-time temperature variations. It shows the results for various computer cores. The best thing about CoreTemp is that it takes up minimum space in your PC while performing all the relevant functions.
To use CoreTemp to check CPU temperature on Windows 11, follow these easy steps:
- Start by downloading the CoreTemp app.
- When the User-Account Control box pops up, click Yes to confirm downloading the software.
- Then, the wizard window will open. Click on Next to proceed.
- You will now need to check the box that says I accept the agreement and click Next.
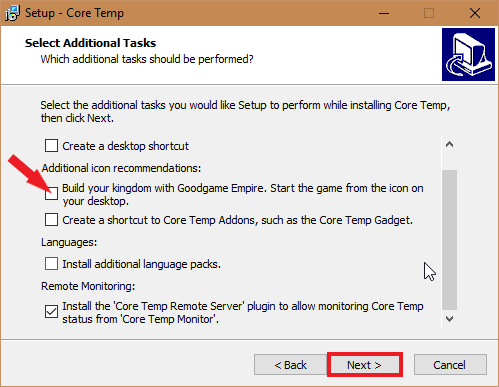
- Again, click the Next button twice and make sure to uncheck the box that says Build your kingdom with Goodgame Empire. Start the game from the icon on your desktop. This is so that you can avoid downloading an extra program called Goodgame Empire.
- Lastly, click on Install and then Finish. The CoreTemp app will then launch automatically. The CPU thermal readings will be available at the bottom.
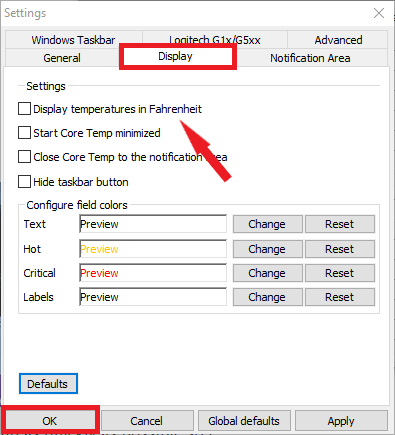
- If you want your temperature values to appear in Farenheits, go to Options and select Settings. Under the Display tab, check the Display temperatures in Fahrenheit box and click OK to save the changes.
For convenience, the CoreTemp app also displays the temperature readings in the Windows system tray.
4. Use the Open Hardware Monitor App.
A more full-featured app available for download is Open Hardware Monitor. It measures not only temperature but also voltage, load, fan speed, and clock speeds. The most prominent function of the Open Hardware Monitor app is that it monitors the performance of the GPU and hard drives along with the CPU.
The app also offers a premium version that allows you to remotely monitor several PCs at different locations at once and to customize the program’s user interface.
To check the CPU performance and temperature using this app, follow the steps below:
- First, download the Open Hardware Monitor.
- Then, open its file location. Right-click on the program icon and select Extract to decompress the files from the folder.
- Finally, right-click on the OpenHardWareMonitor.exe file and choose Run.
- The program will instantly launch and give you the thermal status of your CPU under Temperatures.
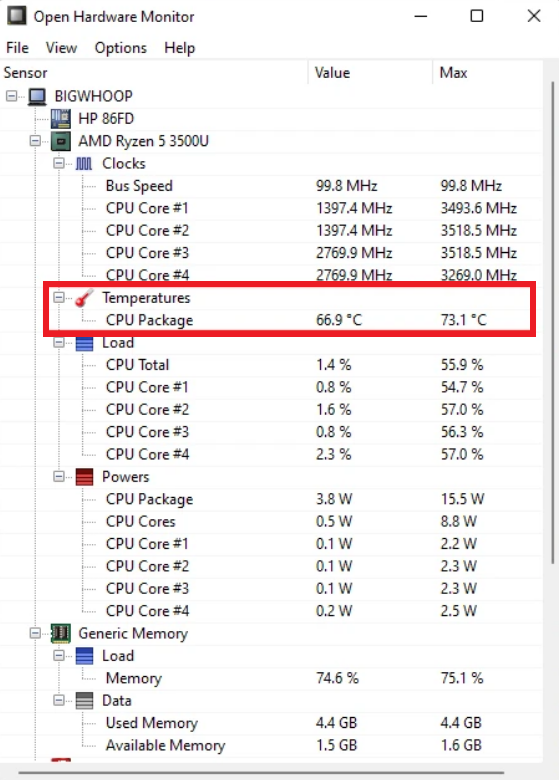
A unique benefit of using this app is that the software doesn’t need to be installed in order to run. This means you can save up some space on your PC without increasing background traffic.
5. Use Speccy App.
One of the most reliable apps in the market is Speccy. It displays additional information apart from the system’s thermal status, such as graphics card, memory, motherboard, BIOS, and more.
To use the app, follow these simple steps:
- First, simply download and install Speccy.
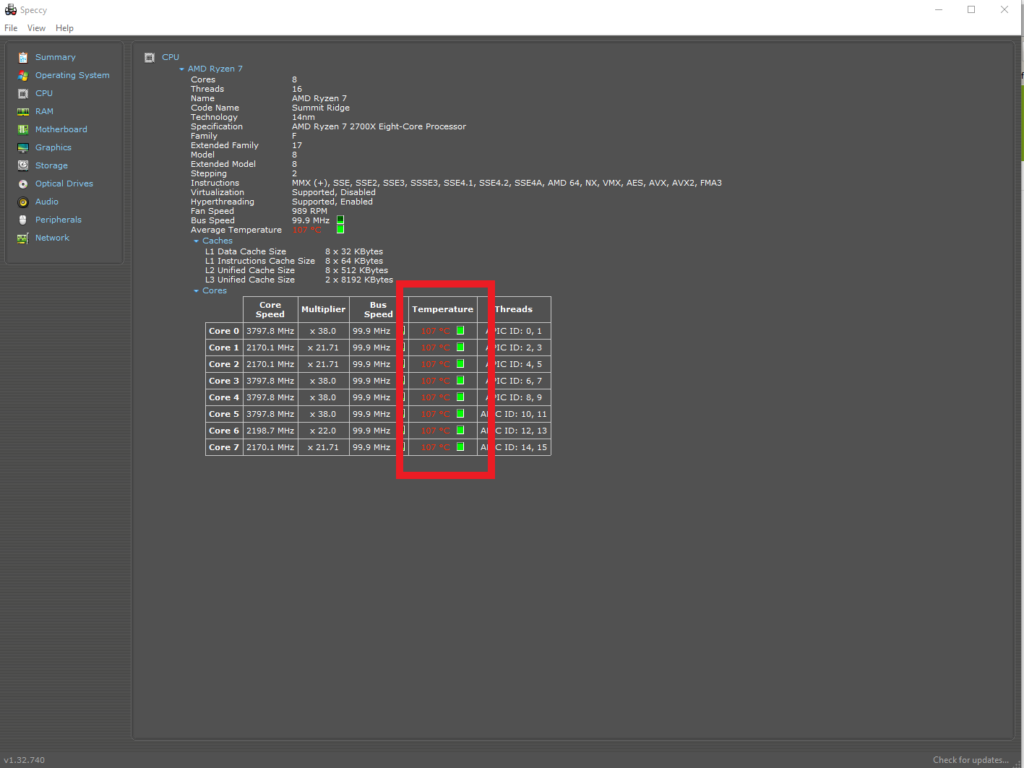
- The program window will then open with details on the main system components. For CPU readings, click on CPU.
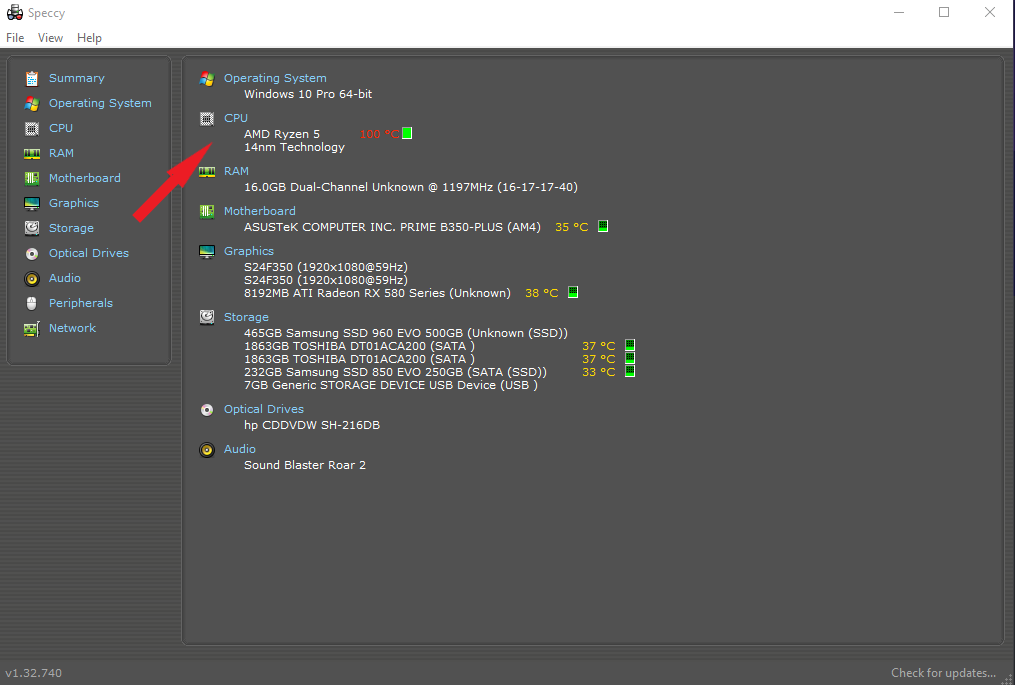
- The CPU thermal values will be at the bottom under the Temperature column on the table.
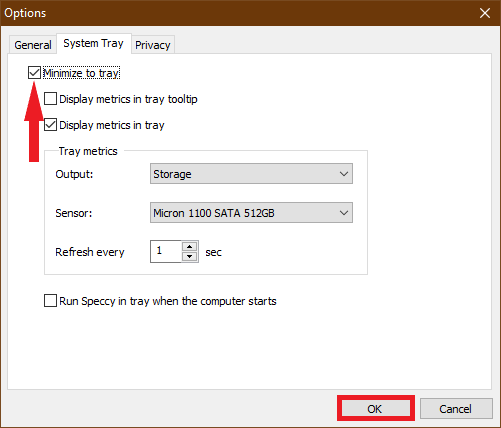
- You can also check the Minimize to tray box in Options if you want Speccy to be visible at all times. Click Okay to save the changes.
Note that this app occasionally misrepresents the values of AMD CPUs.
6. Use Ryzen Master App.
In case you do own an AMD or a Threadripper CPU, using Ryzen Master to check CPU temperature would be the ideal choice. It gives you details on almost all cores of a CPU.
The interface can be pretty daunting, especially if you’re a beginner. However, it doesn’t really matter if you’re only looking for CPU temperature, clock speed, and voltage since it’s on the program window prompted upon launch.
This wraps up our guide on how to check CPU temperature on Windows 11. We hope at least one of the methods can help you. If you still have questions related to this topic, feel free to leave a comment below and we’ll do our best to answer your queries.
If this guide helped you, please share it. 🙂
