

Do you experience choppy playback on Adobe Premiere Pro?
Adobe Premiere Pro isn’t the most stable video editing software in the market. While it offers some of the best features, it’s not optimized for every hardware and consumes a lot of resources.
Due to this, many users encounter performance and playback issues on Premiere Pro while editing videos.
This is particularly imminent on entry-level systems without very powerful CPUs and GPUs.
If you’re running Premiere Pro on a low-powered rig, you may encounter choppy video playbacks, slow rendering times, and unexpected freezes. In worst cases, you might also suffer from random crashes.
While Adobe Premiere Pro demands powerful hardware to run smoothly, it doesn’t mean that you can’t do anything to improve your experience on entry and mid-level rigs.
In this guide, we will show you how to fix choppy playback on Adobe Premiere Pro.
Let’s dive right in!
1. Close Unnecessary Applications.
One of the most effective ways to improve Adobe Premiere Pro’s performance is to close unused applications on your system. This will free up your system resources, which will be available for Premiere Pro to use.
To identify which applications to close, see the guide below:
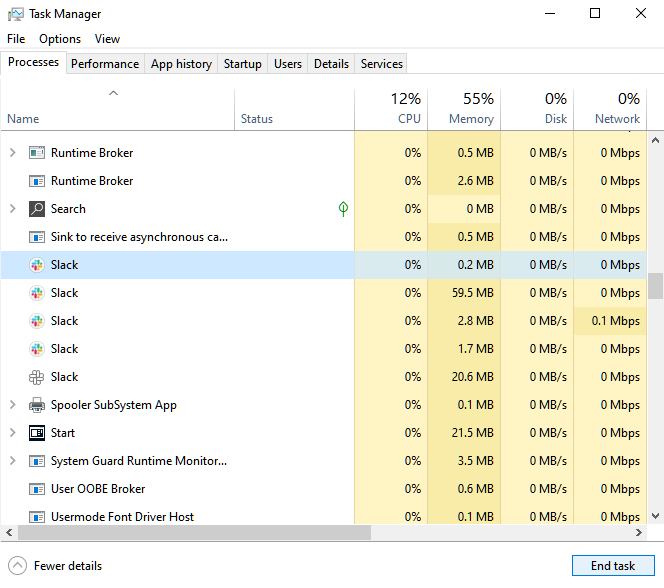
- First, press the CTRL + SHIFT + ESC keys on your keyboard to open the Task Manager.
- Next, go to the Processes tab and click the Memory tab. This should sort your applications based on their RAM usage.
- Lastly, identify the apps you’re not using and close them.
Go back to Adobe Premiere Pro afterward to check if its performance has improved.
2. Enable GPU Acceleration.
If you have a dedicated graphics card on your computer, it will offer more performance than your CPU’s integrated graphics. In this case, we recommend enabling GPU acceleration on Premiere Pro if you’re running discrete graphics on your system.
Here’s what you need to do:
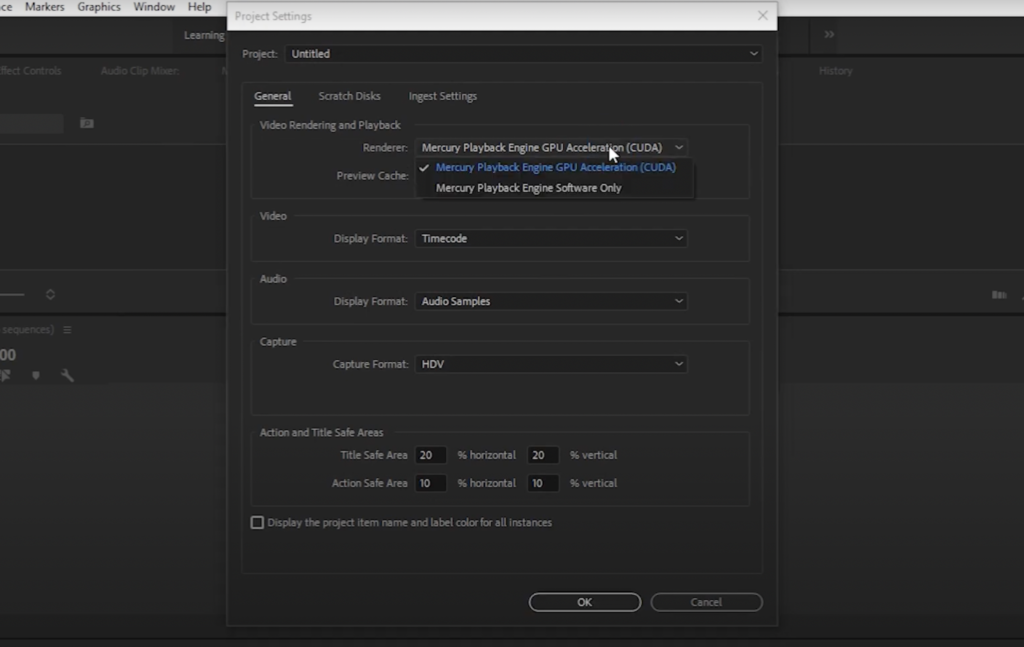
- First, open Adobe Premiere Pro on your computer.
- Now, go to File > Project Settings > General.
- Lastly, change the Renderer to Mercury Playback Engine GPU Acceleration. Hit OK afterward to save the changes.
Once done, continue working on your project and observe if the performance has improved.
3. Clear Your Media Cache.
Adobe Premiere Pro’s media cache accumulates over time. If it gets bigger and bigger, your system will struggle to load them and could negatively affect Premiere Pro’s performance.
To avoid this, follow the guide below to clear your media cache:
- On your computer, launch Adobe Premiere Pro.
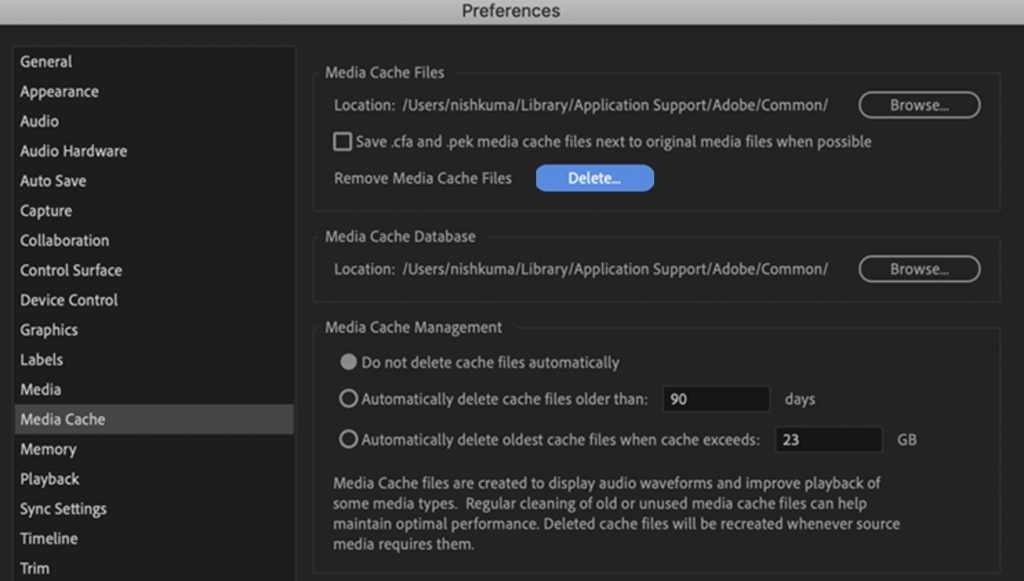
- Next, click on File and choose Preferences.
- After that, access the Media Cache tab.
- Finally, click the Delete button under the Media Cache Files tab.
Restart Premiere Pro afterward and check if the problem is solved.
4. Decrease Your Preview Resolution.
If you experience choppy playback on Adobe Premiere Pro, it may indicate that your system is struggling to play your project and render the effects all at the same time. To reduce the load, we suggest lowering the preview resolution on Premiere Pro.
On the lower right corner of the preview screen, click on the drop-down menu next to the wrench icon.
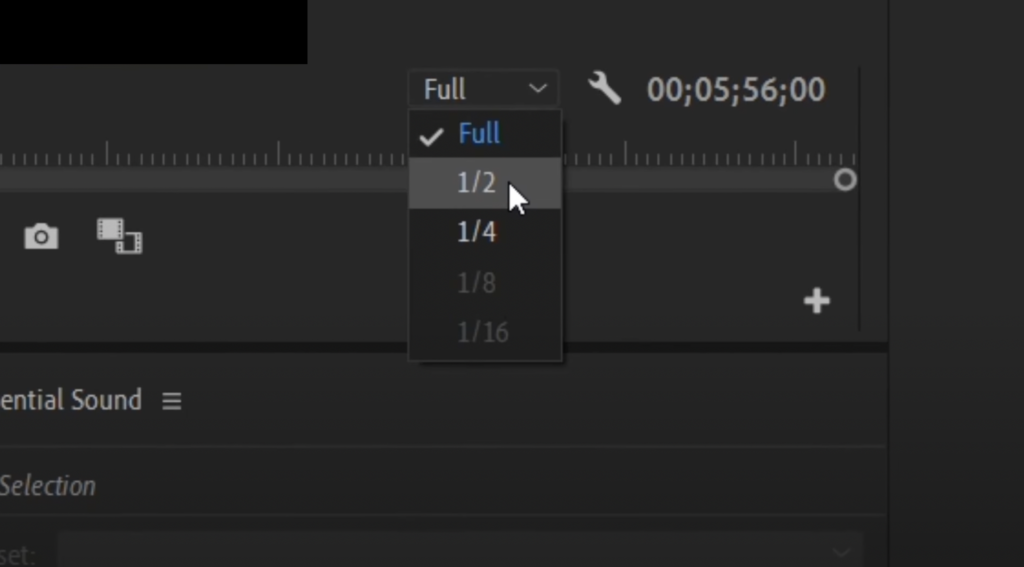
Now, choose a lower resolution from the menu to reduce the load on your system. If your current configuration is set to “Full”, try changing it to “1/2” or lower if necessary.
5. Disable Unused Clips.
If you’re working on a long project, you can try disabling unused clips to reduce the load of Adobe Premiere Pro to your system. While this will require you to re-enable the clips, it’s an option you can consider if you’re using low-end hardware.
Here’s what you need to do:
- First, identify the clips you’re not using.
- After that, highlight them and right-click on the clips.
- Lastly, uncheck the Enable option.
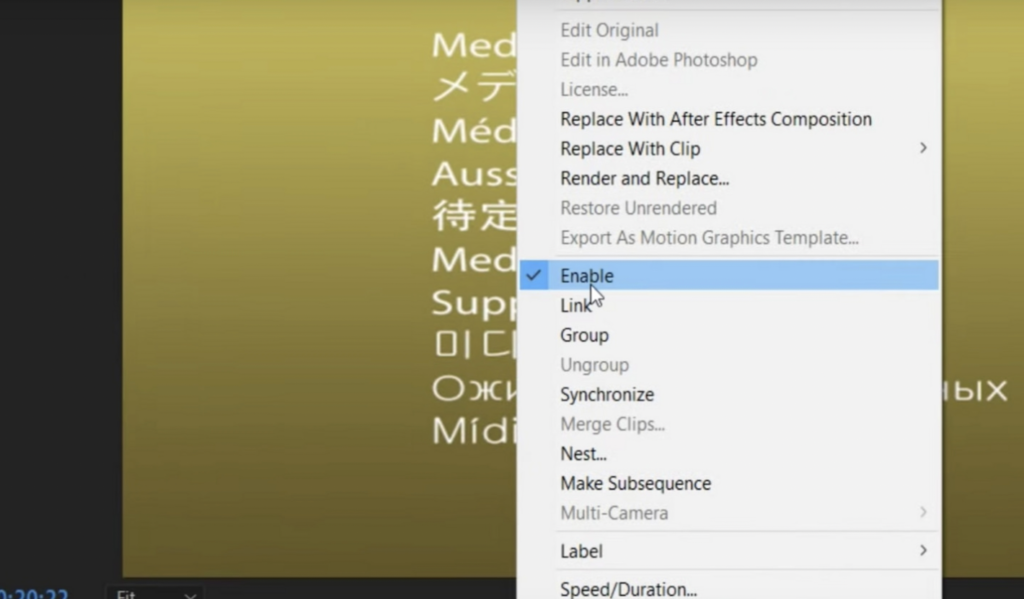
Now, you can work on the other clips without worrying about lags and choppiness.
6. Upgrade Your Hardware.
Unfortunately, the only thing you can do if you still encounter choppy playback on Adobe Premiere Pro is to upgrade your system. If you use the software for professional work, investing in a more powerful CPU and GPU will help in the long run.
This should allow you to use more graphics-intensive effects to improve your outputs. This will also help you finish projects faster, giving you more time to work on other projects.
That ends our guide on how to fix choppy video playback on Adobe Premiere Pro. If you have questions, please don’t hesitate to leave a comment below, and we’ll do our best to answer them.
If this guide helped you, please share it. 🙂
