

Do you want to connect to WiFi from the Terminal in Ubuntu Linux?
Unlike popular belief, Ubuntu and other Linux-based distributions don’t always require users to be familiar with the command prompt—or the terminal—as Linux folks like to call it.
On the contrary, Linux distributions have been becoming more user-friendly with time. As a matter of fact, Linux distros such as Ubuntu, Linux Mint, and Debian allow users to carry out most of the tasks using a graphical user interface.
So, whether you want to install software, change the desktop wallpaper, or connect to the Internet, you can do so without having to run several commands. Accordingly, it is no longer necessary to be tech-savvy if you want to get your hands on a Linux-based operating system.
With that being said, there could be some cases where you’d want to use the Linux terminal to do a job. More specifically, if you have Ubuntu Server installed on your system, you’d have to connect to WiFi the CLI-way since there will be no desktop environment.
If you aren’t familiar with the Linux terminal, you need not worry. In this article, we will teach you all about connecting to WiFi networks with the help of the Linux terminal. Also, note that you can follow our method whether you’re using Ubuntu Desktop or Ubuntu Server.
Let’s have a look at the steps!
Step 2: Connecting to Wi-Fi Network.
Obtaining a Static IP Address.
Step 1: Finding your ESSID.
In order to follow this procedure, the first thing that we have to do is find the ESSID, as it will be used in our next step. If you’re wondering what’s an ESSID, it’s just the network name identifier.
If we have that clear, we can now get to identifying the ESSID with the help of the Linux terminal. Even if you’re new to the terminal, you need not worry as we’ll tell you all the commands to run.
For this step, you need to follow this procedure:
- Start by opening the Linux terminal by simultaneously pressing the Ctrl + Alt + T keys.
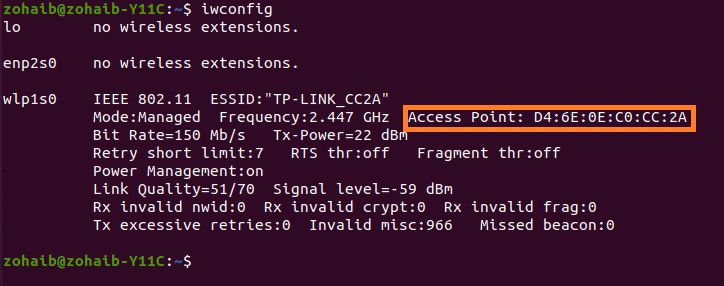
- Afterward, you’d have to find the wireless interface name, which should begin either with ‘wlan’ or ‘wlp’. This is possible with the help of the following command:
iwconfig
- Now that you know the wireless network interface name, running this command should help you find its ESSID:
sudo iwlist <wl-network-interface-name> scan | grep ESSID

Once you have noted down the ESSID, we can move on to our next step.
Step 2: Connecting to Wi-Fi Network.
Now, when it comes to actually connecting to your Wi-Fi network, you would need to take some help from wpa_supplicant. If wpa_supplicant doesn’t ring a bell, you should just know that it determines whether a computer can join a network.
Another utility we’ll be using is the wpa_passphrase, which comes pre-installed with Linux. Once you’re done with this step, your computer should have successfully connected to your Wi-Fi network.
So, here are the steps:
- The first thing we have to do is press the Ctrl + Alt + T keys to open the terminal.
- Next, you have to install wpa_supplicant by running this command:
sudo apt install wpasupplicant
- Once it’s installed, it’s now time to utilize the ESSID we determined earlier and the password to your connection in the following command:
wpa_passphrase <your-ESSID> <your-wifi-password> | sudo tee /etc/wpa_supplicant.conf
- The next step is to establish a connection between your wireless card and the access point. The following command should help you do that:
sudo wpa_supplicant -c /etc/wpa_supplicant.conf -i <your_SSID>
- Although the connection should be established at this point, it’s still a good idea to double-check it. For this, run the
iwconfigcommand and make sure that the wireless network has an access point.
- Ubuntu Desktop users are at a risk of facing problems because of the Network Manager. With the following commands, you can stop this process and prevent it from automatically starting at boot time:
sudo systemctl stop NetworkManager
sudo systemctl disable NetworkManager-wait-online NetworkManager-dispatcher NetworkManager
- The last step is to get a private IP address and check it with the help of the following commands, consecutively:
sudo dhclient <your_SSID>
ip addr show <your_SSID>
With this, your computer should now be connected to your Wi-Fi network. However, one thing to note here is that if your ESSID contains whitespace, your best is to write it inside double quotes so you don’t run into any errors.
Step 3: Enable Auto Connect.
Although it isn’t that difficult to connect to your Wi-Fi network through Linux terminal, following this procedure every time you turn on your PC could be a tad time-consuming.
Considering this, this section will teach you how to make your computer automatically connect to your Wi-Fi network at boot time.
However, for enabling auto connect, we’ll have to use the Nano text editor that comes with Ubuntu Linux. If you’re unfamiliar with Nano, you need not worry as we’ll also give you some basic guidelines on how to use it.
Just follow these steps:
- First of all, you’d have to copy the wpa_supplicant.service file to another directory using the following command:
sudo cp /lib/systemd/system/wpa_supplicant.service /etc/systemd/system/wpa_supplicant.service
- Afterward, run the following command to open this file in the Nano text editor:
sudo nano /etc/systemd/system/wpa_supplicant.service
- Once the file opens, you need to look for the following line:
ExecStart=/sbin/wpa_supplicant -u -s -O /run/wpa_supplicant
- Then, you need to replace it with the following lines:
ExecStart=/sbin/wpa_supplicant -u -s -c /etc/wpa_supplicant.conf -i wlp4s0

Restart=always
- The next step is to find the following line and comment it out by adding ‘#’ at the start:
Alias=dbus-fi.w1.wpa_supplicant1.service
- You should now save this file by pressing Ctrl + O and then Enter and exit by pressing Ctrl + X.
- It is also necessary to reload systemd and make wpa_supplicant run at startup by running the following commands consecutively:
sudo systemctl daemon-reload
sudo systemctl enable wpa_supplicant.service
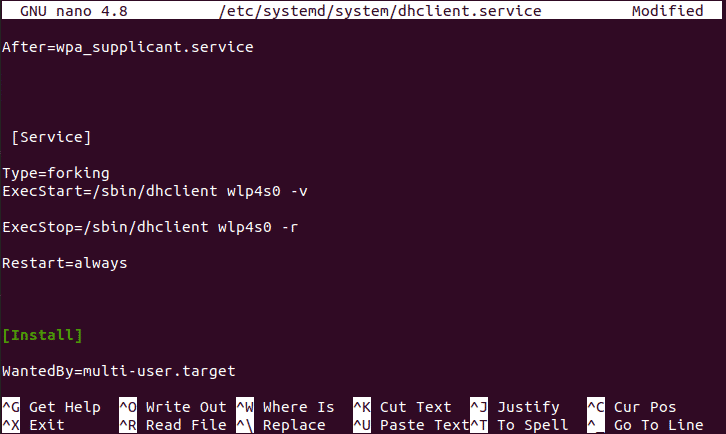
- Now, you have to enable dhclient to start at boot time. For this, you’d have to use Nano again:
sudo nano /etc/systemd/system/dhclient.service
- In the editor, you have to copy/paste the following lines:
[Unit]

Description= DHCP Client

Before=network.target

After=wpa_supplicant.service


 [Service]

Type=forking

ExecStart=/sbin/dhclient wlp4s0 -v

ExecStop=/sbin/dhclient wlp4s0 -r

Restart=always


[Install]

WantedBy=multi-user.target
- Next, save and close this file just as you did in the 6th step.
- Lastly, run the following command to enable dhclient:
sudo systemctl enable dhclient.service
Obtaining a Static IP Address.
Although your computer should now be able to connect to the Internet, it is a good idea to get a static IP address for your connection.
Getting one is possible by following these steps:
- Firstly, open the Linux terminal if you already haven’t by pressing the Ctrl + Alt + T keys.
- Afterward, the dhclient service has to be disabled with this command:
sudo systemctl disable dhclient.service
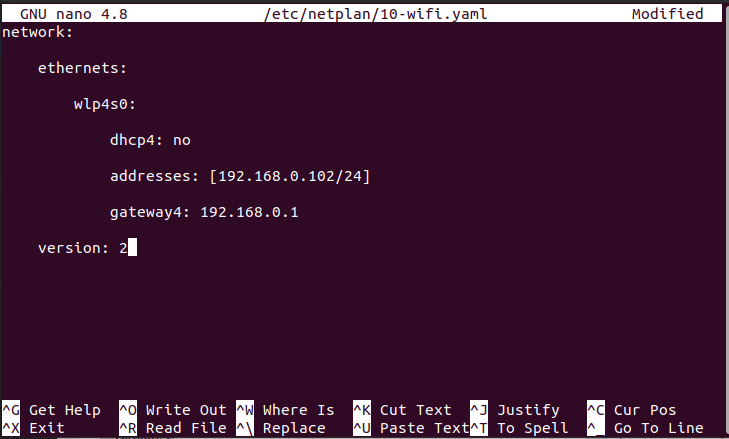
- The next step involves using Nano for creating a configuration file. For this, running the following command should do:
sudo nano /etc/netplan/10-wifi.yaml
- Once the text editor opens, you need to add the following lines of code, but make sure you enter your preferred IP address in place of the default value:
network:

    ethernets:

        wlp4s0:

            dhcp4: no

            addresses: [192.168.0.102/24]

            gateway4: 192.168.0.1

    version: 2
- Next, after saving and closing the file as you did earlier, run the following command for applying the configurations:
sudo netplan apply
- We also recommend making your computer first connect to a Wi-Fi access point and then get a private IP address. To do so, open the wpa_supplicant service using Nano:
sudo nano /etc/systemd/system/wpa_supplicant.service
- Then, look for
Before=network.targetin the file and replace it with Before=network.target systemd-networkd.service. - Lastly, save and exit Nano as you did earlier.
Using this, you have now connected to WiFi from the Terminal in Ubuntu Linux. As long as you carefully follow our instructions, you shouldn’t run into any issues.
If this guide helped you, please share it. 🙂
