

Looking for easy ways to disable Automatic Learning in Windows 10?
Automatic learning in Windows recognizes the handwriting and vocabulary of a user by analyzing the set of texts written by them. With this feature, your system can check your previous texts for current customer interactions and adjust your messaging accordingly.
However, there can be situations where you would want to disable the automatic learning feature on Windows 10.
If you are searching for easy methods to help you do so, you are in the right place.
This guide will walk you through the process of disabling Automatic Learning in Windows 10 in detail. All the methods we have listed are easy to follow and will not take much of your time.
Let’s get started.
1. Use the Group Policy Editor.
If you have ever wanted to have more control over your operating system than you already do, then Windows Group Policy Editor can make that happen.
Group Policy Editor is an administrative-level tool designed for advanced users. It allows the users to customize their operating system’s functions and user experience. If you want to disable automatic learning in Windows 10, then you can use the Group Policy Editor to do so.
Here is what you need to do:
- Open a Run dialogue box by pressing Windows + R keys simultaneously.
- Type ‘gpedit.ms’ in the text field of the dialogue box and hit Enter. Doing so will take you to the Group Policy Editor.

- Inside the Group Policy Editor window, navigate to the location mentioned below.
Computer Configuration\Administrative Templates\Control Panel\Regional and Language Options\Handwriting personalization
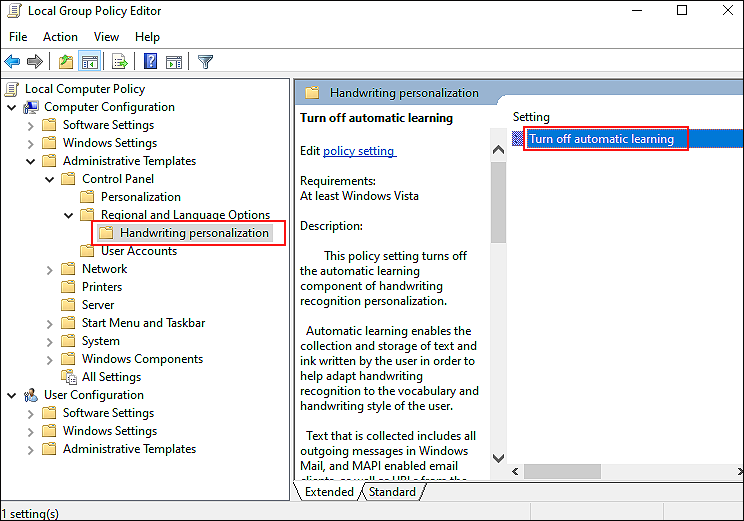
- In the right pane, locate Turn off automatic learning and double-click on it.
- Select Enabled in the next window and click on Apply/OK to save the changes.
As simple as that!
This should disable automatic learning in Windows 10 for you.
2. Try Using CleanMyPC.
If the methods mentioned in this guide are not working for you, then there is a chance that your system is infected with a corruption error that is preventing you from executing specific tasks. In this case, it is best to deep clean your PC and eliminate the junk files using an efficient PC cleaner before proceeding with the methods we have mentioned.
If you haven’t used a PC cleaner before and have no clue about what to look for, we recommend using CleanMyPC.

CleanMyPC is an easy-to-use, efficient PC cleaner that can remove unwanted junk files and take care of all your other PC-related issues. It comes with a wide range of system maintenance tools that include a Multi Uninstaller, Cleaner, Speed Booster, and much more.
You can access all these tools by simply installing CleanMyPC on your computer. Once installed, run a scan using it.
CleanMyPC will identify all the issues in your PC and attempt to resolve them using little to no user input. If this looks like something your PC desperately needs, install CleanMyPC now and get your PC up and running like new.
3. Use Windows Registry.
Another easy way to disable automatic learning in Windows 10 is via Windows Registry.
Like the Group Policy Editor, Windows Registry is also an advanced tool that allows the users to tweak Windows operations according to their preferences. If you find disabling the automatic learning feature via Group Policy Editor hard, then try doing it via Windows Registry.
Here is what you need to do:
- Open a Run dialogue box by pressing Windows + R keys simultaneously.
- Inside the text field of the dialogue box, type ‘regedit’ and hit Enter. This will launch the Windows Registry Editor.

- In the Registry Editor, navigate to the location mentioned below.
HKEY_LOCAL_MACHINE\SOFTWARE\Policies\Microsoft\InputPersonalization
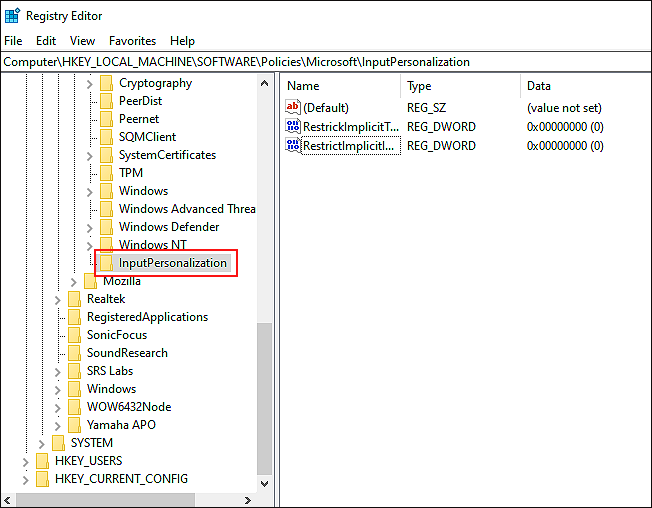
- If you cannot locate the InputPersonalization key, then right-click on Microsoft and choose the New > Key option.
- Now name this key as InputPersonalization and double-click on it.
- In the right-pane, right-click anywhere and choose the New > DWORD (32-bit Value) option. You need to do this two times to create two different values.
- Name these values as RestrickImplicitTextCollection and RestrictImplicitInkCollection respectively.
- Now double-click each of the values one by one, and under Value data, type 1.
That’s it. Doing so will disable Automatic Learning in Windows 10. If you want to enable this feature in the future, simply follow the process mentioned above and change the value of the values from 1 to 0.
This wraps up our guide on disabling Automatic Learning in Windows 10. We hope that one of the methods we mentioned did the trick for you. If you still have any questions regarding the methods in this guide, please let us know in the comment section below. We will try our best to assist you!
If this guide helped you, please share it. 🙂
