

Wondering how to disable the AutoRun feature in Windows 10?
Imagine plugging in one or more than one external device on your PC and the media files within it get started automatically without any permission message. The fact that you don’t know what is going to play on your computer can be frustrating and even embarrassing in some cases (you know which).
AutoRun is a Windows feature that can be useful when you want to skip the permission phase and start your program automatically, such as the setup program or menu shell. In addition, you can have a document (or movie, for example) on the disc open / play automatically when you insert the disc in the drive.
However, if you plug in a lot of removable devices, especially in a professional environment, it is best to disable this handy yet risky feature.
In this guide, we will walk you through the methods of disabling the AutoRun feature in detail.
Let’s get started!
1. Use Windows Registry.
Windows 10 allows users to disable the AutoRun feature in Windows 10 by modifying the Windows Registry.
You should know about Windows Registry if you want to gain better control over your operating system. A user with advanced knowledge of Windows Registry can make use of this application to manage and customize their operating system.
In the Windows Registry, data is stored in the form of Registry keys, and in this step, we will alter the key corresponding to our problem.
It is important to be extra careful as you perform these steps, as a slight mistake can cause serious issues within the Registry.
Here is what you need to do:
- Press Windows + R keys simultaneously to open a Run dialogue box.
- Type ‘regedit‘ in the text field of the dialogue box and hit Enter. This will launch Windows Registry on your PC.

- Once you are inside Windows Registry, navigate to the location mentioned below.
HKEY_CURRENT_USER\Software\Microsoft\Windows\CurrentVersion\Policies\Explorer
- If you cannot locate the Explorer key, right-click on the Policies key and select New > Key option.
- Name this newly created key as Explorer.
- Right-click in the right pane and select the New > DWORD (32-bit) Value option.
- Rename this value as NoDriveTypeAutorun and double-click on it. Now set the Value data to one of the following values according to your preferences.
FF – To disable AutoRun on all drives
20 – To disable AutoRun on CD-ROM drives
4 – To disable AutoRun on removable drives
8 – To disable AutoRun on fixed drives
10 – To disable AutoRun on network drives
40 – To disable AutoRun on RAM disks
1 – To disable AutoRun on unknown drives

- Hit OK to save the changes you just made.
This should successfully disable the AutoRun feature in Windows 10.
2. Use Group Policy Editor.
Similar to the Windows Registry, Group Policy Editor allows administrators to customize features of an operating system.
In the Windows operating system, Group Policy Editor stores policies that determine the behavior of programs and processes. The policies can be tailored to meet individual requirements, and that is exactly what we will do with this approach.
However, this method is not compatible with Windows 10 Home Edition.
Here is how you can use the Group Policy Editor to protect the screensaver in Windows 10:
- Press Windows + R keys together to open a Run dialogue box.
- Type ‘gpedit.msc‘ in the text field of the dialogue box and hit Enter.

- Once you are inside the Group Policy Editor, navigate to the location mentioned below.
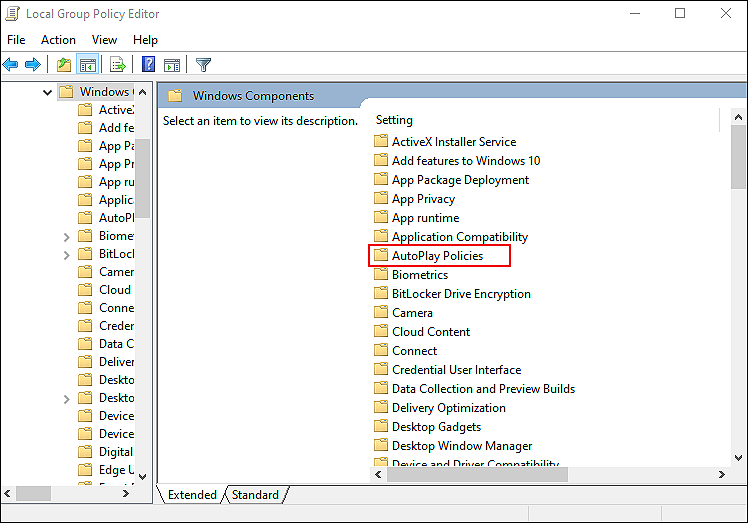
Computer Configuration > Administrative Templates > Windows Components
- Select Autoplay Policies in the right pane.
- Now locate and double-click on Turn off Autoplay.
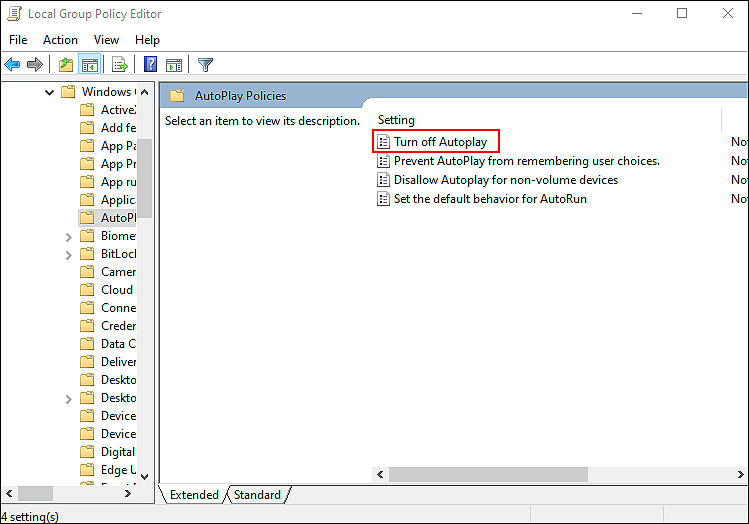
- Select Enabled and click Apply/OK to save the changes.
Hopefully, following the steps mentioned above will help you make the desired changes.
3. Try Using CleanMyPC.
Sometimes, the junk files residing in the system can become corrupt and cause problems within the operating system. In the event that the steps in this guide cannot yield the desired results on your PC, then it’s possible that your PC has some kind of corruption error that is preventing you from disabling the AutoRun feature in Windows 10.
In order to eradicate these corruption errors, it is best to use an efficient PC cleaning tool, such as CleanMyPC.

CleanMyPC is a one-stop solution for all your computer problems. You can use it to fix everything from slow performance errors on your PC to corruption errors that are preventing you from performing the actions you want on it.
Your only need is to install CleanMyPC and let the utility scan your operating system. With little or no user input, the software will identify all the problems and repair them!
4. Modify Windows Settings.
For those of you who don’t want Windows to launch media automatically, which can include opening a folder with File Explorer, configuring the storage after launching the app, importing images, or another action, you can disable AutoPlay in Windows Settings.
Here is how you can do that:
- Type AutoPlay Settings in the search bar and click Open.
- Under Use AutoPlay for all media and devices, turn the toggle off to disable the feature.
- Now expand both the dropdown menus under Choose AutoPlay defaults, select Take no action.

That’s it.
Windows will no longer open media automatically.
This brings us to the end of our guide on disabling the AutoRun feature in Windows 10. We tried walking you through all the steps in detail and hope that one of the methods mentioned above did the trick for you. In case you still have any confusion about the methods, please let us know in the comment section below!
If this guide helped you, please share it. 🙂
