

Are you looking for solutions to fix DISM error 50 on Windows 10 so you can scan or repair Windows components?
DISM helps the system perform several servicing tasks in Windows. It executes, repairs, and modifies several programs and commands, but like every other tool, DISM can sometimes fail to perform.
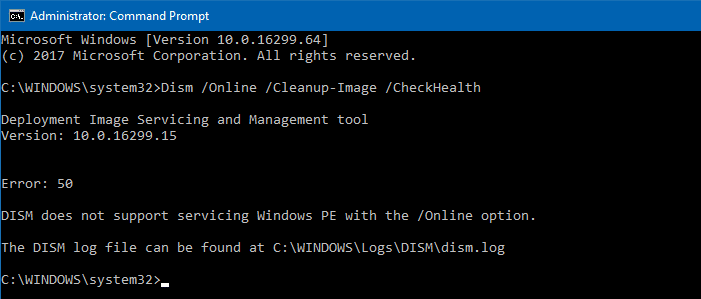
One of the common errors DISM displays on Windows 10 is ‘Error 50’. This error occurs when the user is trying to run one of the following commands:
Dism /Online /Cleanup-Image /CheckHealth
Dism /Online /Cleanup-Image /ScanHealth
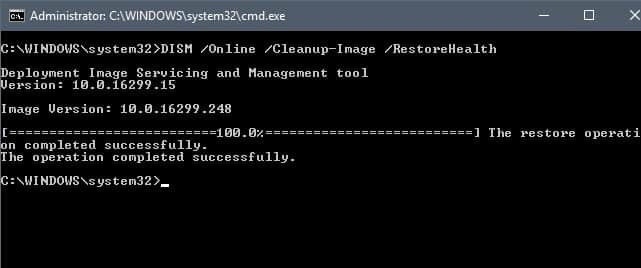
Dism /Online /Cleanup-Image /RestoreHealth
The main cause behind this error is a misplaced registry key. DISM assumes that the command is being executed from a location within the Pre-installation Environment (WinPE) or Windows Recovery Environment (WinRE) instead of an Operating System. This results in error 50 that states, “DISM does not support servicing Windows PE with the /Online option.”
If you have been experiencing DISM Error 50 on Windows 10, you’re in the right place.
This guide will introduce you to some simple steps you can follow to solve the error.
Let’s get started.
1. Refresh DISM.
If you have been facing the DISM error 50 on your PC, the first method you should try is refreshing the DISM tool. It will solve all the minor issues in the software, including the error.
To refresh DISM software, follow the steps mentioned below:
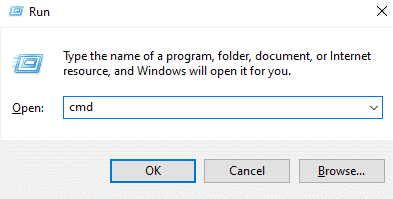
- Press the Windows + X keys simultaneously and select the Run option.
- Type cmd in the dialogue box and press Ctrl + Shift + Enter simultaneously to run Command Prompt as an Administrator.
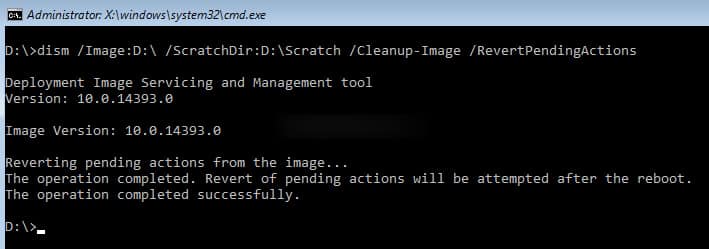
- Paste the command mentioned below in Command Prompt and hit Enter to execute it.
dism.exe /image:C: /cleanup-image /revertpendingactions
- Now open the Run dialogue box again.
- Type msconfig in the dialogue box and click OK.
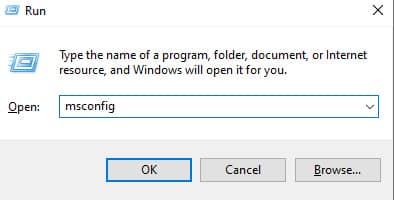
- This will launch the System Configuration.
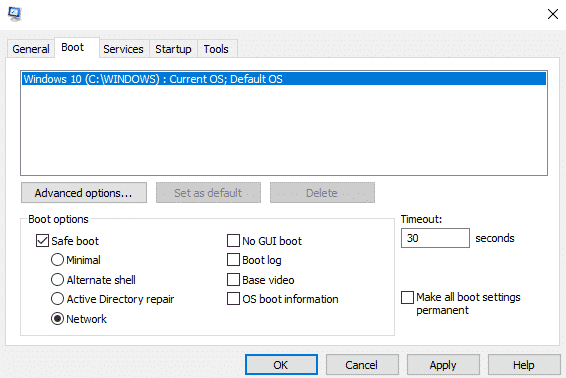
- Now select Boot and check the Safe Boot option.
- Under the Safe Boot option, select Network and click OK.
- You can restart your PC to enter into Safe mode.
- Now, run Command Prompt as an administrator.
- Type the command mentioned below and hit Enter.
sfc /scannow
- This will take some time to process. Once the operation is completed successfully, restart your PC again.
Doing so will hopefully solve error 50 on your PC.
2. Delete the Associated Registry Key.
As mentioned earlier, a corrupt registry key is likely to cause DISM error 50 in your PC. To delete the associated registry key, follow the steps mentioned below.
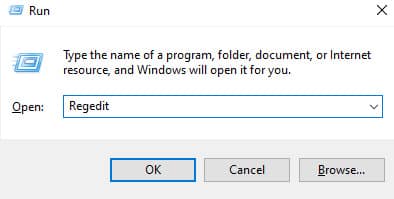
- Press the Windows + R keys simultaneously to open the Run dialogue box.
- Type regedit in the dialogue box and click OK to launch the Registry Editor.
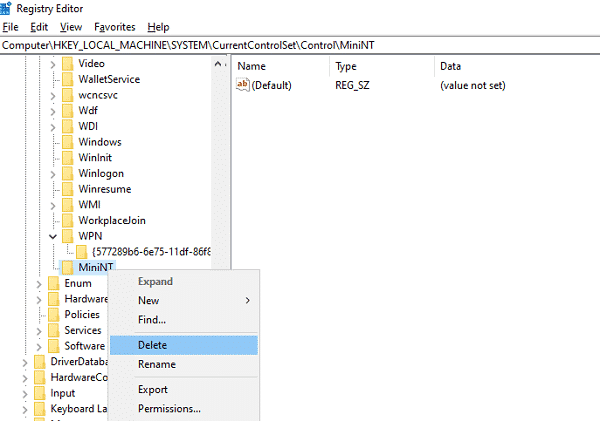
- Now navigate to the key mentioned below.
HKEY_LOCAL_MACHINE\SYSTEM\CurrentControlSet\Control
- Right-click the MiniNT folder in the left pane and click on Permissions.
- This will open a pop-up dialogue window. Click on your username under the list of Group or user names.
- Now select Allow in front of the Full Control option.
- Click OK to close the dialogue box.
- You can now delete the MiniNT folder.
- Finally, select Yes to confirm the action.
This would delete the associated registry key and solve the DISM error 50 on your PC.
3. Use Command Prompt.
It is common to face DISM error 50 while running the command mentioned below.
Dism.exe /Online /Cleanup-Image /Restorehealth
The /RestoreHealth parameter runs scans for issues in the system and helps repair them. If you have been facing DISM error 50 while repairing the corruption errors, the issue can be solved by executing a few commands in Command Prompt.
Follow the steps mentioned below for detailed guidance.
- Boot your computer using Windows 10 Installation Media.
- Launch Command Prompt by pressing the Shift key and F10 key simultaneously at the first install screen.
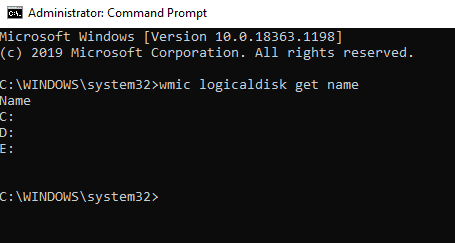
- Type the command mentioned below in the WinRE command prompt window and hit Enter to execute it.
wmic logicaldisk get name
- Now, type the command mentioned below to find the drive with the Windows folder. Replace “drive-letter” with the letter of your drives. For instance, dir C: or dir D: (without quotes).
dir drive-letter:
- Once you have found the “Windows” folder, type the command mentioned below. Don’t forget to replace “D” with the letter of your drive containing the Windows folder.
dism.exe /Image:D:\ /Cleanup-Image /Restorehealth
- If you face “Error 0x800f081f” after this step, you will have to perform a repair upgrade. If not, jump to Step 10 below.
- To perform a repair upgrade, boot from Windows Installation Media and at the “Windows Setup wizard”, click Next.
- Follow on-screen instructions to successfully perform a repair upgrade.
- Once the process is complete, restart Windows in Safe Mode and type the command mentioned below in Administrative Command Prompt.
DISM /Online /Cleanup-Image /RestoreHealth
- Now complete the repair by typing the command mentioned below. Don’t forget to replace “D” with the letter of your drive containing the Windows folder.
SFC /SCANNOW /OFFBOOTDIR=D:\ /OFFWINDIR=D:\Windows
- Once the operation is completed, restart your PC.
This method will hopefully solve the DISM error 50 on your PC. If the problem persists, see the next method.
4. Reset BIOS.
If the methods mentioned above did not solve the DISM error 50 on your PC, you should try resetting BIOS to its default settings.
BIOS (Basic Input/Output System) is responsible for managing data flow between the Operating System and external devices such as the hard disk. Resetting BIOS will reboot the Output/Input System to the last saved configuration.
To reset BIOS, follow the steps mentioned below.
- Access BIOS on your PC. For this, you must press the BIOS key set by your manufacturer. These keys are different for each PC.
- Once you have accessed BIOS on your PC, access the Default Option entry.
- Your screen will display Reset to Default and Factory Default options.
- Choose your preferred option and confirm changes.
- Lastly, restart your PC and your PC should work fine now.
Resetting BIOS will solve the DISM error 50 without damaging the data in your PC. However, it best to try this method only if none of the other methods mentioned above work.
This brings us to the end of our guide on fixing DISM Error 50 on Windows 10. We hope this guide helped solve the error on your PC. Moreover, we have also discussed the DISM source files could not be found on Windows 10, 8, or 7 error in our previous guide. Don’t forget to give it a read if you have been facing the “DISM source files could not be found” error.
If you have any queries, feel free to drop them down in the comment section below.
If this guide helped you, please share it. 

After executing dism.exe /image:C: /cleanup-image /revertpendingactions I encountered error:0x900f082f