

Looking for ways to enable/disable Data Execution Prevention in Windows 10?
DEP (Data Execution Prevention) is a Windows feature that prevents malicious code from running on your operating system. The DEP displays an error if a program tries to execute a code that is reserved for authorized programs, as a security measure.
This feature is enabled by default and if you want to disable it to run certain programs on Windows, you are in the right place.
We have listed a few easy methods that you can follow to enable/disable data execution prevention in Windows 10. The methods are easy to execute so even if this is your first time performing an administrative-level task, you will do just fine.
Let’s jump right in!
1. Enable/Disable Data Execution Prevention via Command Prompt
Command Prompt is an administrative-level tool that allows advanced users to perform operations within the operating system by executing commands.
Advanced users use this tool to repair corrupt disks and other corruption errors within the operating system.
If you want to enable/disable DEP (Data Execution Prevention) in Windows 10, then the easiest way of doing so is via Command Prompt.
Here is what you need to do:
- Type cmd in the search bar and click on Run as administrator. Doing so will launch elevated Command Prompt.
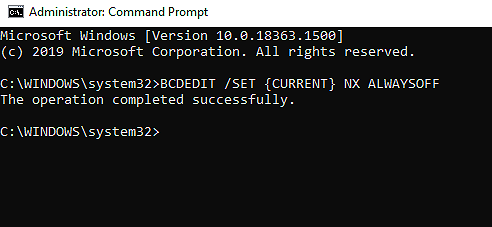
- If you want to disable DEP in Windows 10, then type the command mentioned below and in the elevated Command Prompt window. Hit Enter to execute it.
BCDEDIT /SET {CURRENT} NX ALWAYSOFF
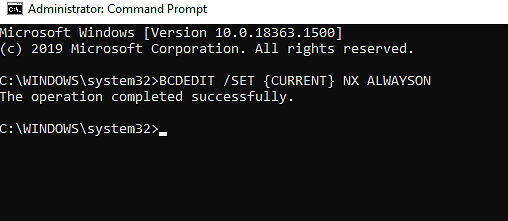
- In case you want to enable DEP in Windows, then type the command mentioned below in the elevated Command Prompt window and hit Enter.
BCDEDIT /SET {CURRENT} NX ALWAYSON
That’s it. Doing so will successfully enable/disable Data Execution Prevention in Windows 10.
2. Try Using CleanMyPC.
If the methods mentioned in this guide are not helping you, then there is a chance that a corruption error within your operating system is preventing you from enabling/disabling Data Execution Prevention in Windows 10. In this case, it is best to deep clean your PC using an efficient PC cleaner and then proceed with the troubleshooting steps.
We recently tested a few top-rated PC cleaners and found CleanMyPC to be the best.

It does not just eliminate the junk files but also can take care of your other PC-related issues like sluggish performance and slow speed. Moreover, CleanMyPC is easy to use, which means you do not have to spend hours figuring how to start a scan.
If this looks like something your PC desperately needs, install CleanMyPC now and get your PC up and running like new!
3. Use the Control Panel.
Control Panel is a safe place to change user accounts, access network settings, and change system settings.
If you find using Command Prompt to enable/disable DEP difficult, then you can try doing it via Control Panel. The process is simple, and should not take much of your time.
Here is what you need to do:
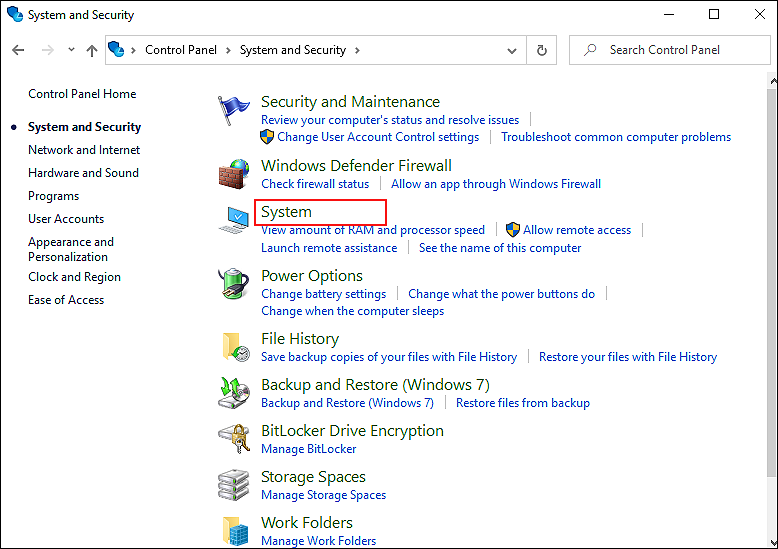
- Type Control Panel in the search bar and click on Open.
- Inside the Control Panel window, click on System and Security and in the right panel, choose System.
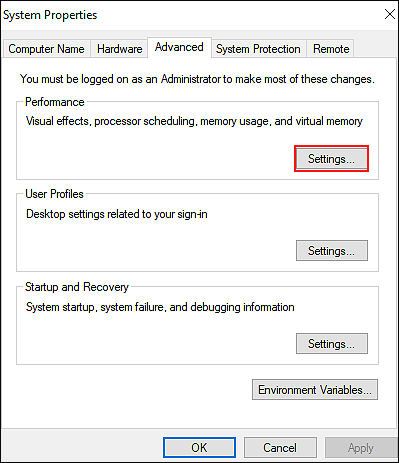
- Now choose Advanced system settings from the left panel to launch the System Properties window.
- In the System Properties window, click on the Advanced tab and select Settings under Performance.
- Next, go to the Data Execution Prevention and if you want to disable DEP, uncheck both the options in the window. Similarly, you can checkmark the options if you want to enable DEP.
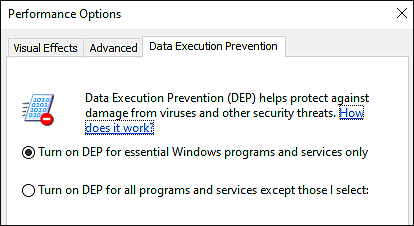
- In case you want to disable DEP for specific programs, then select the Turn on DEP for all programs except those that I select option and click on Add. You can now add the programs you want.
- Finally, click on the Apply/OK button to save the changes.
Hopefully, this will enable/disable Data Execution Prevention in Windows 10 successfully.
This brings us to the end of our guide on ways to enable/disable Data Execution Prevention in Windows 10. We hope one of the methods did the trick for you and if you still have any questions, please let us know in the comment section below!
If this guide helped you, please share it. 🙂
