

Wondering how to enable/disable the pane features in File Explorer on Windows 10?
Windows 10 allows its users to customize a wide array of features so that they can enjoy a personalized experience.
The pane in File Explorer is one such customizable feature that makes it easy for users to navigate through files. A preview pane, for example, allows users to view a file’s contents without having to open it, while the details pane shows the properties associated with the selected file.
In this guide today, we will walk you through the steps of enabling/disabling the pane features in File Explorer on Windows 10 in detail.
Let’s get started.
1. Use File Explorer.
If you want to enable/disable the pane features in File Explorer on Windows 10, the best way to do is by modifying the File Explorer settings.
Here is how you can access the pane features in File Explorer and modify them according to your preferences:
- Press Windows + E keys simultaneously on your keyboard to launch File Explorer.
- Locate View on the menu bar and click on it.
- You can now select either the Preview pane or Details pane from the list of options available.
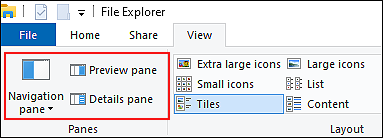
- You can also click on the Navigation pane and then select the Navigation pane option again to enable/disable it.
That’s it. This should allow you to enable/disable the pane feature in File Explorer on Windows 10.
2. Try Using CleanMyPC.
Occasionally, unwanted files in our operating system prevent us from completing certain tasks, and if the methods mentioned in this guide don’t work for you, that’s probably the case with your computer.
In this case, we recommend removing junk files from your computer first, and then proceeding with the methods we’ve listed.
The easiest way to eliminate junk files is to use an efficient PC cleaner and if you don’t have a PC cleaner on your computer already, we suggest installing CleanMyPC.

Among the most popular PC cleaners on the market, CleanMyPC has the ability to deal with almost all your PC-related issues. It includes a host of system-maintenance tools that can keep computers in top shape. These tools include (but are not limited to) Multi-Uninstaller, Registry Cleaner, and a Speed Booster.
To start, simply install CleanMyPC on your PC and run a scan using it. It will take care of the rest!
3. Use Windows Registry.
Another easy way to enable/disable the pane features in File Explorer on Windows 10 is by using the Windows Registry.
Windows Registry is a database that stores low-level information about the essential Windows programs and features. Administrators who want to gain better control over their operating system use Windows Registry frequently.
Windows Registry stores information in the form of Registry keys, and we will be altering the relevant keys in this procedure.
Here is what you need to do:
- Open a Run dialogue box by pressing Windows + R keys simultaneously.
- Type ‘regedit’ in the text field of the dialogue box and hit Enter. Doing so will launch Windows Registry on your PC.

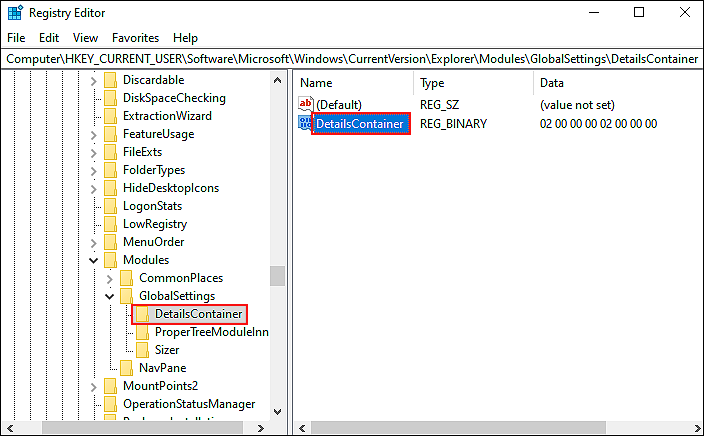
- Inside the Registry Editor, navigate to the location mentioned below.
HKEY_CURRENT_USER\Software\Microsoft\Windows\CurrentVersion\Explorer\Modules\GlobalSettings\DetailsContainer
- Double-click on DetailsContainer key in the right pane, right-click anywhere.
- Select the New > Binary Value option and rename this key as DetailsContainers.
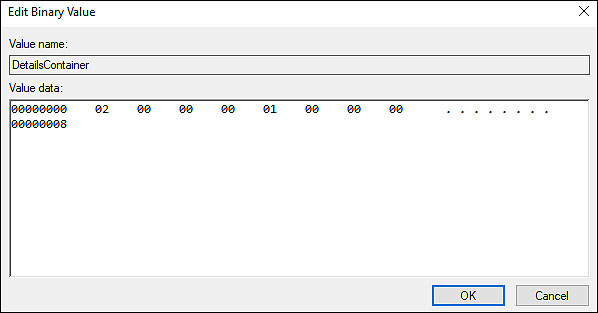
- Now in case you want to enable the preview pane, type the binary code mentioned below under Value data and hit Enter.
02 00 00 00 01 00 00 00
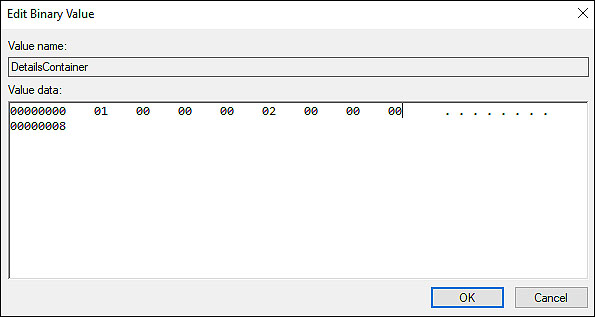
- If you want to enable the Details pane, type the binary code mentioned below under Value data and hit Enter.
01 00 00 00 02 00 00 00
- If you wish to disable the Preview pane, type the binary code mentioned below under Value data. Hit Enter to save the changes.
02 00 00 00 02 00 00 00

- The Navigation pane in File Explorer is enabled by default. If you want to disable it, navigate to the location mentioned below in Windows Registry.
HKEY_CURRENT_USER\Software\Microsoft\Windows\CurrentVersion\Explorer\Modules\GlobalSettings\Sizer
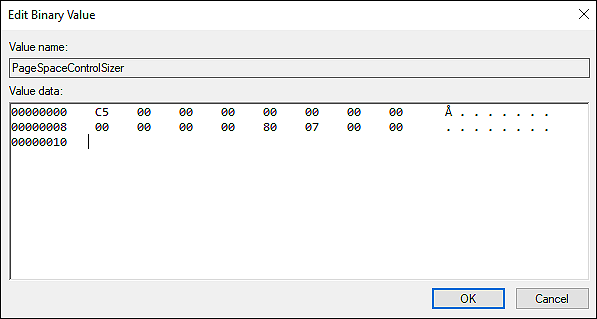
- In the right-pane, double-click on the PageSpaceControlSizer value and under Value data, type the binary code mentioned below. Hit Enter to save the changes.
c5 00 00 00 00 00 00 00 00 00 00 00 80 07 00 00
As simple as that!
Hopefully, this will help you perform the intended function without any issues.
This wraps up our guide on enabling/disabling the pane features in File Explorer on Windows 10. We hope that one of the methods mentioned in this guide did the trick for you. If you have any questions about the methods, please let us know in the comment section below.
If this guide helped you, please share it. 🙂
