

Looking for easy ways to enable or disable the Presentation settings in Windows 10?
Sometimes there is nothing more annoying and embarrassing than certain notifications popping up at the wrong time. For example, when you share your screen during an online presentation and receive a private message notification.
To prevent you from any distractions and embarrassments of this sort, Windows offers a Presentation mode. This mode disables all the notifications, sets the sound volume to a predefined value, turns off the screensaver, and prevents the computer from going to sleep.
The good part is that the Presentation settings are customizable, and you can enable/disable them according to your own preferences.
This guide will walk you through the relevant methods of enabling/disabling the Presentation settings in Windows 10 in detail.
Let’s get started!
1. Try Using Group Policy Editor.
The first method to enable/disable the Presentation settings is by modifying the Group policies.
Windows 10 Pro, Enterprise, and Education editions of Windows come with an administrative-level feature called the Local Group Policy Editor, which is designed for advanced users to control the working environment of their operating system better.
The Group Policy Editor is stored in the form of policies, and by modifying the relevant policies, we can make the desired changes.
Here is what you need to do:
- Press Windows + R keys on your keyboard simultaneously to open a Run dialogue box.
- Inside the text field of the dialogue box, type ‘gpedit.msc’ and hit Enter. This will launch Group Policy Editor.

- In the newly launched window, navigate to the location mentioned below.
Computer Configuration\ Administrative Templates\ Windows Components\ Presentation Settings
- Locate Turn off Windows presentation settings in the right pane and double-click on it.
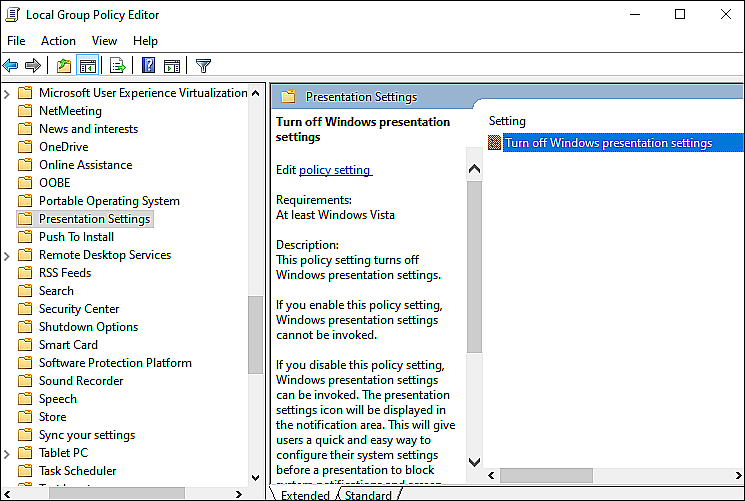
- If you want to disable the presentation settings, select Enabled and click Apply/OK to save the changes you just made.
- If you want to enable the settings, select Disabled. Now check if the desired changes have been made.
- If not, then type Command Prompt in the search bar of the taskbar and click on Run as administrator. Doing so will launch elevated Command Prompt.
- Inside the Command Prompt window, type the command mentioned below and hit Enter.
gpupdate /force
- Once the command has been successfully executed, restart your PC.
Hopefully, this will enable/disable the Presentation Settings in Windows 10.
2. Try Using CleanMyPC.
If both the methods in this guide are not working for you, then there is a chance that your system is infected with a corruption error that is preventing you from executing certain operations.
If this scenario is applicable, you should deep clean your PC first to remove any bugs and corruption errors and then proceed with the steps mentioned in this guide. For this purpose, we highly recommend using an efficient PC cleaner, as doing it manually will cost you both time and energy.
If you haven’t used a PC cleaner before and are looking for a recommendation, we recommend going for CleanMyPC.

CleanMyPC is a one-stop-shop solution for all your PC-related issues. It comes with an extensive list of valuable tools such as a Multi-Uninstaller, Speed Booster, and a Registry Cleaner that will take care of most system-related problems and give your system a performance boost.
If this looks like something your PC desperately needs, install CleanMyPC now and get your PC up and running like new!
3. Try Using Registry Editor.
If using the Group Policy editor did not work for you, try enabling/disabling the Presentation settings in Windows 10 via Registry Editor.
Registry Editor is a database that stores low-level settings for Windows programs and operations. Windows refers to this information when performing relevant tasks.
Unlike the Group Policy Editor, information stored in Windows Registry is in the form of Registry keys. In this method, we will be modifying the keys related to the Presentation settings.
Here is what you need to do:
- Press Windows + R keys on your keyboard simultaneously to open a Run dialogue box.
- Inside the text field of the dialogue box, type ‘regedit’ and hit Enter. This will open Registry Editor on Windows.

- Inside the Registry Editor window, navigate to the location mentioned below.
HKEY_LOCAL_MACHINE\SOFTWARE\Microsoft\Windows\CurrentVersion\Policies\PresentationSettings
- If you cannot locate the PresentationSettings key, right-click on the Policies key and select the New > Key option. Name this newly created key as PresentationSettings.
- Now double-click on the PresentationSettings key and right-click anywhere in the right pane.
- Choose the New > DWORD (32-bit) Value option and rename this value as NoPresentationSettings.
- Double-click the NoPresentationSettings value and type 1 to disable the settings. To enable settings, type 0.
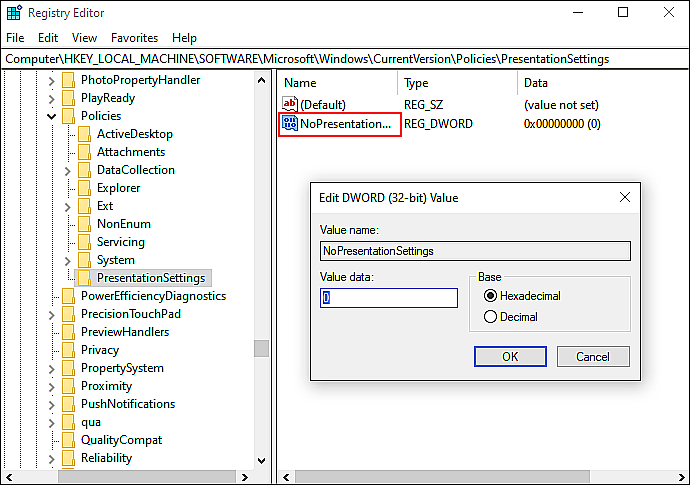
- Finally, click OK to save the changes.
That’s it.
This should disable the presentation settings without any issues.
This brings us to the end of our article on enabling or disabling the Presentation settings in Windows 10. We hope that one of the methods mentioned in this guide did the trick for you. If you have questions regarding the methods discussed above, please let us know in the comment section below.
If this guide helped you, please share it. 🙂
