

Wondering how to enable or disable Cortana in Windows 10?
Windows users have mixed feelings about Cortana.
Some say it is always looking out for them, remembering things so they don’t have to, and proactively suggesting relevant information. On the other hand, some disappointed users think it does not live up to its legendary name and is just another piece of bloat they do not want.
Whichever category you fall in, we have good news for you. Cortana is customizable, which means that you can enable or disable it according to your preferences.
If you are looking for easy ways of doing so, we got you covered. This guide will walk you through some easy methods of enabling/disabling Cortana in Windows 10 in detail.
Let’s get started!
1. Use the Registry Editor.
The Windows Registry is a database that stores low-level information about Windows applications and processes. When Windows performs relevant functions, it uses this information. This makes the Registry a crucial part of our operating system.
Information in Windows Registry is stored in the form of keys, and by modifying the relevant keys, we will enable/disable Cortana in Windows 10.
Make sure, however, that you are logged into Windows as an administrator before proceeding with this method.
Here is what you need to do:
- Press Windows + R keys simultaneously to open a Run dialogue box.
- In the text field of the dialogue box, type ‘regedit’ and hit Enter. This will open Windows Registry on your PC.

- Once you are inside the Registry Editor, navigate to the location mentioned below.
HKEY_LOCAL_MACHINE\SOFTWARE\Policies\Microsoft\Windows\Windows Search
- If you cannot locate the Windows Search key, then right-click on the Windows key and select the New > Key option.
- Rename this key as Windows Search and double-click on it.
- Now right-click in the right pane and select the New > DWORD (32-bit) Value option.
- Rename this newly created value as AllowCortana and double-click on it.
- If you want to enable Cortana, then type 1 under Value data, and if you want to disable it, type 0 under Value data.
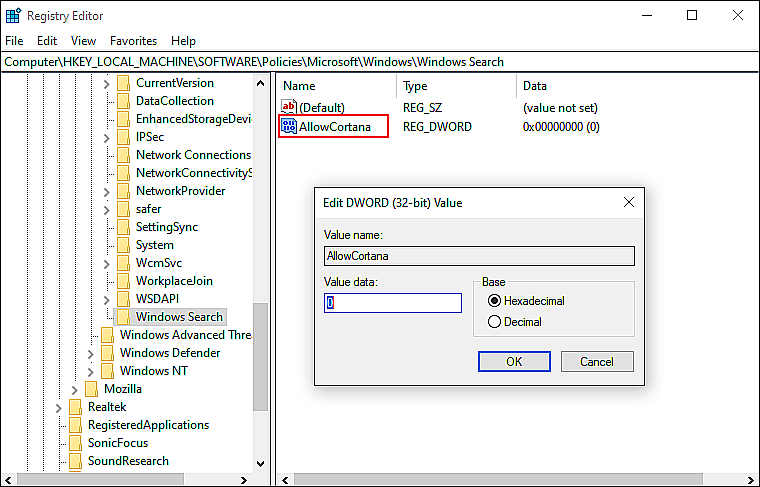
- Finally, hit Enter and close the Registry Editor.
Doing so will enable/disable Cortana in Windows 10 without any issues.
2. Try Using CleanMyPC.
If your operating system is corrupted, the steps described here might not work for you.
Usually, corrupted files in your operating system are caused by junk files, so you should clean your system if you haven’t done so in a while.
The best way to do so is by using an efficient PC cleaner, and we recommend using CleanMyPC for this purpose.

This program offers a wide range of system maintenance tools, which are powerful enough to handle much more than simply removing the junk files. These tools include (but are not limited to) Multi-Uninstaller, Registry Cleaner, and a Speed Booster.
Install CleanMyPC now and get your PC up and running like new!
3. Use the Group Policy Editor.
The working of the Group Policy Editor is quite similar to that of Windows Registry. It provides administrators control over their operating system by allowing them to customize the working of Windows.
Group Policy Editor stores information in the form of policies. In this method, we will modify policies related to Cortana to make the desired changes.
Here is what you need to do:
- Press Windows + R keys on your keyboard simultaneously to open a Run dialogue box.
- Inside the text field of the dialogue box, type ‘gpedit.msc’ and hit Enter. This will launch the Group Policy Editor on your PC.

- In the newly launched window, navigate to the location mentioned below.
Computer Configuration/Administrative Templates/Windows Components/Search
- In the right pane, search Allow Cortana and double-click on it.
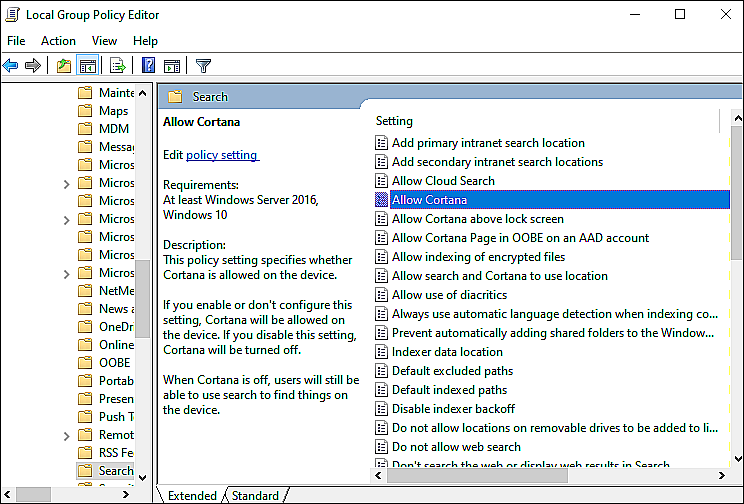
- If you want to enable it, select Enabled or Not Configured.
- To disable it, select Disabled.
- Finally, click on OK/Apply and restart your PC to save the changes.
Hopefully, following the steps mentioned above will help you make the desired changes in no time.
This brings us to the end of our article on enabling/disabling Cortana in Windows 10. We hope that one of the methods mentioned in this guide did the trick for you. If you have questions regarding the methods discussed above, please let us know in the comment section below.
If this guide helped you, please share it. 🙂
