

Wondering how to enable or disable Dynamic Refresh Rate (DRR) on Windows 11?
Generally speaking, refresh rate in display is the rate at which the screen refreshes the image in a given period of time. When the refresh rate of the display is higher, the display will perform better.
With Windows 11, Microsoft offers Dynamic Refresh Rate (DRR), which offers a great balance between a lower and a higher refresh rate depending on the content. The DRR feature makes it easier for users to extend their laptop battery life when they work on high refresh rates. You can enable the DRR feature to improve performance and battery life, but if it’s not your cup of tea, you can disable it easily.
In this guide, we will walk you through several methods of enabling/disabling Dynamic Refresh Rate (DRR) on Windows 11. All the methods are easy to execute, and should not take much of your time.
Let’s get started!
1. Dynamic Refresh Rate Requirements.
For you to be able to use Dynamic Refresh Rate, your graphic driver must support WDDM (Windows Display Driver Model) 3.0.
Before we jump into telling you how you can enable/disable DRR on Windows 11, here is how you can see if your PC supports DRR:
- Press Windows + R keys simultaneously to open a Run dialogue box.
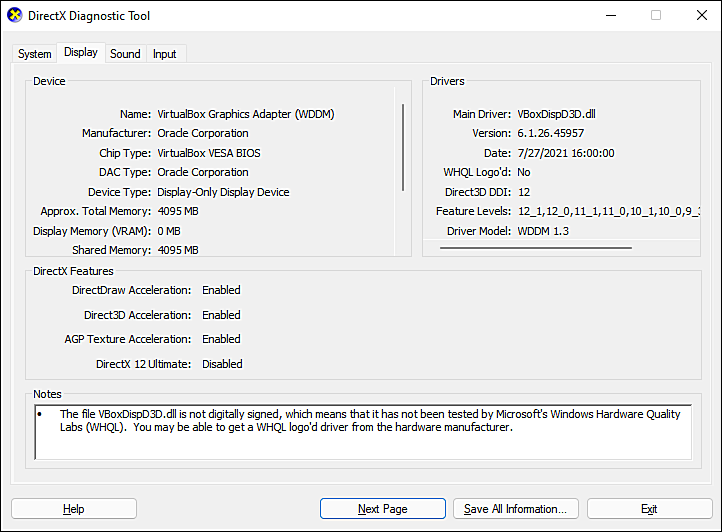
- Inside the text field of the dialogue box, type dxdiag and hit Enter. This will launch DirectX Diagnostic Tool on your PC.
- Now select the active display and under the Drivers category, check the Driver Model.
- If the model is under WDDM 3.0, it implies that your display does not support DRR. You can try installing the latest drivers update to use DRR.
However, if you already have installed the latest updates, then there is nothing much you can do except wait for Microsoft to release an updated driver for your display.
2. Enable or Disable DRR via Settings
The easiest way to perform the desired action is via Windows Settings. However, this method can be performed by both the standard users and administrators.
Here is all that you need to do:
- Press Windows + I keys simultaneously on your keyboard to open Windows Settings.
- Now select System from the left panel.
- In the dedicated System window, select Display and then click on Advanced Display.
- Next, expand the dropdown menu against Select a display to view or change its settings and select a display according to your preferences.
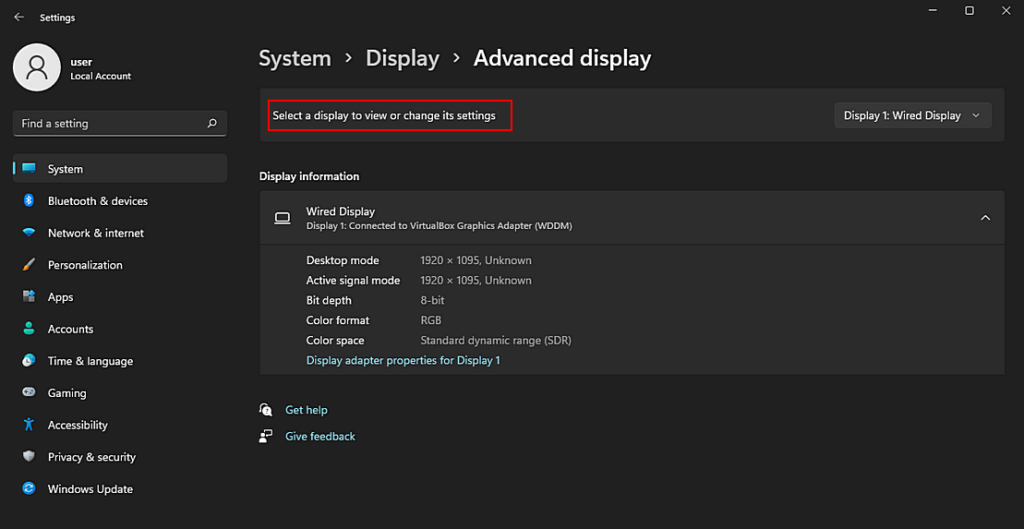
- Similarly, expand the dropdown menu against Choose a refresh rate and select the desired option.
This should make the desired changes.
3. Try Using CleanMyPC.
If you are unable to make the desired changes, it might be because of corruption errors within your system which are typically caused by junk files.
The simplest way to remove these junk files is by using an efficient PC cleaner. If you’re looking for a recommendation, we recommend CleanMyPC.

A simple yet effective cleaner, CleanMyPC will scan your operating system and fix any issues on its own. It comes with a wide range of system maintenance tools like a Multi-Uninstaller, Registry Cleaner, and Speed Booster that can take care of all your PC-related issues in no time.
Install CleanMyPC now and get your PC up and running like new in no time!
4. Enable or Disable DRR from Intel’s Graphics Command Center.
If you are using Intel’s GPU drivers, then you can enable or disable DRR by following the steps mentioned below.
- Type Intel Graphics Command Center in the search area of your taskbar and click on Open.
- Once you’re inside Intel’s Graphics Command Center, choose System from the left panel.
- Now navigate to the Power tab and turn the toggle against Dynamic Refresh Rate Switching on or off according to your preferences.
This wraps up our guide on ways to enable or disable Dynamic Refresh Rate (DRR) on Windows 11. We hope that one of the methods mentioned in this guide did the trick for you. If you have any questions regarding the methods listed above, please let us know in the comment section below.
If this guide helped you, please share it. 🙂
