

Wondering how to enable or disable ‘Find my device’ in Windows 10?
We don’t want to sound overly dramatic, but honestly, there is nothing quite as gut-wrenching as discovering that your phone or computer is no longer where it was supposed to be.
Luckily, there are some steps you can take in a situation like this to set yourself up for success in case your laptop goes missing. Of course, it is not easy to witness your years of hard work disappear in thin air, is it?
This guide will show you how to locate your Windows 10 device using the ‘Find my device’ feature in a few easy methods.
Let’s get started!
1. Modify Windows Settings.
Windows Settings is a component of Windows that allows the users to customize and configure the settings of their operating system.
If you want to enable or disable the ‘Find my device’ feature in Windows 10, the easiest way to do so is via Windows settings. All that you need to do is turn the toggle associated with this feature off.
Here is how you can do that:
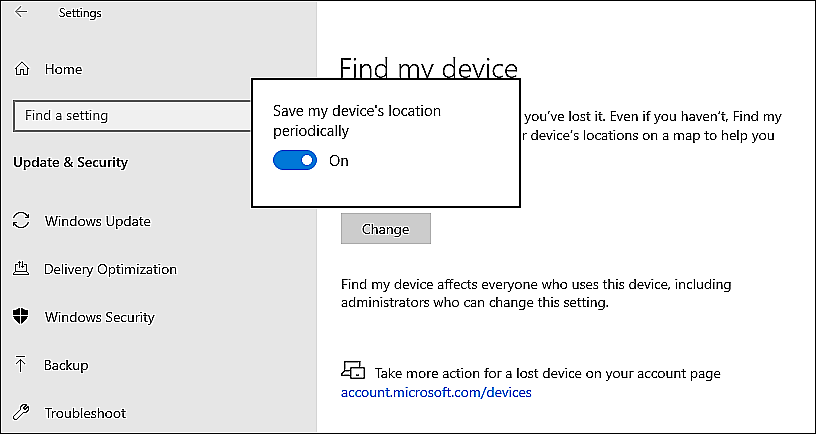
- Press Windows + I keys simultaneously to open Windows Settings on your PC.
- In the next window, click on Update & Security from the list of options available.
- Select Find my device from the left panel and click on the Change button in the right pane.

- Turn the toggle on if you want to enable the ‘Find My Device’ feature. If you want to disable it, turn the toggle off.
That’s it!
This should make the desired changes without any issues.
2. Use Group Policy Editor.
Another easy way to enable/disable the feature under consideration is by making changes in the Group Policy Editor.
Group Policy Editor is an administrative tool that allows advanced users to customize the operating system according to their requirements. It stores information as policies, and users can alter these policies to customize Windows operations.
Here is how you can use the Group Policy Editor to customize the ‘Find my device’ feature in Windows:
- Press Windows + R keys to open a Run dialogue box.
- In the text field of the dialogue box, type ‘gpedit.msc’ and hit Enter to launch the Group Policy Editor.

- Once you are inside the Group Policy Editor, navigate to the location mentioned below.
Computer Configuration\Administrative Templates\Windows Components\Find My Device
- Locate Turn On/Off Find My Device in the right pane and double-click on it.
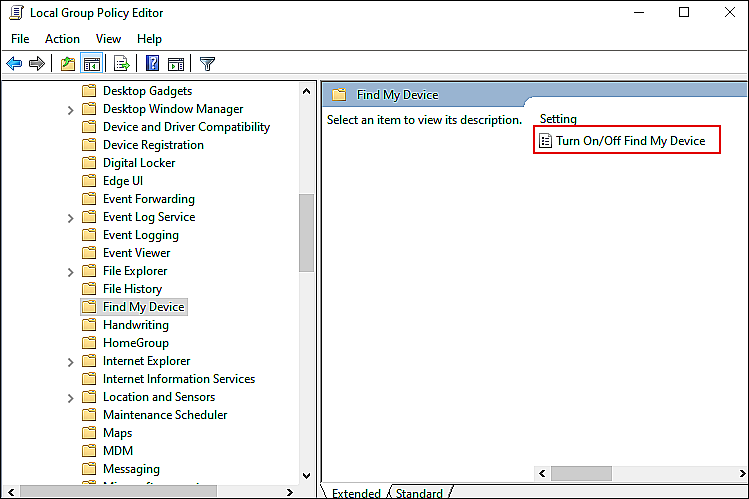
- Select Enabled/Disabled according to your preferences and hit Apply to save the changes.
Hopefully, you will enable/disable the ‘Find my device’ feature by following the steps mentioned above.
3. Try Using CleanMyPC.
If you are having a hard time performing the methods mentioned in this article, it might be because of the corruption errors and bugs within the system. It’s important to deep clean your PC regularly to keep it safe from such issues, and if you haven’t done so in a while, now might be the right time to do so.
We highly recommend using CleanMyPC for this purpose since it is an efficient tool that can handle almost all your PC-related problems.

CleanMyPC comes with a wide range of maintenance tools such as a Multi-Uninstaller, Registry Cleaner, and a Speed Booster. All that you need to do is install CleanMyPC and run a scan using it. It will identify the potential issues and fix them with little to no user input!
4. Use Windows Registry.
If modifying Windows Settings did not work for you for any reason, then the next thing you should try is configuring Windows Registry.
Windows Registry is a database of low-level settings for Windows applications and programs. It lets the programs access computer resources and offers a location to store your custom settings for the operating system.
In the Windows Registry, information about programs and processes is stored as Registry keys, and through modification of the relevant keys, you can customize your operating system.
Here is what you need to do:
- Press Windows + R keys simultaneously on your keyboard to launch a Run dialogue box.
- In the text field of the dialogue box, type ‘regedit‘ and hit Enter. This will launch Windows Registry on your computer.

- Once you are inside the Registry Editor, navigate to the location mentioned below.
HKEY_LOCAL_MACHINE\SOFTWARE\Policies\Microsoft\FindMyDevice
- If you cannot locate the FindMyDevice key, right-click on the Microsoft key and select the New > Key option.
- Rename this new key as FindMyDevice and double-click on it.
- Now right-click anywhere in the right pane and select the New > DWORD (32-bit) Value option.
- Rename this newly created value as AllowFindMyDevice and double-click on it.
- If you want to enable the feature, then type 1 under Value data and hit Enter. To disable it, type 0 and hit Enter.
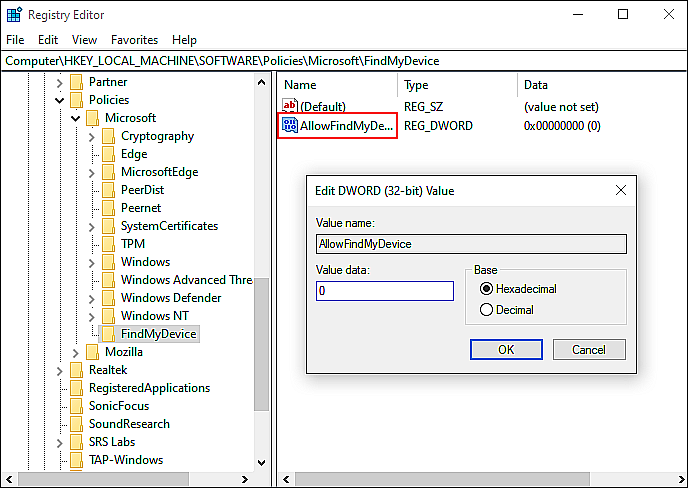
- Finally, restart your PC.
Once the computer has been rebooted, the desired changes should have been applied by the Windows Registry.
This wraps up our guide on enabling/disabling the ‘Find my device’ feature in Windows 10. We hope that one of the methods mentioned above helped you fix the issue in no time. If you have any questions regarding the methods listed above, please let us know in the comment section below.
If this guide helped you, please share it. 🙂
