

Wondering how to enable or disable Microsoft Defender Antivirus in Windows 10?
Security software is not fun to buy, and only a little fun to experiment with. We already pay a subscription for the videos we watch or the games we play, and protecting our computers should not come with an extra cost.
If you agree with this, then you most likely appreciate having a free antispyware application (aka Microsoft Defender Antivirus) on your Windows.
Microsoft Defender Antivirus has come a long way in terms of its efficiency and capabilities. It was once regarded as one of the poorest means of protecting your PC from malware but fortunately, it has built itself a better reputation over time. Considering its recent performance, we wouldn’t mind saying that it’s pretty darn good.
However, there can be situations where you would want to disable it temporarily. For instance, when it acts overly protective and alarms you falsely.
Fortunately, Windows allows you to enable or disable it according to your preferences and in this guide, we will show you how you can do that in a few easy steps.
Let’s get started!
1. Use Windows Registry.
For users with advanced skills, Windows Registry is a powerful tool that can help them better control their operating system. Registry entries contain information about low-level Windows processes and programs. When Windows performs a relevant operation, it looks up this information.
Windows Registry information is stored in the form of Registry keys. Modifying the appropriate Registry keys will allow us to make the desired changes.
With this method, we’ll modify the keys associated with Microsoft Defender Antivirus. It’s important to follow these steps carefully, since even a slight error can lead to major issues within the Registry.
Here is what you need to do:
- Press Windows + R keys simultaneously to open a Run dialogue box.
- In the text field of the dialogue box, type ‘regedit‘ and hit Enter. This will open Windows Registry on your PC.

- Once you are inside the Registry Editor, navigate to the location mentioned below.
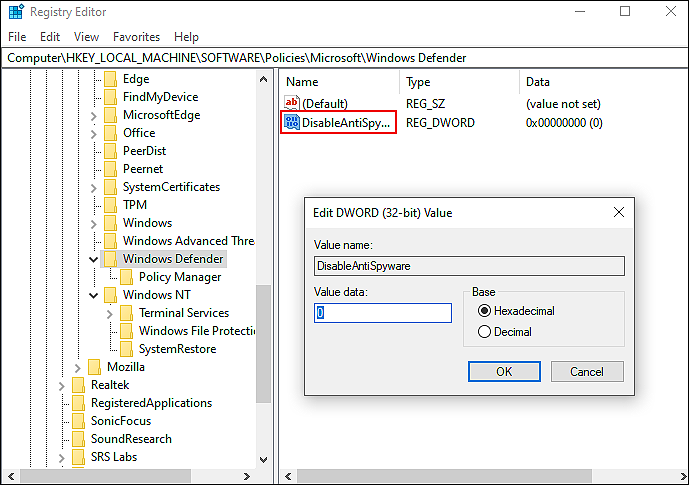
HKEY_LOCAL_MACHINE\SOFTWARE\Policies\Microsoft\Windows Defender
- Right-click in the right pane and select the New > DWORD (32-bit) Value option.
- Rename this newly created value as DisableAntiSpyware and double-click on it.
- Under Value data, type 1 and hit Enter.
- Now right-click on the Windows Defender (folder) key and select the New > Key option.
- Rename this key as Real-Time Protection and press Enter.
- Double-click on the Real-Time Protection key and select the New > DWORD (32-bit) Value option.
- Rename this value as DisableBehaviorMonitoring and press Enter.
- Next, double-click on DisableBehaviorMonitoring, and under Value data, type 1.
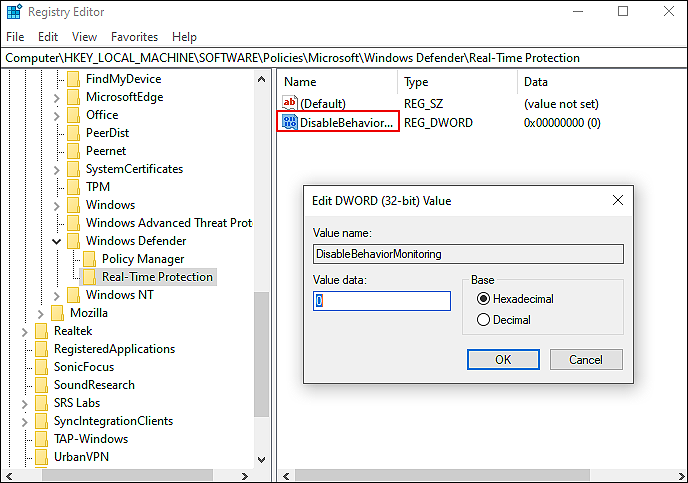
- Hit Enter.
- Now repeat the 9th step and this time, rename the value as DisableOnAccessProtection.
- Double-click on the newly created value and under Value data, type 1.
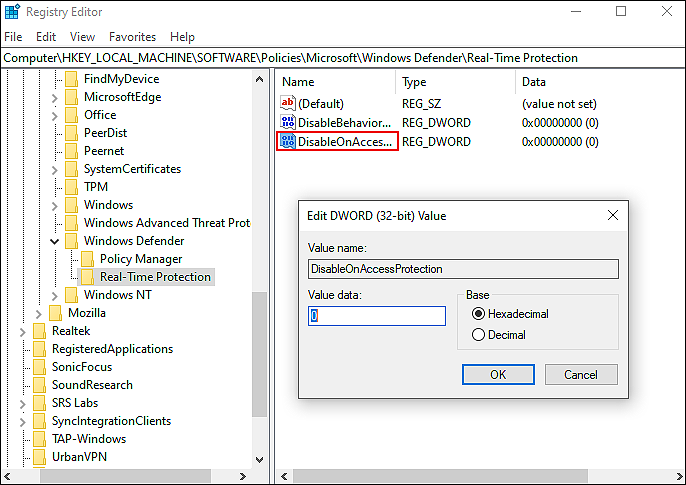
- Finally, hit Enter and restart your PC.
This should make the desired changes in no time.
2. Use Group Policy Editor.
In the event that Windows Registry does not work, you may try the Group Policy Editor.
Group Policy Editor (GPE) is also a utility provided to help users customize the behavior of their operating systems from an administrative level. The information in GPE is stored in policies, and by modifying the relevant policies, you can make the changes you desire.
Here is what you need to do:
- Press Windows + R keys on your keyboard simultaneously to open a Run dialogue box.
- Inside the text field of the dialogue box, type ‘gpedit.msc‘ and hit Enter. This will launch the Group Policy Editor on your PC.

- In the newly launched window, navigate to the location mentioned below.
Computer Configuration > Administrative Templates > Windows Components > Windows Defender Antivirus
- In the right pane, locate and double-click on Turn off Windows Defender Antivirus policy.
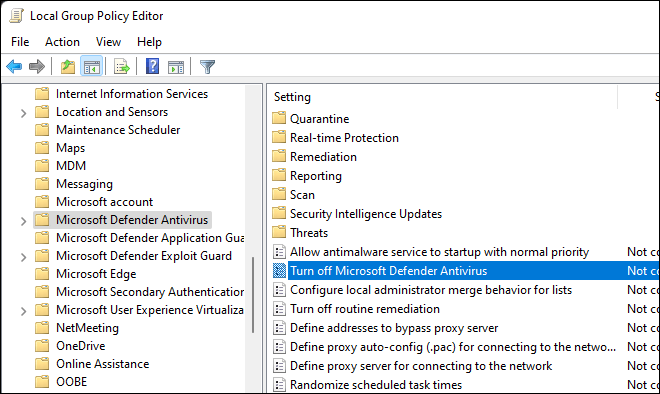
- Select Enabled and hit Enter.
- Now navigate to the following path in the Group Policy Editor.
Computer Configuration > Administrative Templates > Windows Components > Windows Defender Antivirus > Real-time Protection
- In the right pane, locate and double-click the following three policies one-by-one.
Turn on behavior monitoring policy

Monitor file and program activity on your computer

Turn on process scanning whenever real-time protection is enabled
- For all three, select Disabled and hit Apply.
- Restart your PC to save the changes.
Hopefully, following the steps mentioned above will help you make the desired changes.
3. Try Using CleanMyPC.
In the event that you have not cleaned your PC recently, it may be worth removing any junk system files since they may be contributing to the issue.
Even though junk files may seem harmless, they can cause serious issues with the operating system and its programs, like Microsoft Teams. Using a PC cleaning program is your best bet for removing junk files on your system, in which case we recommend CleanMyPC.

With CleanMyPC, any errors on your computer will be detected and automatically repaired. In our experience, it has greatly enhanced PC performance by optimizing storage and removing junk files.
There are a wide range of tools provided by CleanMyPC that can optimize your PC’s performance. In addition, the user-friendly interface allows you to use it without spending hours learning how it works.
Install CleanMyPC now and get your PC up and running like new!
4. Use Windows Security Center.
The last method to turn on or off Microsoft Defender Antivirus is by modifying Windows Settings.
This method is fairly simple, but if you want to enable/disable the feature under consideration as an administrator for all users, then use Windows Registry or Group Policy Editor to do so.
Here is how you can modify relevant Windows Settings:
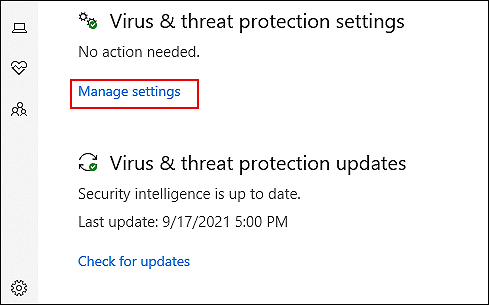
- Type Windows Defender Security Center in the search bar and click on Open.
- Click on Virus & threat protection and select Manage settings under the Virus & threat protection settings option.
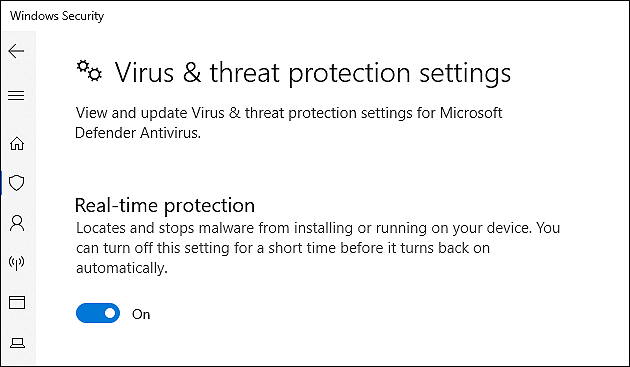
- Turn on/off the Real-time protection toggle switch.
That is it. You can always revert the changes by following the steps mentioned above again.
This brings us to the end of our guide on ways to enable or disable Microsoft Defender Antivirus in Windows 10. We hope that one of the methods mentioned above did the trick for you. If you have any questions regarding the methods mentioned in this guide, please let us know in the comment section below.
If this guide helped you, please share it. 🙂
