

Facing issues trying to enable Telnet on Windows 10?
Telnet or Teletype Network is a transmission control protocol developed in 1969 that can be useful on your Windows 10 system. It lets users communicate via text commands to access remote devices and servers. Because all the commands are sent in simple texts without any graphics, there’s no data encryption.
As Telnet was developed prior to internet services, there weren’t any potential threats to its security initially. But now, many modern protocols such as SSH have replaced the program as they also safeguard your data while it’s being transferred over a network.
This is the main reason that Windows disabled the feature by default. However, Telnet is not entirely abandoned and unusable. People still use it in a local area network, just not over the internet. In fact, some legacy equipment only supports Telnet, so it becomes mandatory to enable it.
So without further delay, let’s look at the different ways you can enable Telnet on Windows 10!
1. Enable Telnet on Windows 10 with Control Panel.
The Control Panel is a Windows component that lets you alter the configurations of your system. Although finding specific settings through the countless options may be difficult, it doesn’t require any technical commands. That is why it’s a go-to for users looking to customize system features and setup.
Here’s how you can follow this method to enable Telnet:
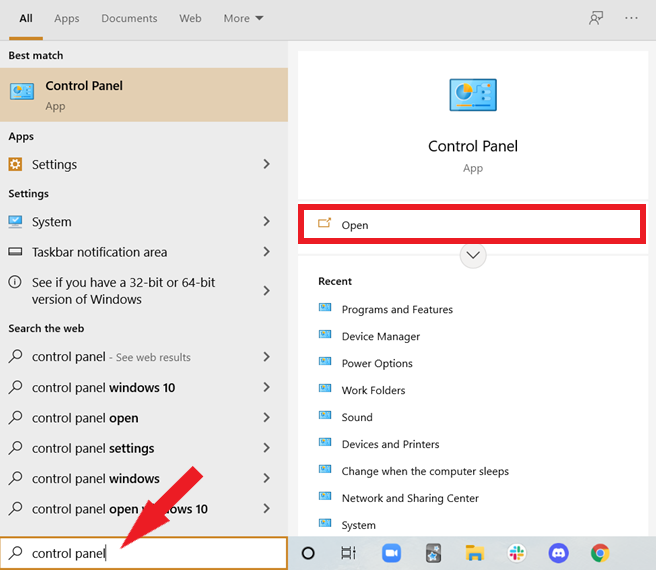
- Start by clicking on the Windows icon on the screen or pressing the Windows key on your keyboard.
- Scroll through the apps or simply type ‘Control Panel’ in the search bar, then select Open.
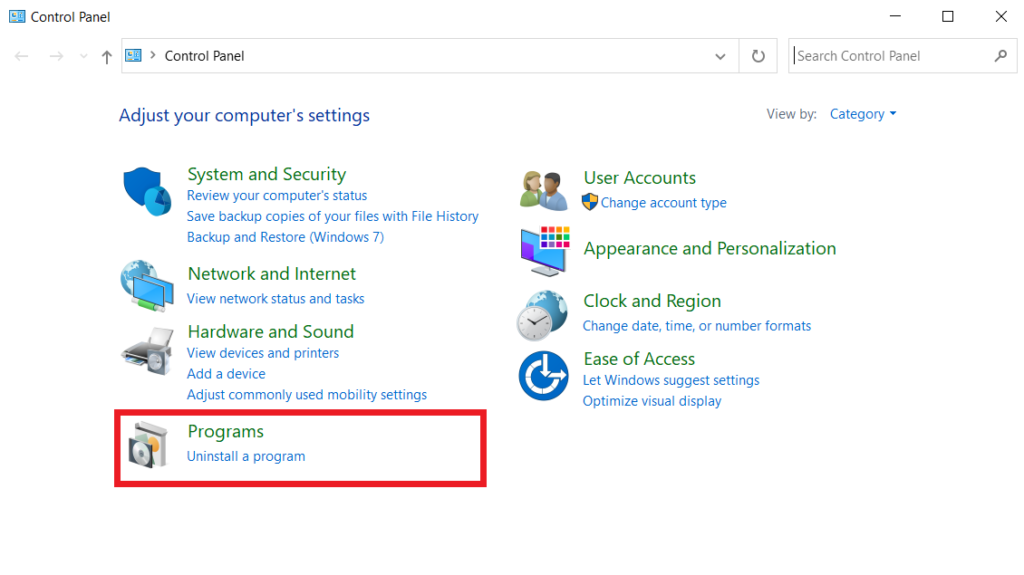
- When the Control Panel opens, click on the Programs option at the bottom-left of the window.
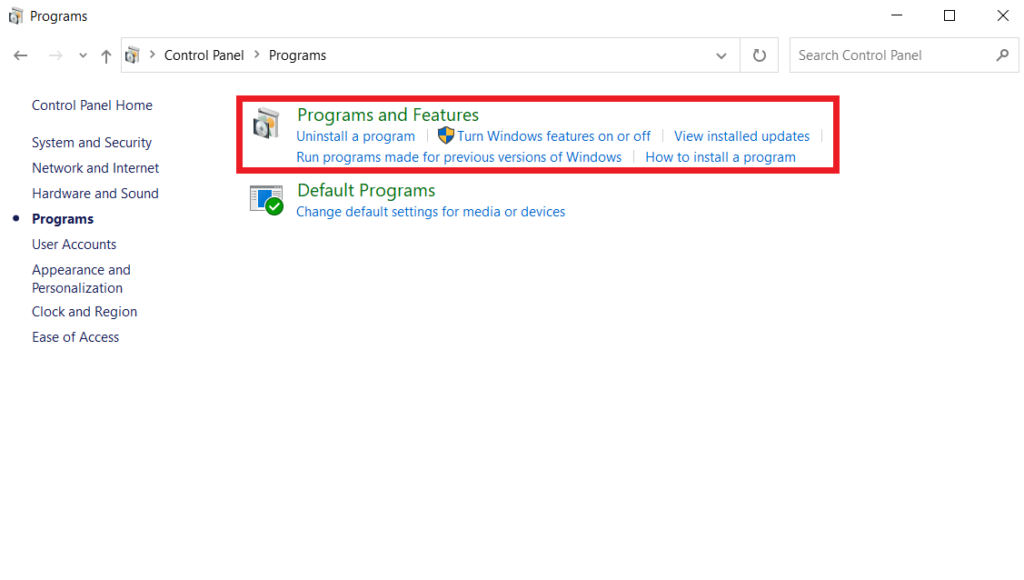
- Then, click on the top option that says Program and Features.
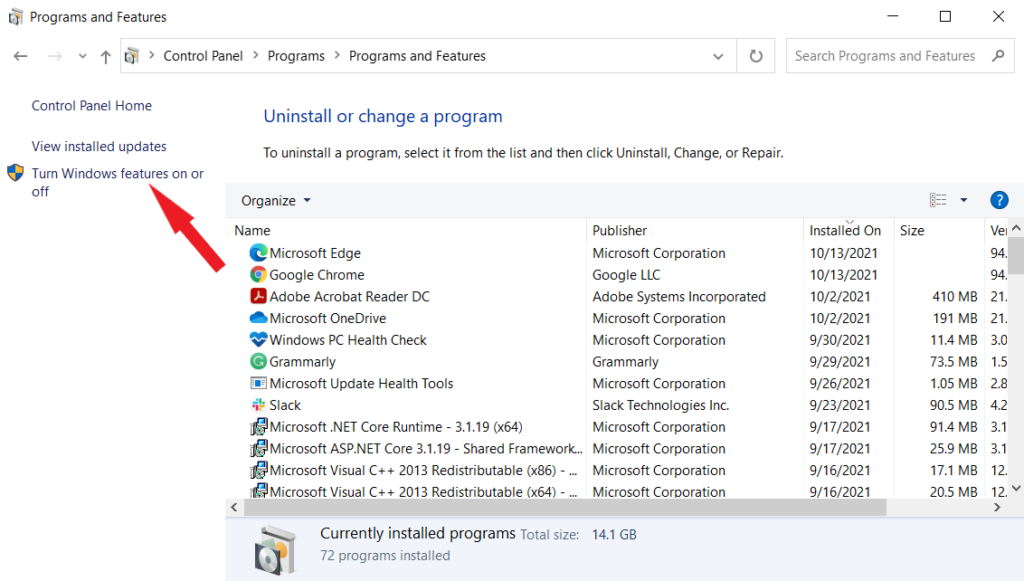
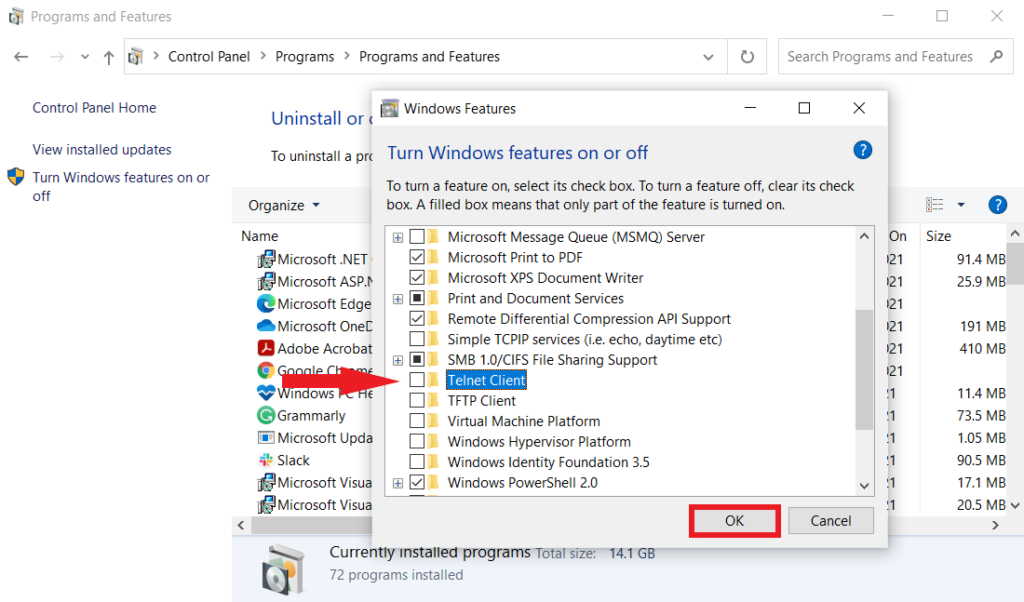
- After that, you’ll see a Turn Windows features on or off link at the left pane. Click on it. If it asks for the administrator’s password, type that in the dedicated box.
- In the next pop-up window, you will see a list of all available features. Scroll down to find the entry labeled Telnet Client and check the box right next to it.
- Now, click OK to apply these changes.
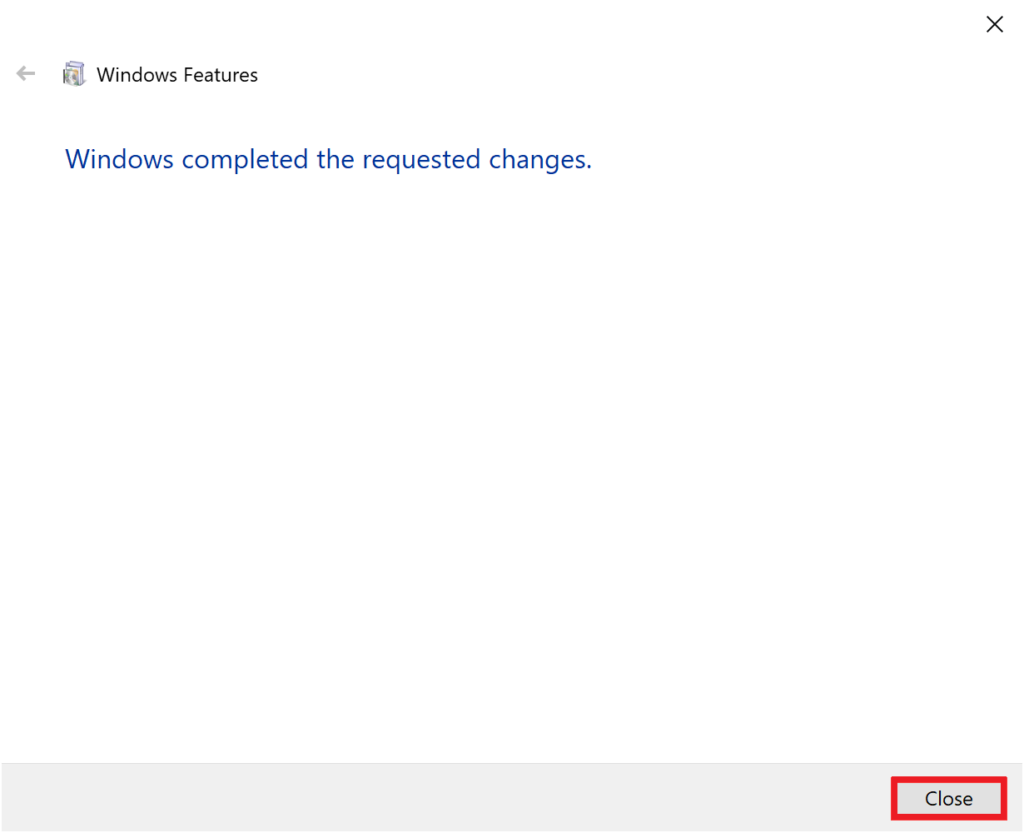
- You may have to wait a couple of minutes to let Windows install the required Telnet Client files. Once the installation finishes, a success message will be displayed in a window. Click on Close.
When you’re done, you can verify whether Telnet Client has been properly installed on your computer by opening the app. A window will open displaying a list of Telnet commands you can now use to access other systems. This ensures that Telnet is now supported on your computer.
2. Enable Telnet on Windows 10 Using Command Prompt.
The command-line interpreter application in most Windows operating systems provides a quick way to perform tasks such as enabling Telnet. However, you do need to be somewhat proficient in technical computer language to find your way through.
Fortunately, we’re here to give you the required command to enable Telnet on Windows 10 instantly. To make your computer execute the entered commands, you will first need to run the program under administrator mode.
Here are the steps you need to follow:
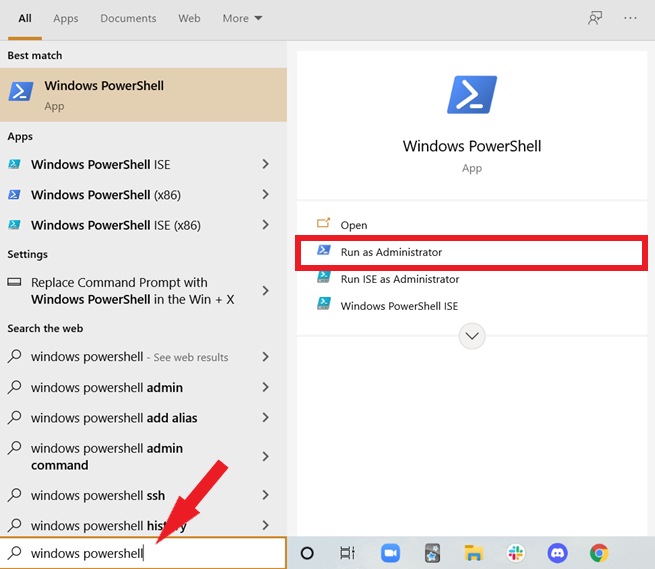
- To begin, go to the Start menu by clicking on the Windows icon or by pressing the Windows key from your keyboard.
- Now, type ‘cmd’ in the search bar and select Run as administrator from the right pane, so you have full permission to run the program.

- If the system demands the administrator’s password, put it in the appeared box.
- When the Command Prompt window opens, type in the following command and hit Enter:
pkgmgr /iu:"TelnetClient"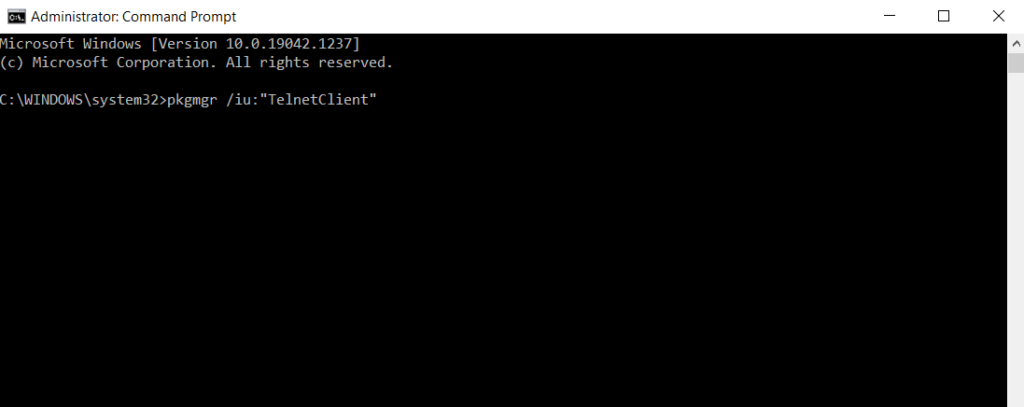
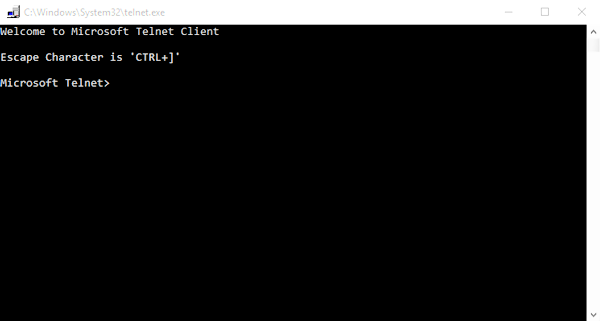
- Telnet should then be installed and accessible on your computer. To verify Windows has enabled Telnet, rerun Command Prompt as administrator and type ‘Telnet’. Then, hit Enter, and you should see a similar prompt to this.
You may now use Telnet on Windows 10.
3. Use Windows PowerShell to Enable Telnet.
Windows PowerShell is a Microsoft application that combines CMD functionality with new scripting instructions. In other words, it is an advanced version of Command Prompt that automates tasks using a simpler script.
For this reason, users familiar with Command Prompt shouldn’t face issues getting the hang of this program and running commands when enabling Telnet.
Follow the steps below to complete this task:
- First, press the Windows key or click on the Windows icon on your screen to open the Start menu.
- In the search bar, type ‘Windows PowerShell’ then select Run as administrator from the right pane.
- When the PowerShell window appears on your screen, type the following in the command line, then hit Enter.
dism /online /Enable-Feature /FeatureName:TelnetClient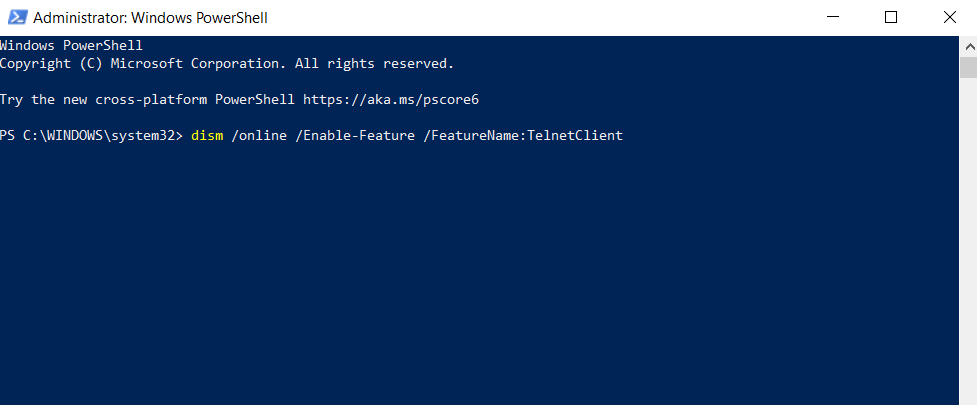
After following these simple steps, Telnet should be automatically enabled on your computer.
4. Use Third-Party Apps to Enable Telnet.
Telnet Client is applicable only when connecting to other Telnet servers. If you need to connect to your own system and direct remote commands, you’ll need to install third-party apps.
The most widely used utilities to start a Telnet server are HK Telnet Server and KpyM Telnet Server. If you only want to enable the Telnet server to run remote commands on your system, HK Telnet Server would be better and easier to use.
Here are the steps you need to follow to enable Telnet with HK Telnet Server:
- To set up, simply download HK Telnet Server and launch the application.
- You will then come across a floating window where you need to input the port number from where Telnet will be allowed to accept connections. In this case, type ‘23’ in the box.
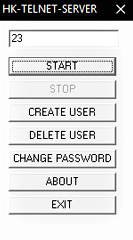
- After that, a prompt window will appear on your screen where you can set your Telnet login credentials.

On the other hand, HK Telnet Server doesn’t support encryption. So if you want security features like custom login messages and IP blocking, KpyM Telnet Server would be a better option for you.
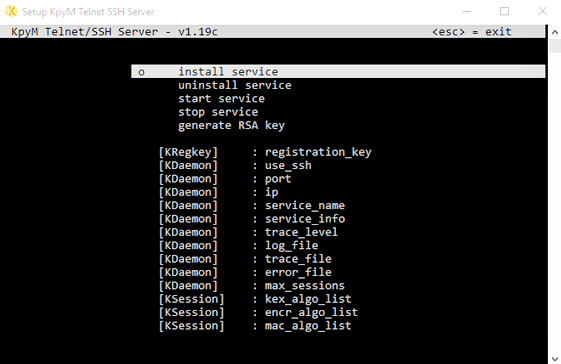
To set it up, follow these steps to enable Telnet with KpyM Telnet Server:
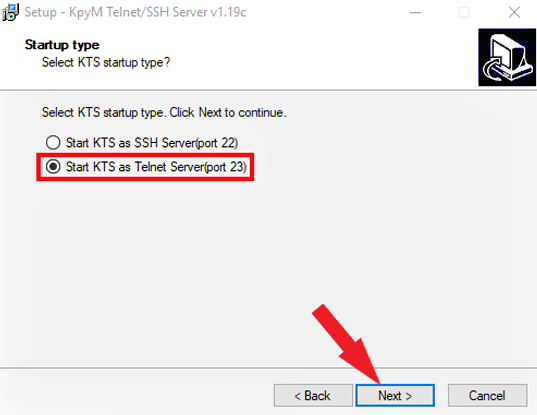
- To start, download the KpyM Telnet Server app on your computer.
- Then run the application file to start the setup process. There, you’ll need to choose between port 22 (for SSH) and port 23 (for Telnet). Since you need the Telnet server, select Start KTS as Telnet Server (port 23) and click Next.
- Once the installation ends, go to the Start menu and type ‘Select KpyM Telnet SSH Server’ in the search box. A black dialogue box will then appear on the screen where you can configure encryption settings.
This marks the end of our guide on how to enable Telnet on Windows 10. You can share your experience with us through the comment section below or let us know if you face problems following any of the listed methods. We’ll be happy to help you out.
If this guide helped you, please share it. 🙂
