Wondering how to fix error code 30045-29 on Microsoft Office on Windows?
Most OEMs include a trial version of MS Office with their laptops/systems. Most users either subscribe to these applications or uninstall them after a while. If you do not subscribe, the Office services usually prompt you to do so.
Recently, several users reported that their screens display error code 30045-29 at odd times. We had a look into this issue, and discovered that it could be caused by mainly two reasons which are as follows:
- Your trial period has expired and Office failed to update itself
- Office Click-to-Run (CTR) service is unable to find an Office installation within your system. This typically happens when you have uninstalled the Office suite.
If you are facing a similar issue, you are in the right place because, in this guide, we will walk you through several methods of resolving this issue. All the troubleshooting methods are easy to execute and should not take much of your time.
Let’s get started!
1. Uninstall the Old Microsoft Office 365 Installation.
The most common reason behind error code 30045-29 is the expiration of the trial version subscription.
If you were using a trial version of Microsoft Office and do not have a valid license copy, then your screen will display the error under consideration when Microsoft Office tries to update itself.
You can resolve this issue by uninstalling the expired version of Microsoft Office on your PC.
Here is what you need to do:
- Press Windows + I keys on your keyboard simultaneously to open Windows Settings.
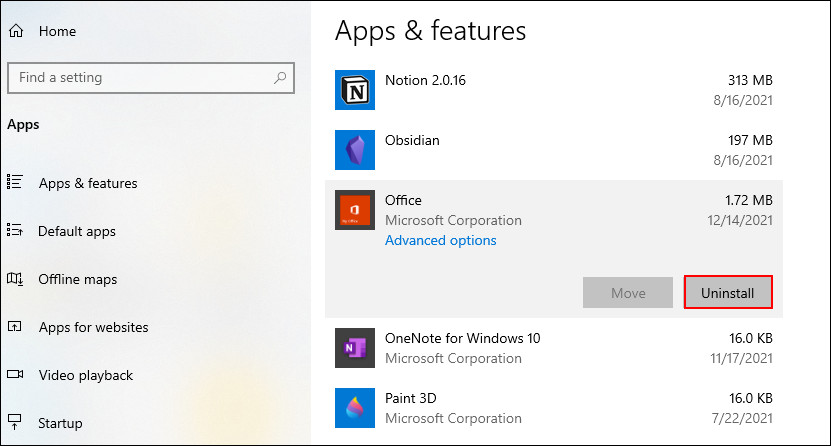
- Select Apps from the list of options available, and in the next window, select Apps & features.
- Now locate the Office installation in the right pane and click on it.
- Hit the Uninstall button and follow the on-screen instructions to complete the process.

- Finally, reboot your PC.
If an expired version of Microsoft Office was causing the issue, then uninstalling it will resolve the issue. You can now install the latest version of Office again.
2. Try Using CleanMyPC.
You might also be facing the issue at hand because of corruption errors within your system which are typically caused by junk files.
The simplest way to remove these junk files is by using an efficient PC cleaner. If you’re looking for a recommendation, we recommend CleanMyPC.

A simple yet effective cleaner, CleanMyPC will scan your operating system and fix any issues on its own. It comes with a wide range of system maintenance tools like a Multi-Uninstaller, Registry Cleaner, and Speed Booster that can take care of all your PC-related issues in no time.
Install CleanMyPC now and get your PC up and running like new in no time!
3. Disable the Microsoft Office Click-to-Run Service.
Microsoft Office Click-to-Run Service makes installing and launching Office products faster. However, if it does not find an Office installation in your operating system, it can display the error code 30045-29 on your screen.
The solution is simple – disable the Microsoft Office Click-to-Run Service temporarily. You can enable it back when you get a new Office installation.
Here is what you need to do:
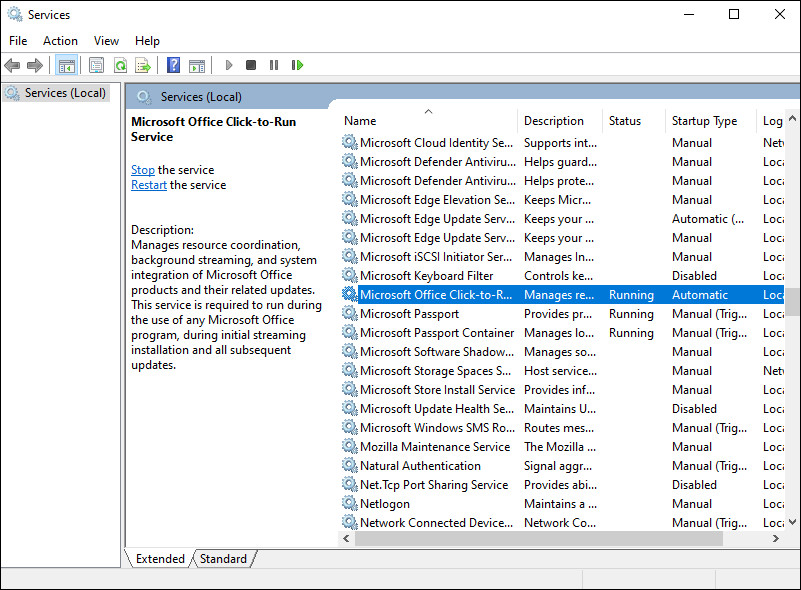
- Type Services in the search bar and click on Run as administrator. This will launch Services with administrative privileges.
- Locate and right-click on Microsoft Office Click-to-Run Service from the list of options available.

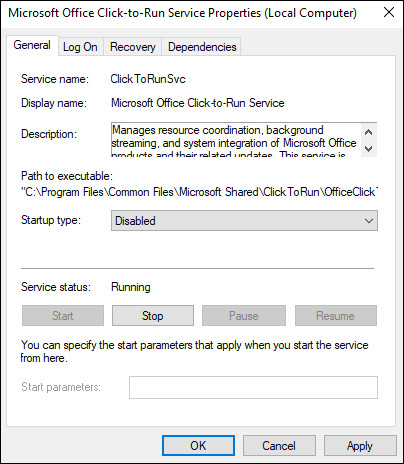
- Select Properties and inside the Properties window, expand the dropdown menu against Startup type, and select Disabled.

- Now click on the Stop button to disable the service.
- Finally, click on Apply and restart your PC to save the changes.
This brings us to the end of our guide on ways to fix error code 30045-29 ‘Something went wrong on Microsoft Office’ on Windows. We tried walking you through all the steps in detail and hope that one of the methods mentioned in this post did the trick for you. In case you still have any confusion about the steps, please let us know in the comment section below!
If this guide helped you, please share it. 🙂


