

Wondering how to fix ‘Powershell.exe is not a Microsoft-verified app’ on Windows 10?
A cross-platform shell and scripting language, PowerShell lets people automate numerous tasks directly from the command line. It’s a programming language built on Microsoft’s .NET Framework that makes many processes easier by automating them.
Recently, several users reported that their screens display a bizarre error that states that ‘PowerShell.exe is not a Microsoft-Verified App’ when they attempt to log into their system. We had a look into this issue and discovered that it can be caused by a number of reasons including:
- Conflicting applications
- Windows S mode
If you are facing a similar issue, you are in the right place because in this guide, we will walk you through relevant troubleshooting steps in detail.
Let’s get started!
1. Clean Boot Your PC.
there is a chance that a background program in your operating system is causing the problem.
With a clean boot state, you will be able to identify the faulty background program with a minimum set of drivers. Once the culprit is identified, you can uninstall that program and hopefully, the error at hand will be resolved once and for all.
Here is how you can clean boot your PC:
- First, you need to restart your PC in a Clean Boot State. For this, you need to type msconfig in the search bar to open the System Configuration utility.
- Go to the General tab and select the Selective Startup option.
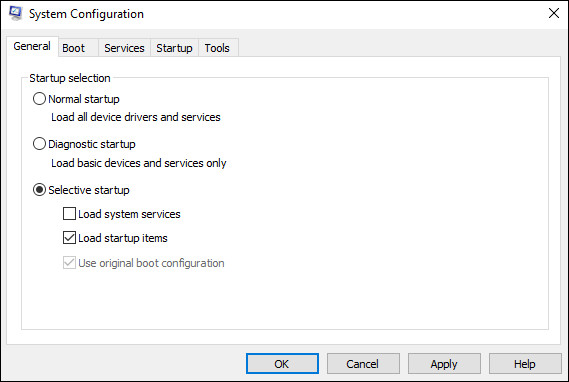
- Now uncheck the ‘Load Startup items’ option.
- Checkmark the ‘Load System Services’ and the ‘Use Original boot configuration’ as well.
- Next, go to the Services tab and checkmark the ‘Hide All Microsoft Services’ check box.
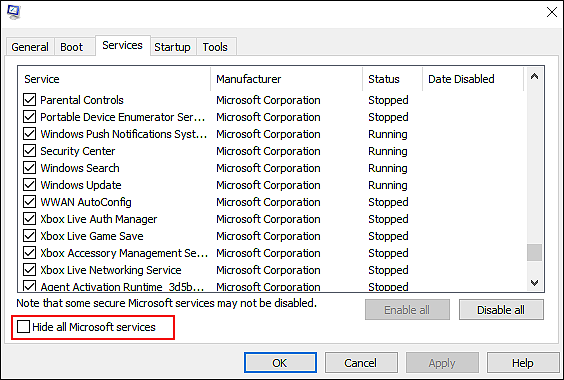
- Click on Disable all and select Apply to confirm the changes.
- You can now restart your PC and identify problematic programs.
If a background process was causing the issue, performing a clean boot will help you identify it. Once you eliminate the faulty program, the SiHost.exe hard error on Windows 10 will automatically be resolved.
2. Disable PowerShell in the Windows Features
Another easy way to fix the issue at hand is to disable Powershell. However, if you are someone who uses Powershell on their Windows frequently, then disabling it might not be a good option. If this scenario is applicable, jump to the next method below.
Here is how you can disable Powershell using Windows Features:
- Type Turn Windows features on or off in the search bar and click on Open.
- Inside the Windows Features screen, uncheck the box associated with Windows PowerShell 2.0.
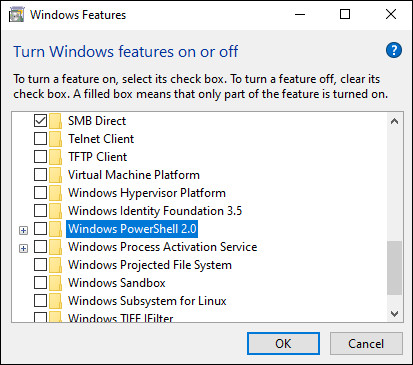
- Now click on OK and restart your PC to save the changes.
As simple as that!
3. Try Using CleanMyPC.
Did you recently clean out your computer and remove files that had taken up space on it? There is a high likelihood that you are experiencing the error under consideration due to these corrupt junk files if it has not happened recently.
The simplest way to remove these junk files is by using an efficient PC cleaner. If you’re looking for a recommendation, we recommend CleanMyPC.

A simple yet effective cleaner, CleanMyPC will scan your operating system and fix any issues on its own. It comes with a wide range of system maintenance tools like a Multi-Uninstaller, Registry Cleaner, and Speed Booster that can take care of all your PC-related issues in no time.
Install CleanMyPC now and get your PC up and running like new in no time!
4. Disable the S Mode.
If you want to run unverified apps on your device, you’ll need to remove S Mode.
It is, however, not a good idea to run any unknown program on your system. Remember that S Mode’s primary job is to prevent you from installing apps that are not from the App Store. It is a very handy option for PCs used in corporate or educational settings.
Here is all that you need to do:
- Press Windows + I keys simultaneously on your keyboard to open Windows Settings on your PC.
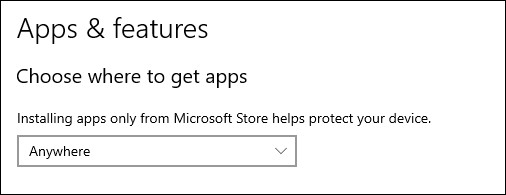
- In the Settings window, click on Apps and then select Apps & features in the next window.
- Expand the dropdown menu under Choose where to get apps and select Anywhere. Now check if doing so resolved the Powershell issue. If it did not, then proceed with the 4th step.
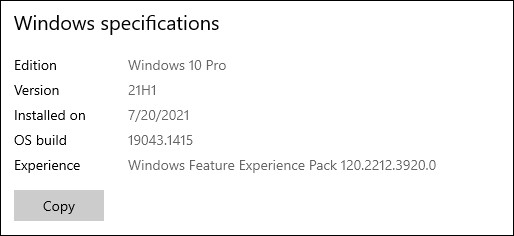
- Type About your PC in the search area of the taskbar and click Open.
- Now select About from the left pane and in the right pane, check your Windows Edition in the Windows Specification section.
- If the edition is S Mode, then press Windows + I keys simultaneously on your keyboard to open Windows Settings.
- Select Update & Security from the list of options available and choose Activation from the left panel.
- In the next window, click on the Get button and then hit Install.
- Next, click on Yes, Let’s Go, and wait for the process to complete.
Once done, check the Edition of Windows again to see if the S Mode is disabled. If it is, repeat the first three steps again and restart your PC.
This brings us to the end of our guide on ways to fix ‘Powershell.exe is not a Microsoft-verified app’ on Windows 10. We tried walking you through all the steps in detail and hope that one of the methods mentioned in this post did the trick for you. In case you still have any confusion about the steps, please let us know in the comment section below!
If this guide helped you, please share it. 🙂
