

Wondering how to fix the ‘Former volume not mounted’ error on Windows?
Torrent clients are a great way to download and manage large files such as movies and games faster. They save you from the frustration you would have faced while downloading files directly from the busy and crowded servers.
However, several users recently reported that their screens display the error code ‘Former volume not mounted’ error upon their attempt to move or rename the downloaded files. We had a look into this matter and found out that the error at hand can be caused by a number of reasons including a bad external drive letter, corrupt torrent, and incorrect download location.
If you are facing a similar issue, you are in the right place.
In this guide, we have listed some of the most effective solutions that can resolve the issue and will try to walk you through each of them in detail.
Let’s get started.
1. Reconnect the External Hard Drive.
The error at hand is commonly caused by external hard drives connected to your PC like a USB. When you connect an external device to your PC, Windows assigns a drive letter to it. So for instance, if you have connected a USB flash drive with your PC, Windows may assign it the letter Z.
There are times when these drive letters change upon disconnecting the device from your PC, and as a result, applications using the device fail to recognize it upon reconnecting.
If your screen is displaying the ‘Former volume not mounted’ error in uTorrent on your PC, then the first thing you should do is disconnect the external hard drive and reconnect it. Doing so will allow your operating system to reassign a drive letter to the device, and hopefully, the issue will be resolved.
2. Change the Download Location.
If uTorrent was downloading a file on an external drive and you removed the drive during installation, then that is why your screen displays the ‘Former volume not mounted’ error.
A simple solution to this issue is to change the download location in uTorrent from the external drive to another valid location.
Here is what you need to do:
- Open uTorrent and check if the problematic file is still under download. If it is, simply right-click on it and click on Stop.
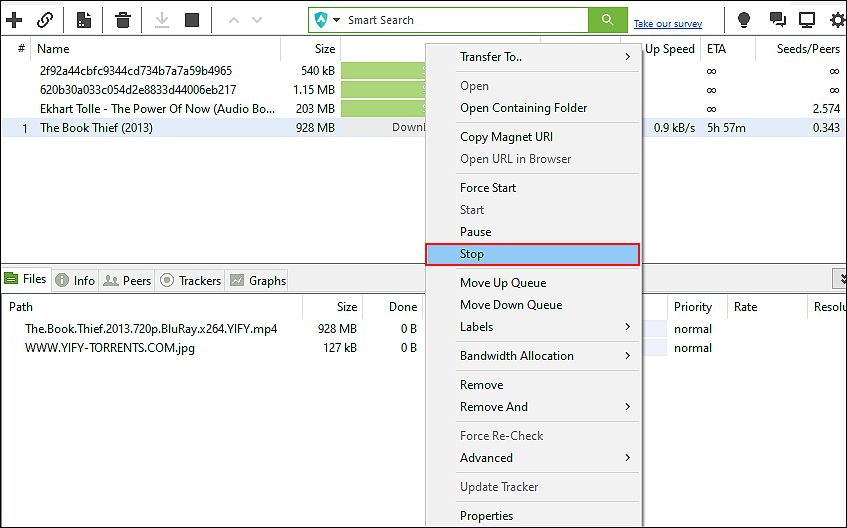
- Now right-click on it again and select Advanced from the list of options available.
- Then click on Set Download Location and select another location for your Torrent file.
- Finally, restart the Torrent client and check if the issue is resolved.
If an invalid download location was causing the issue, switching to another location will resolve it.
3. Change the Drive Letter
If you find it difficult to change the files’ download location and want them to be downloaded on your external drive only, you can do this by changing the drive letter.
As we mentioned earlier, there are times when the operating system appoints a new drive letter to an external device when you reconnect it. Applications like Torrent do not recognize the newly appointed drive letter and thus fail to perform operations properly.
In this method, we will be changing the newly appointed drive letter to the one Torrent expects. This way, Torrent will complete the installation on your external drive without any issues.
Here is all that you need to do:
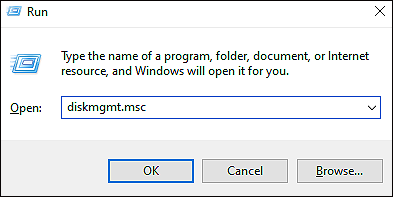
- Open a Run dialogue by pressing Windows + R keys simultaneously.
- Type ‘diskmgmt.msc’ in the text field and hit Enter. Doing so will launch the Disk Management window.
- Right-click on the targeted drive and click on Change Drive Letter and Paths from the list of options available.

- Click on the Change button on the pop-up window and then select Assign the following drive letter option. You can now select the drive letter that Torrent expects by using the drop-down menu.
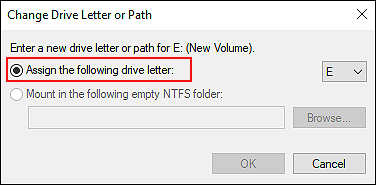
- Finally, click on OK to save the changes.
That’s it. The file will now successfully download on your external drive.
4. Try Using CleanMyPC.
When was the last time you deep cleaned your PC and eliminated all the junk files that have been occupying space for months? If that did not happen recently, then now might be a good time to do so as there is a fair chance that a corrupt file is causing the issue at hand within your system that is preventing Torrent from installing new files.
If this scenario is applicable, the easiest way to identify and eliminate corrupt junk files is by using a reliable PC cleaning tool. In case you are looking for a recommendation, then we highly recommend using CleanMyPC.

CleanMyPC is a one-stop shop for all your PC-related needs. It comes with a wide range of system maintenance tools that can take care of everything, from eliminating the corrupt files to increasing your PC’s speed and boosting its overall performance. All that you need to do is run a scan using CleanMyPC, and it will take care of the rest with little to no user input.
Install CleanMyPC now and give your PC a much-needed performance boost!
5. Modify the Resume.dat File.
If none of the methods mentioned above works for you, then try replacing the changed path by modifying the resume.dat file.
The resume.dat file is where uTorrent saves information about a session.
This method is a bit complicated, which is why we recommend following it step-by-step for successful execution.
Here is what you need to do:
- Open a Run dialogue box by pressing Windows + R keys simultaneously.
- Type ‘%AppData%\uTorrent\’ in the text field of the dialogue box and hit Enter. Doing so will open uTorrent in File Folder.
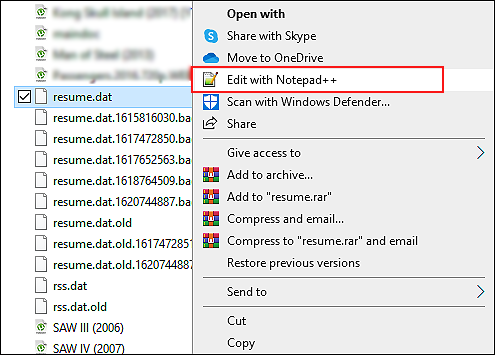
- Locate the resume.dat file in the list of files available on your screen. Copy the file and paste it into a different folder to create a backup.
- Once the backup is created, right-click on the original resume.dat file and select the Edit with Notepad++ option from the context menu.
- Now press Ctrl + F and click on the Replace tab.
- Enter the incorrect path in the text field against Find what.
- Now enter the correct path in the text field against Replace with.
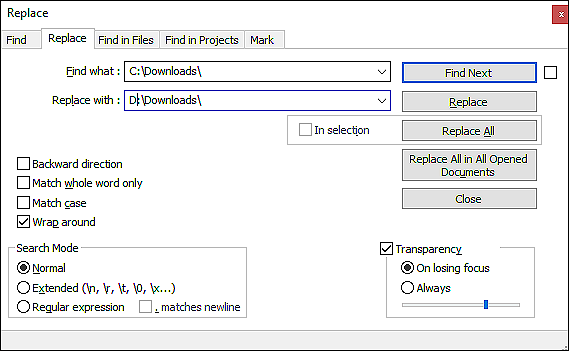
- Finally, click on the Replace All button and hit the Close button. Also, press Ctrl + S before closing the save the changes made.
- Once done, restart your PC.
This should resolve the issue once and for all.
This wraps up our guide on fixing the ‘Former volume not mounted’ error on your PC. We hope that one of the troubleshooting methods helped you resolve the issue on your device. If you have any questions, please let us know in the comment section below.
If this guide helped you, please share it. 🙂
