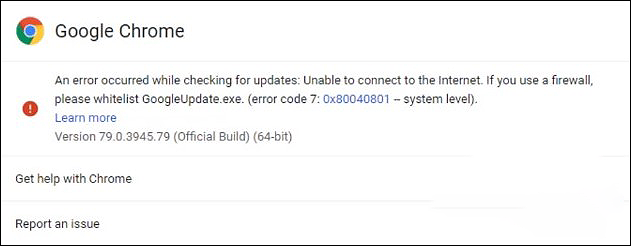
Wondering how to fix Google Chrome update error (Error Code – 7: 0x80040801) on Windows?
You can get a lot done with Google Chrome, and no browser has become more synonymous with online living than it has. From being easy to use to having a sophisticated algorithm, there is just so much to like about it.
For the most part, it also installs updates without creating any fuss but there are some exceptions. Recently, several users reported that their screens display error 0x80040801 when they attempt to update their Google Chrome version to the latest one available on Windows.
We had a look into this issue and discovered that this error can be caused by a number of reasons, including Firewall blockage, corrupt Chrome installation, and faulty Google Update Service.
If you are facing a similar issue, you are in the right place because in this guide, we will walk you through all the relevant troubleshooting steps in detail.
Let’s get started!
1. Force Start Google Updates Service.
Google Updater, which is responsible for downloading, installing, and automatically updating Google applications is run by Google Updates Service. If Google Updates Service is disabled on Windows, then you will not be able to install the latest version of Google Chrome on your PC.
We recommend checking the status of this service on your PC before moving to the next troubleshooting steps. In case the service is disabled, enabling it will resolve the error at hand in no time.
Here is how you can do that:
- Press Windows + R keys simultaneously on your keyboard to open a Run dialogue box.
- Inside the text field of the dialogue box, type ‘services.msc‘ and hit Enter. Doing so will launch the Services window.

- In the newly launched window, locate Google Update Services (gupdae) and right-click on it.
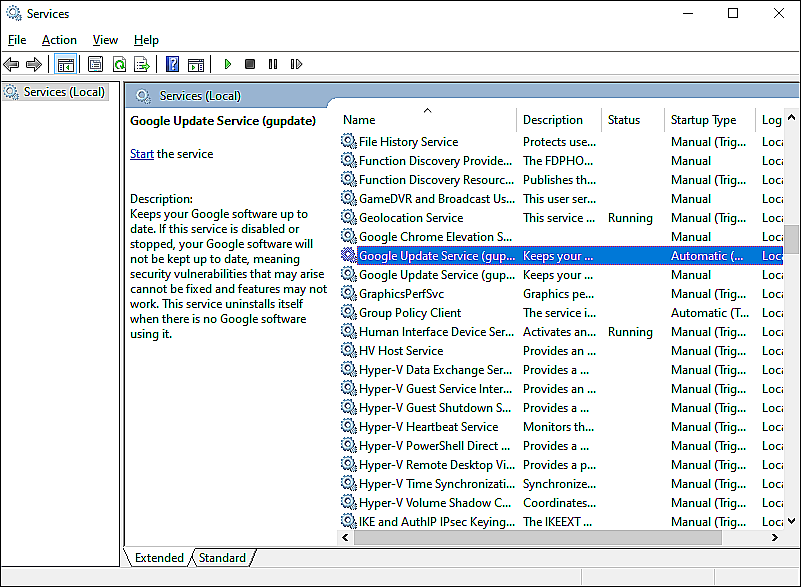
- Select Properties and in the General tab, set the Startup type to Automatic (Delayed Start).
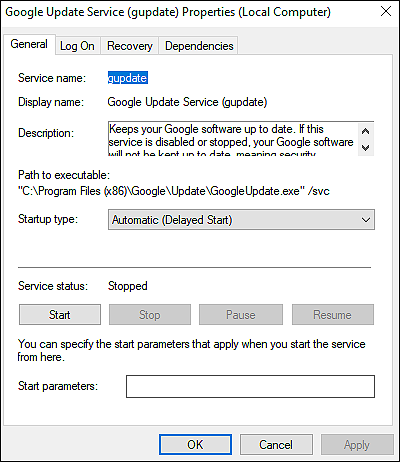
- Now click on the Start button under Service status and hit Apply to save the changes.
- Once done, repeat steps 3 and 4 for Google Update Service (gupdatem).
- Finally, restart your PC and check if the error is resolved.
If the status of the service was causing the issue, following the steps mentioned above will resolve it. In case the error persists, proceed to the next method below.
2. Modify Firewall Settings.
It is common for security programs like Windows Firewall to prevent certain applications and programs from installing the latest updates on your operating system.
If you are using the Windows Firewall of a third-party security program on your PC, whitelist Google Update Service from its settings and then try to install the latest updates.
We have discussed the process of modifying relevant Windows Firewall settings below. In different third-party applications, the steps for performing the same function may differ, but the basic principle remains the same.
Here is what you need to do:
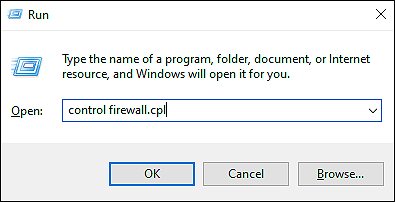
- Press Windows + R keys simultaneously on your keyboard to open a Run dialogue box.
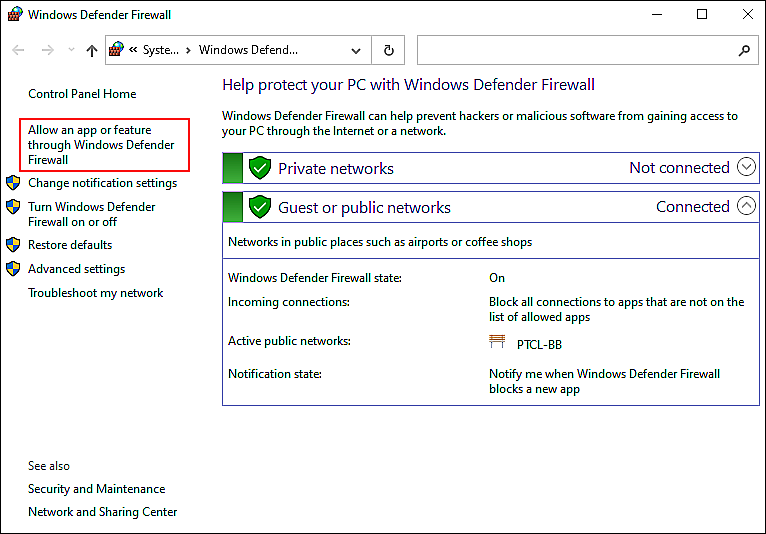
- Type ‘control firewall.cpl‘ in the text field of the dialogue box and hit Enter to launch Windows Firewall.
- Inside the newly launched window, select Allow an app or feature through Windows Defender Firewall from the left panel.
- Click on the Change settings button and select Yes in the User Account Control prompt.
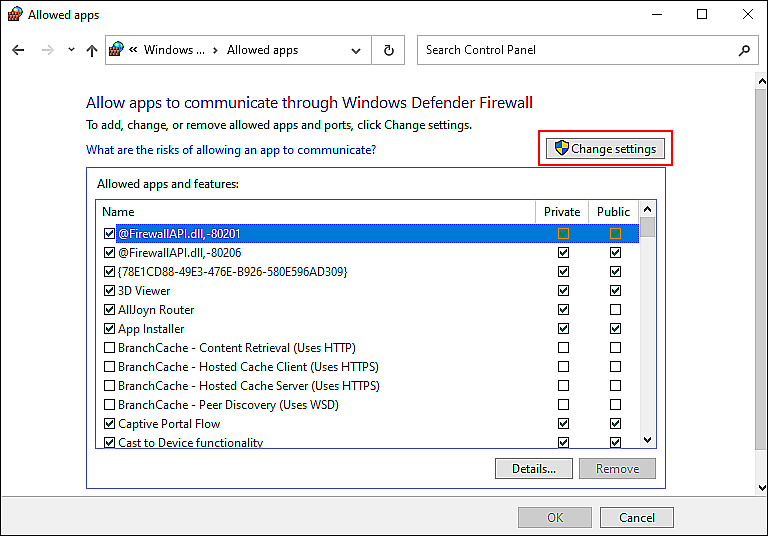
- Now locate googleupdate.exe from the list of options available and checkmark the boxes against it under both Public and Private section.
- Finally, click on OK to save the changes and check if the issue is resolved.
In case Windows Firewall or other third-party applications were preventing Windows from installing the latest Chrome update, whitelisting Google Update Service will resolve the Google Chrome Update Error (Error Code – 7: 0x80040801) on your PC.
3. Try Using CleanMyPC.
In case modifying Windows Firewall settings did not do the trick for you, you can also try using a third-party PC cleaner to clean the junk files from your PC.
Occasionally, unused junk files become corrupted and block your operating system from installing new applications or updating existing ones. If you don’t know how to get rid of this junk, we recommend using an efficient PC cleaner to unclog your system. If you’re looking for a recommendation, we recommend CleanMyPC.

A wide variety of system maintenance tools is available in CleanMyPC, including (but not limited to) a cleaner, a speed booster, and an uninstaller. These tools can take care of all your PC-related issues in no time.
If this is something your PC desperately needs, install CleanMyPC now and get your PC up and running like new!
4. Reinstall Chrome.
If none of the methods mentioned above works for you, then we encourage you to go ahead and uninstall the current version of Chrome on your PC. You can then install the latest version of Google Chrome from the official Google Update page.
Don’t worry, doing so will not make you lose your data. You will be able to retrieve all your settings and other user data by logging in with your Google account in the latest version of Chrome.
Here is all that you need to do:
- Press Windows + R keys simultaneously on your keyboard to launch a Run dialogue box.
- Inside the text field of the dialogue box, type ‘appwiz.cpl‘ and hit Enter to open the Programs and Features window.
- In the newly launched window, locate Google Chrome and right-click on it.
- Click on Uninstall and follow the on-screen instructions to complete the process.
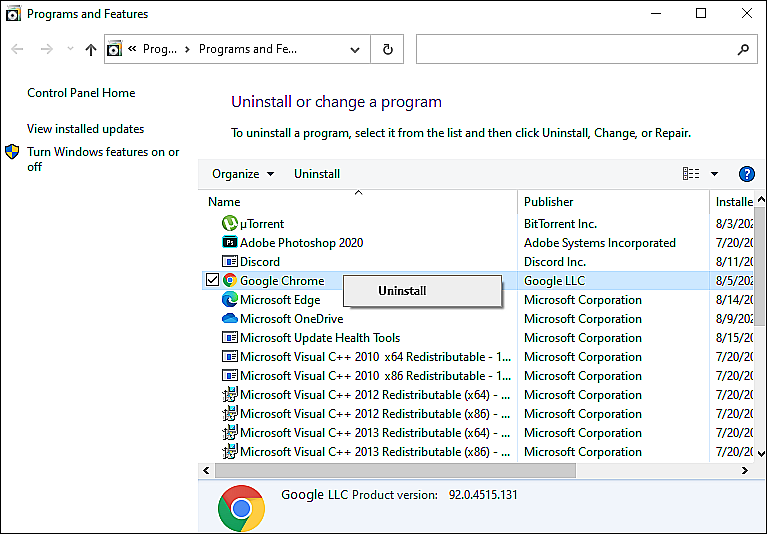
- Once Chrome has been uninstalled, restart your PC.
- Upon reboot, open a Run dialogue box again and type ‘%localappdata%‘ in the text field.
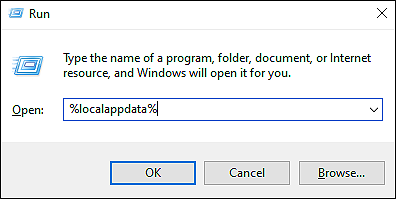
- Hit Enter and in the next window, locate a folder named Chrome.
- Delete this folder to remove the local data cache.
- Once done, visit the download page of Chrome and click on the Download button.
- Follow the on-screen instructions to complete the process.
That’s it.
This should install the latest version of Chrome on your PC.
This brings us to the end of our guide on fixing the Google Chrome update error (Error Code – 7: 0x80040801). We hope that one of the methods mentioned above did the trick for you. If you have any questions regarding the troubleshooting steps, feel free to let us know in the comment section below.
If this guide helped you, please share it. 🙂


