Wondering how to fix HDMI Audio not working on Windows 11?
Streaming content on big screens brings another level of satisfaction. For this reason, many laptops and computers come with an HDMI port via which you can connect your computer to a TV screen and other external displays for superior video and audio quality.
But what happens if either one of the two elements stops working? Many users have reported that the audio goes missing when they connect HDMI to their PC, and they’re left watching the video on mute. The reasons for this may vary from a faulty HDMI cable to misconfigured settings and even corrupted drivers.
Fortunately, Windows 11 has various built-in troubleshooters and adjustable settings that you can modify as per your needs. So follow through this guide to fix HDMI audio not working on Windows 11.
Now, let’s get started!
1. Check the HDMI Cable and Port.
Before diving into some serious troubleshooting methods, the easiest solution to fix HDMI Audio not working on Windows 11 is to check the HDMI cable and the input and output ports. Ensure that the cable is correctly inserted into the ports. If not, unplug the HDMI cable and replug it into your PC and TV.
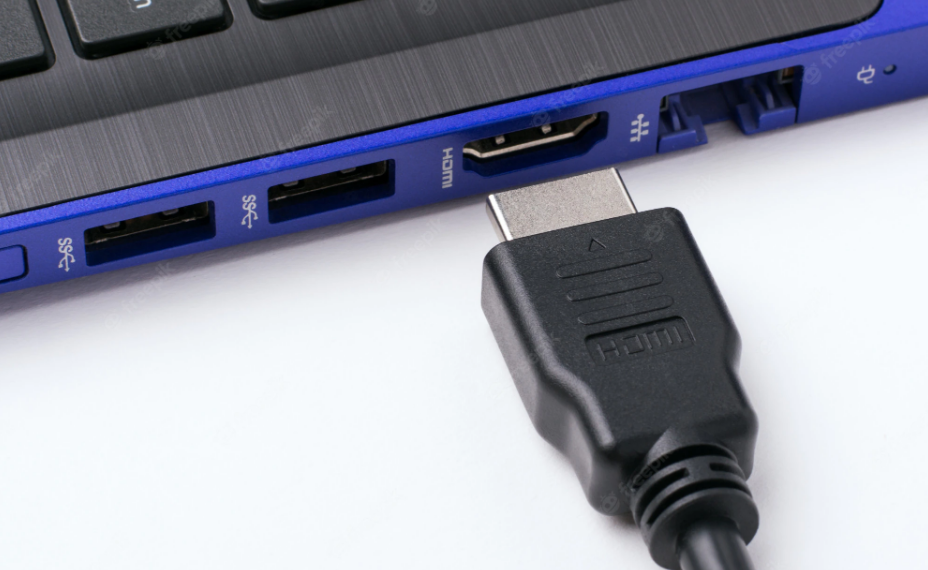
Sometimes, a faulty cable or port may also be the reason behind the audio not working properly. In these cases, consider changing the HDMI cable or trying a different port to fix the issue.
2. Ensure the Sound is Working on Windows and TV.
Another basic method to resolve the audio issue you’re facing is to ensure that the sound is working on your PC and the device you’re connecting to. If your Windows device is on mute, the audio will also not work on TV.
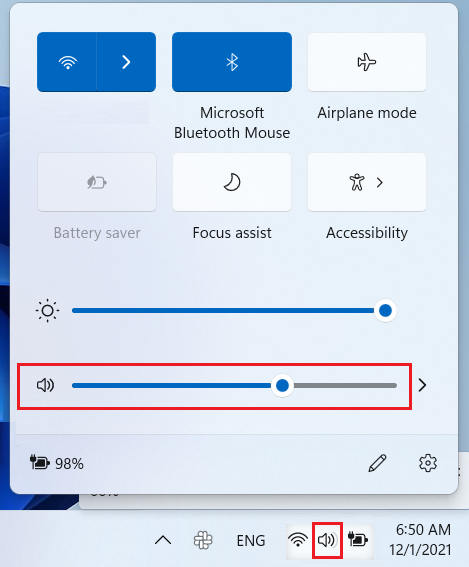
Therefore, check the sound settings on your PC and TV before trying out anything else. Here’s a shortcut to check the sound on your computer:
- First, click on the Volume icon from the taskbar.
- Then, check volume levels. Bring the slider to the right to increase the volume.
3. Restart the PC and TV.
Rebooting your devices has proven to eliminate various common issues that users may face. So, if you can’t get the HDMI audio to work on Windows 11, consider restarting your PC and TV. This will give your device a fresh start, end all the background tasks, and eliminate any minor errors and glitches in the system.
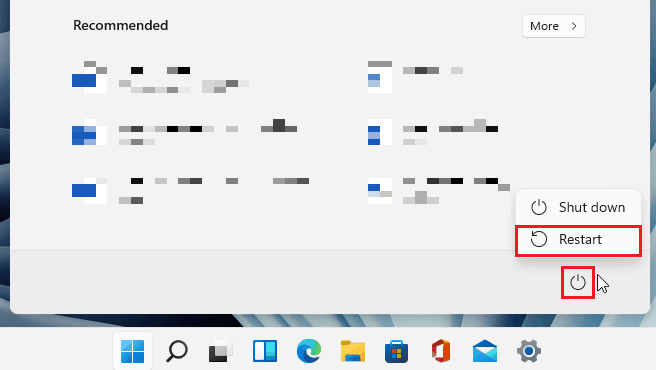
Here’s how to restart your Windows 11 device:
- Click on the Windows icon from the taskbar.
- Then, click on the Power icon at the top right corner.
- Next, select the Restart option.
To restart your TV, follow these steps:
- Simply press the Power button from the remote to turn it off.
- After a few seconds, turn it back on by pressing the Power button again.
4. Manually Select HDMI Output From Sound Settings.
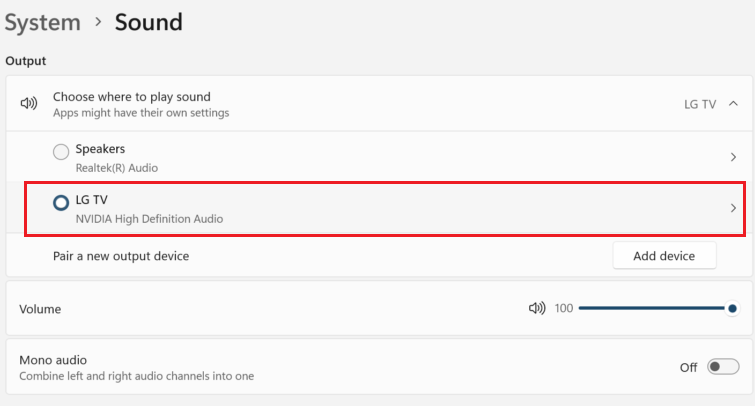
Although Windows automatically detects the connected external audio device, there may be times when it fails to do so. In these cases, you can manually change the Windows audio to HDMI audio through Windows Settings.
Here’s how:
- Go to the Search icon from the taskbar and click on it.
- Then, type Sound settings in the search bar.
- Click on Sound settings to open it.
- Under Choose where to play sound from the Output section, pick your desired audio device.
5. Set HDMI as Default Playback Service.
Your PC may fail to recognize the connected HDMI device due to an issue within the system. If this occurs, Windows may not detect the default playback output device, resulting in HDMI audio not working on Windows 11.
To fix this, you can manually change the default playback device to HDMI by following the steps below:
- Click on the Search icon from the taskbar.
- Next, search for Sound settings and click on it to open the window.
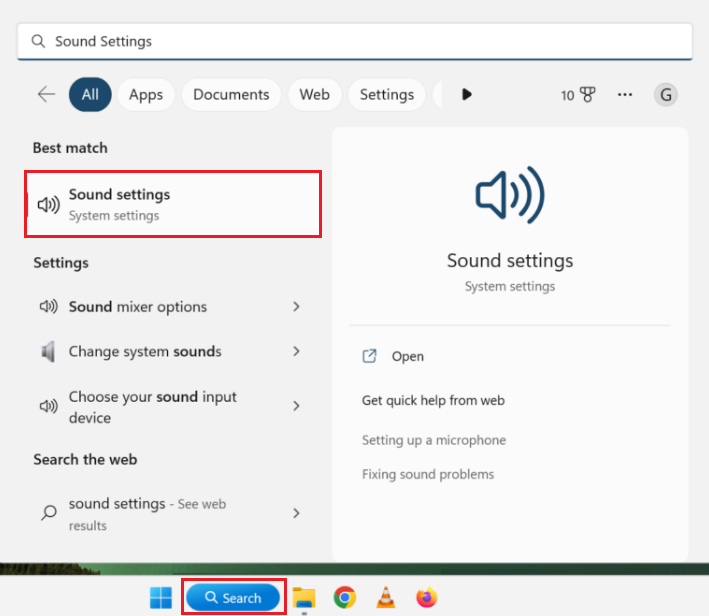
- Scroll down and locate More sound settings, then click on it.
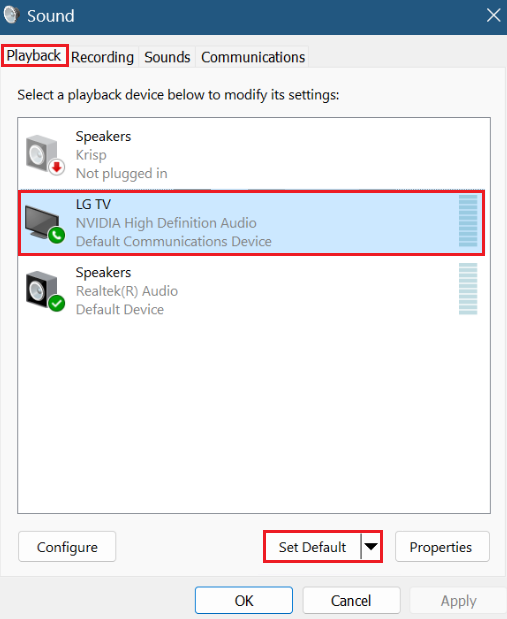
- Under the Playback tab, choose your desired HDMI output device.
- Lastly, click on the Set Default button to confirm the changes.
6. Enable HDMI Auto Detection.
Auto-detection allows your PC to recognize the external audio device and connect to it. If this feature is turned off, Windows may not detect any external device, including the HDMI audio output.
Simply turn on the auto-detection to fix this problem. Here’s what you must do:
- First, click on Search from the taskbar.
- Search for your device’s audio console.
- Then, click on the app to open it.
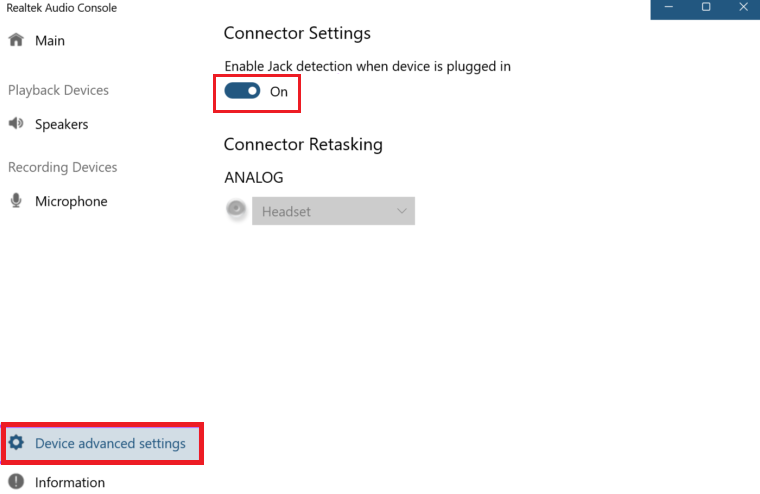
- After that, select Device advanced settings from the left pane.
- Finally, switch on the toggle below Enable Jack detention when device is plugged in.
7. Run Sound Troubleshooter.
Windows have built-in troubleshooters that can help you detect, diagnose, and fix various issues your device may face. So, if you’re having any problem with the HDMI audio, consider running a Windows sound troubleshooter.
Follow the steps below to do it:
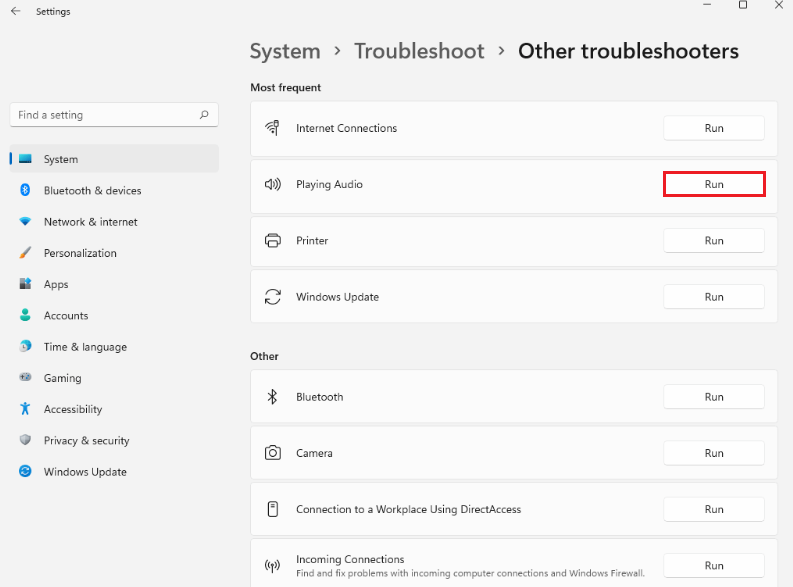
- Go to Settings by pressing Win + i keys.
- Next, select Troubleshoot from the System tab.
- Click on Other troubleshooters.
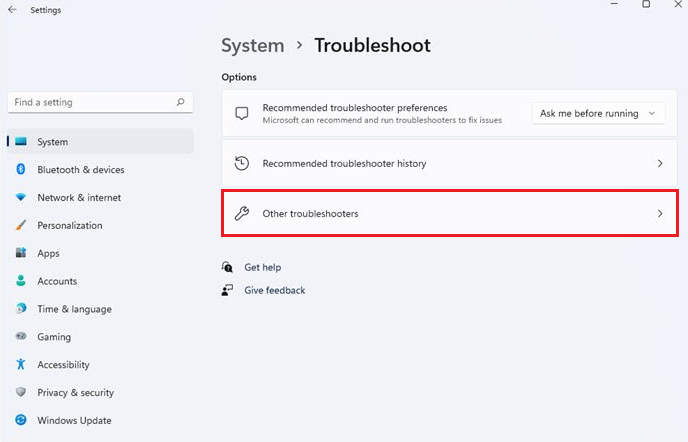
- Lastly, click on Run next to Playing Audio.
8. Check Windows Update.
Every device is prone to bugs and glitches within the system. To overcome this, Windows regularly releases version updates to allow your device to work properly. Hence, we suggest you check regularly for these updates and download them.
Follow the instructions below to do it:
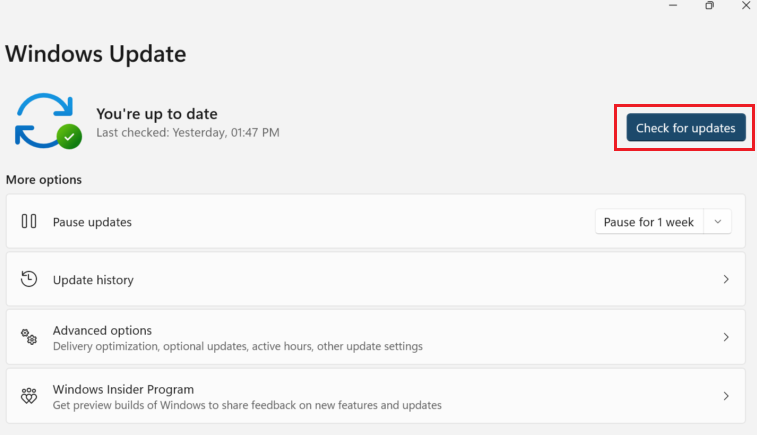
- Click on the Search icon from the Windows taskbar.
- Then, search for Windows Update.
- Next, click on Windows Update Settings to open it.
- Once the window opens, click on the Check for updates button on the right side of the screen.
- If there is any pending Windows update, click on the Install option.
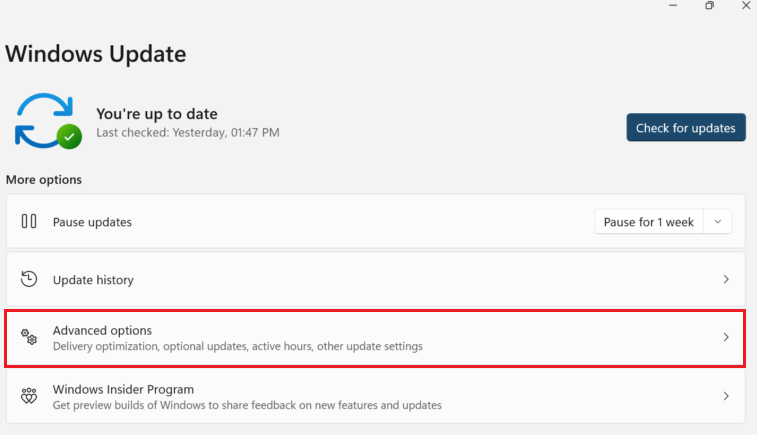
- However, if there is no available Windows update, go to Advanced options.
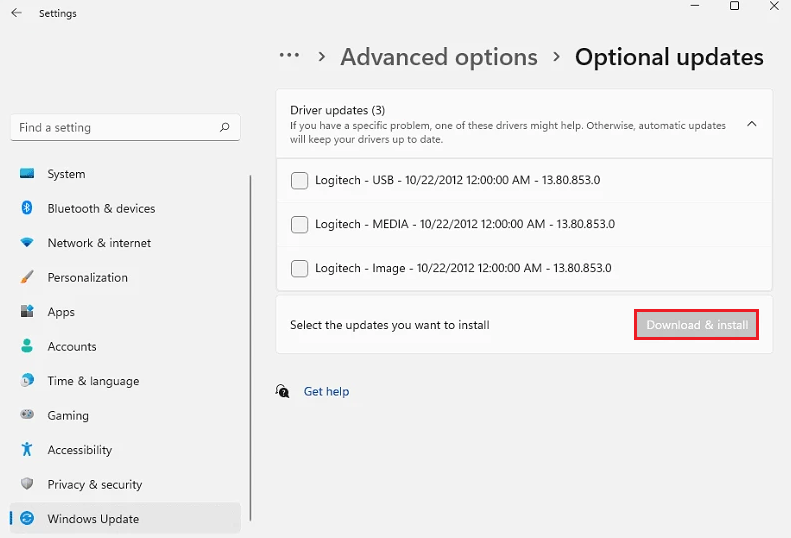
- Then, scroll down and locate Optional updates. Click on it.
- If you find any optional updates available, click on Download & install them.
9. Update Sound Drivers.
Corrupted or faulty sound drivers may also cause HDMI audio not working on Windows 11. Drivers also receive updates from the developers that you can install on your PC to fix these issues.
Here’s how to update the sound driver on your PC:
- Open Device Manager from Windows Search.
- After the window opens, go to Sound, video and game controllers and click on it.
- From the options, right-click on your desired audio driver.
- Then, select the Update driver option.
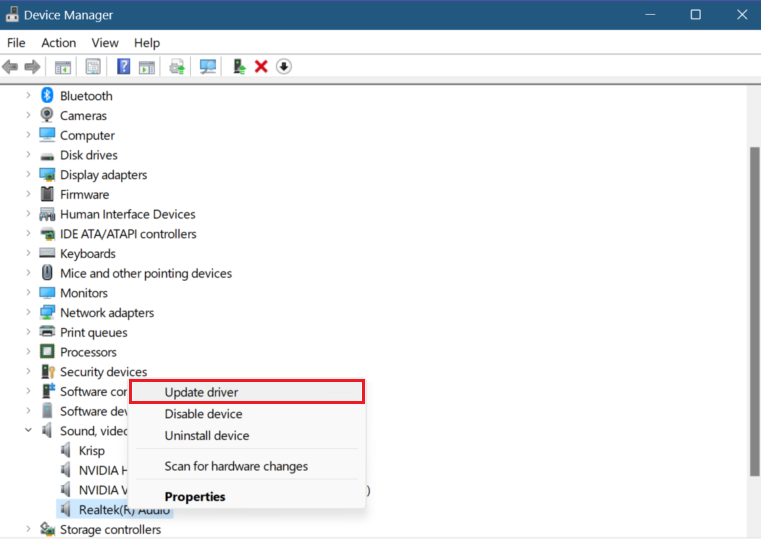
- Next, select Search automatically for drivers and install any available updates.
10. Restart Audio Service.
Windows audio services may also not work correctly at times and result in audio problems in HDMI output devices. In such instances, restarting this service will give it a fresh start and troubleshoot your problem.
Here’s how:
- First, use Windows Search to launch Services.
- Once the window opens, scroll down, locate Windows Audio, then right-click on it.
- Select Restart from the options.
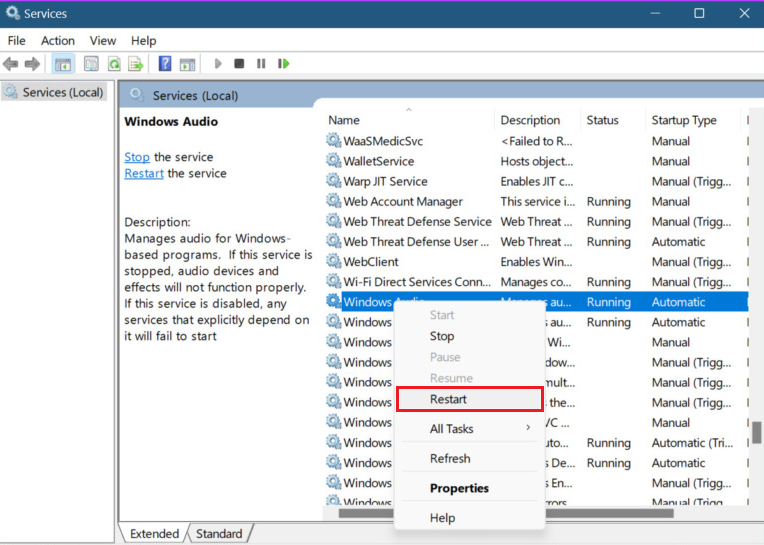
- A new window will appear. Click on the Yes button.
11. Reset Windows.
If everything else fails, the last solution to HDMI audio not working on Windows 11 is to Reset Windows. This will resolve all the sound driver-related problems in your PC.
This Is it! We hope you were successful in fixing the HDMI audio not working on Windows 11 issue by following the methods mentioned in this guide. If you have any confusion or queries regarding this topic, feel free to leave them in the comments below. We’ll get back to you in no time.
If this guide helped you, please share it. 😊


