

Being a software engineer, you often come across many instances where you would require to have Python installed on your Mac.
However, the issue is most modern macOS versions come with rather with Python 2.7.x installed and not the newer, modern version like Python 3.6.5 or Python 3.7.2 (which is the most up-to-date version right now).
This short guide is written to show you how to properly install Python 3 on a Mac OS X computer.
Before you jump into the guide, do take note that there are multiple ways to install Python 3 on a Mac but with this guide, I’ll show you the two easiest ways to do this, step by step.
Personally, the way I did it was using a package manager like HomeBrew (it’s okay if you don’t understand what it is). Again, I’ll show you how to do this method down below.
Wait, how do I check if Python 3 is already installed on my Mac?
Simple. Open up your Terminal and type the following line python --version and then hit your Enter key:
$ python --version
Python 2.7.15
You should see the python version that is currently installed on your Mac.
How to Install Python 3 on macOS: 2 Ways
1. The Simplest Way.
Perhaps the simplest way to install Python 3 on macOS.
This is for you especially if you’re a newbie (though I still strongly recommend you try the HomeBrew method below) or if you don’t want to deal with copy-pasting code into your Terminal and downloading other software.
Here’s how to install Python 3 on your macOS:
- Jump into Python.org downloads page and simply just download the latest Python version.
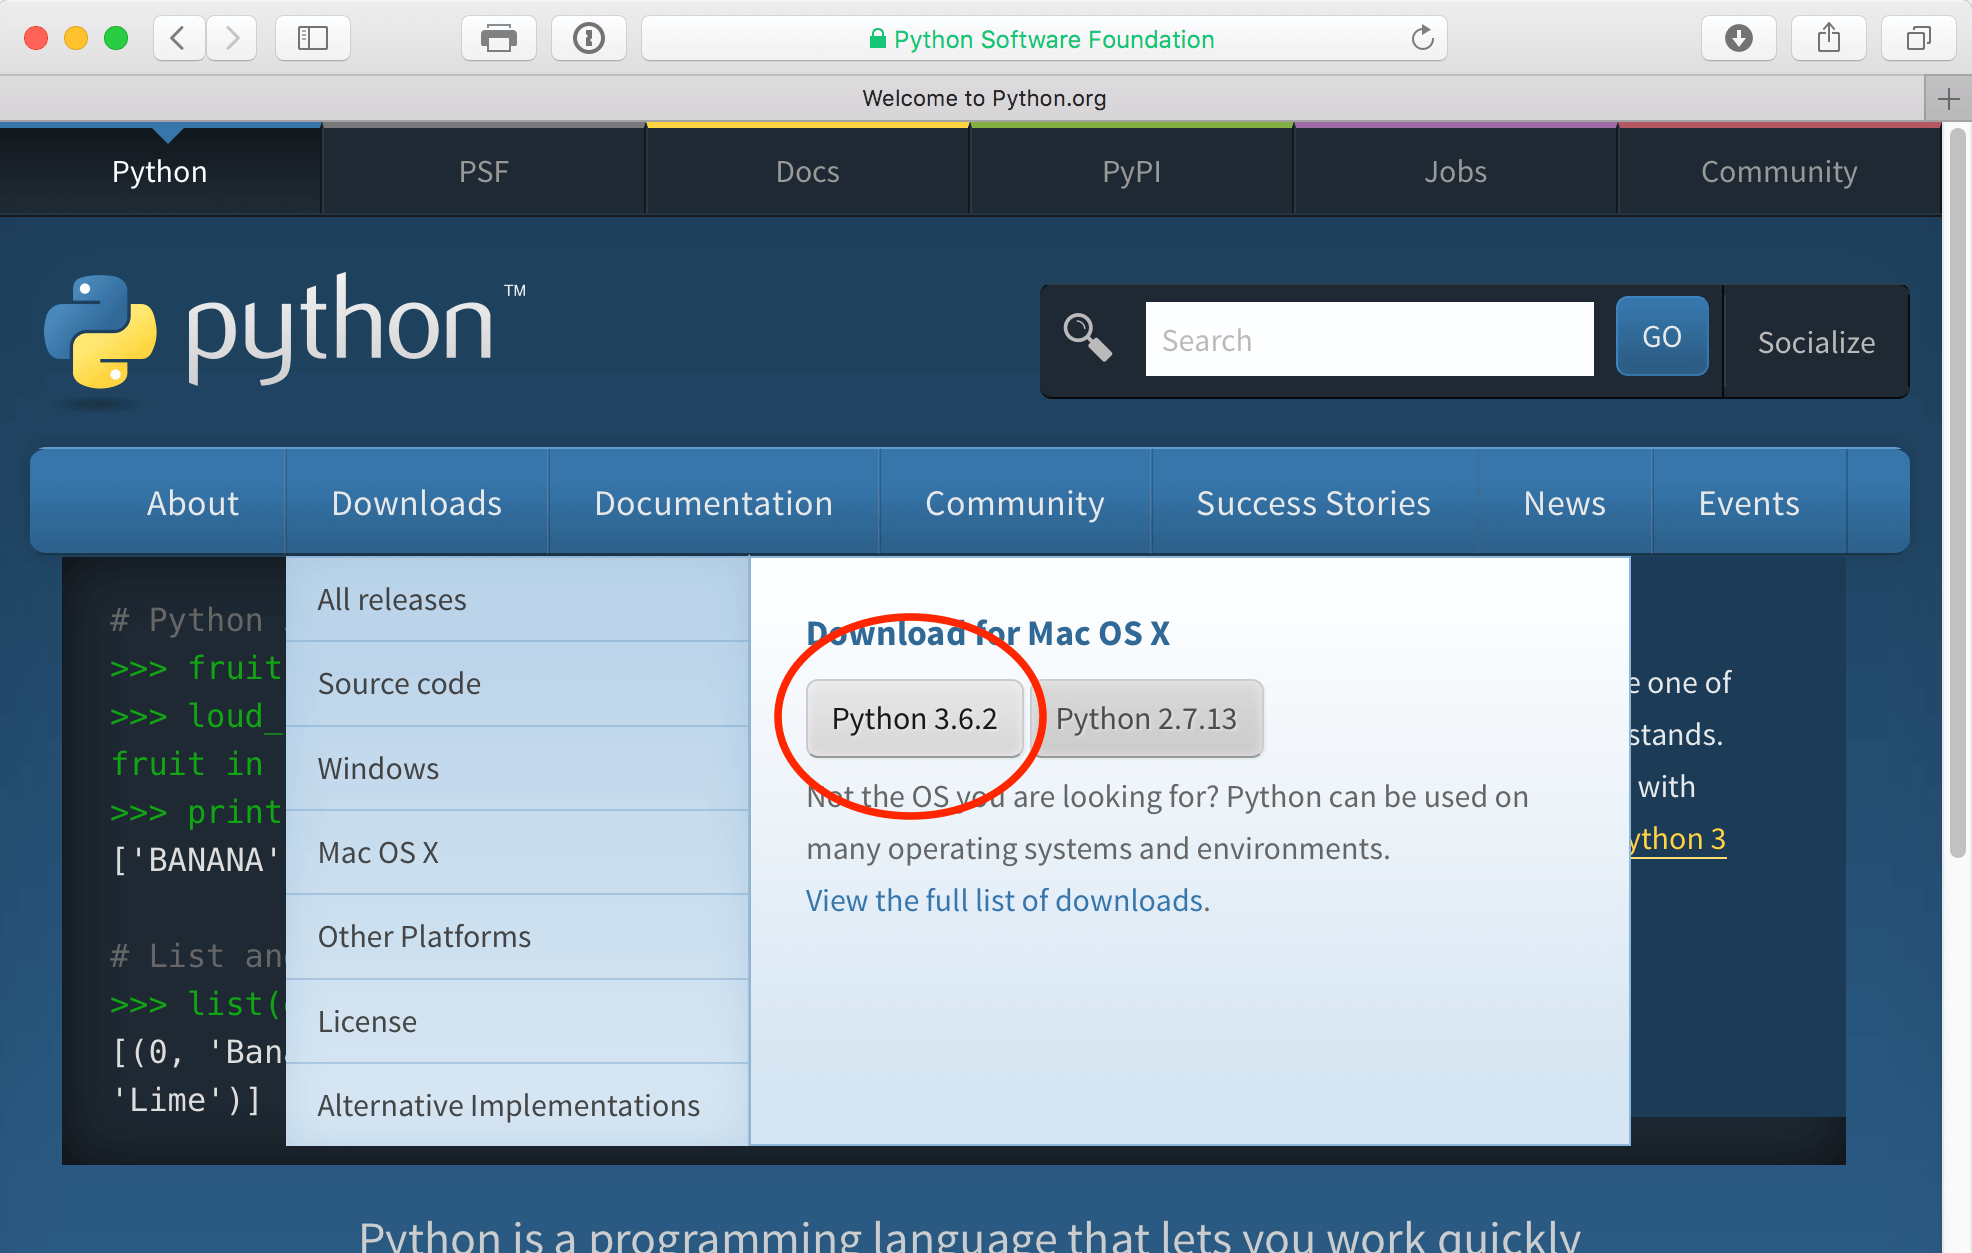
- Next, run the Python Installer to install Python 3 onto your Mac.
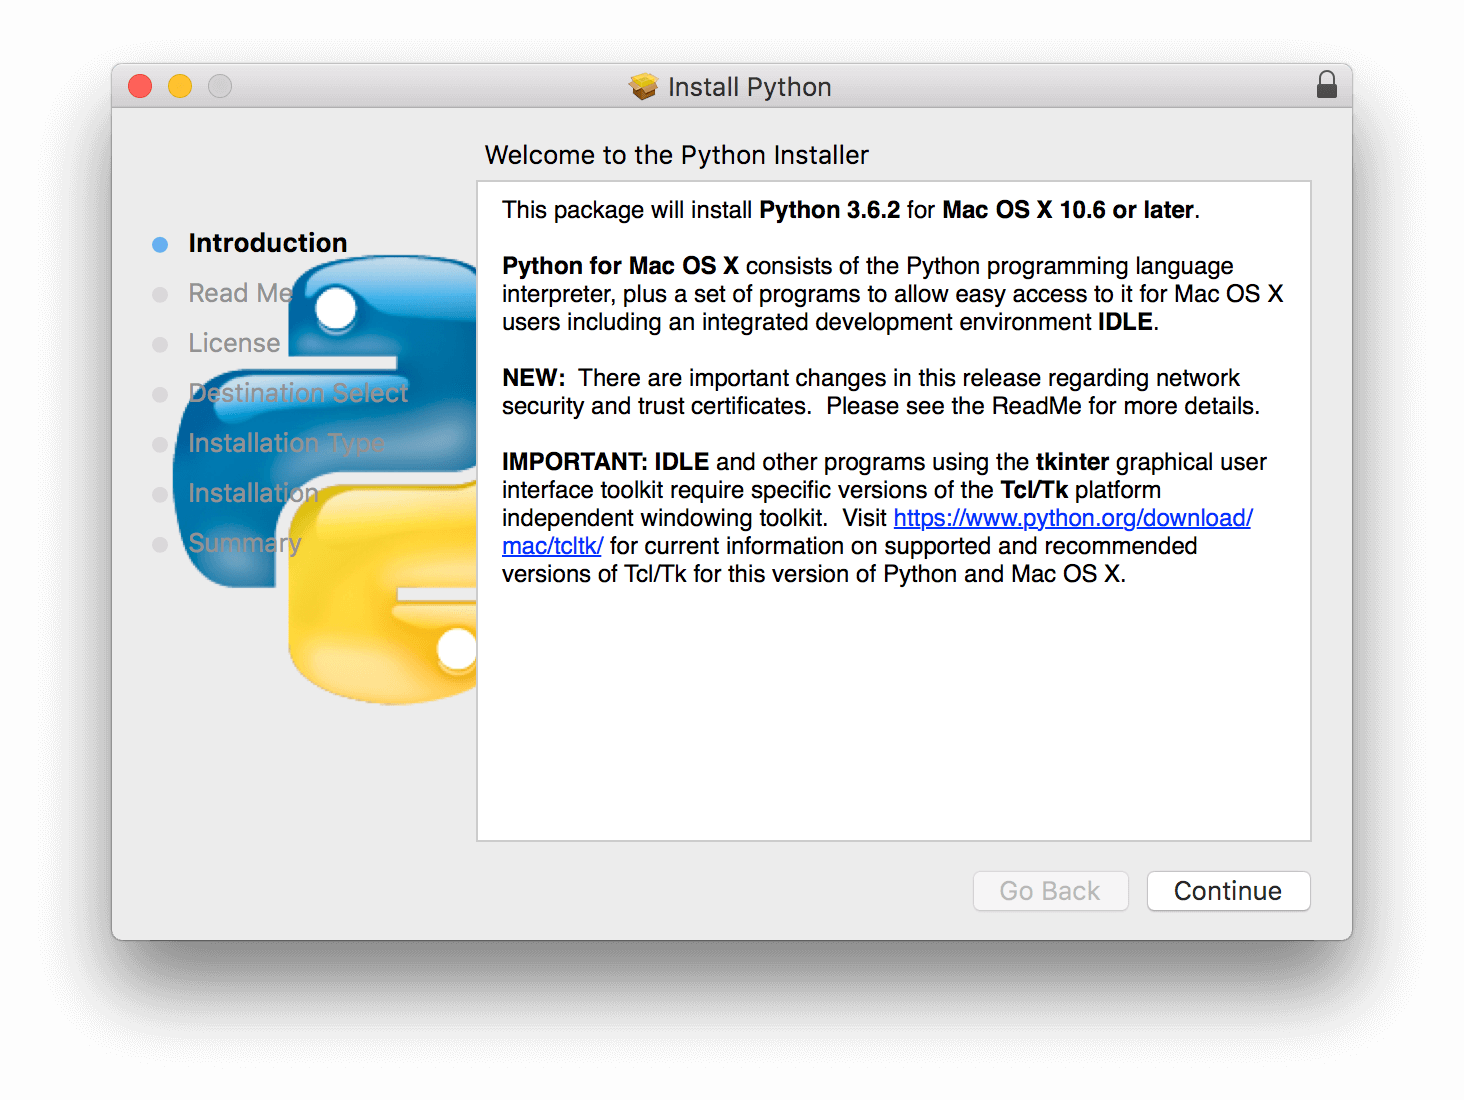
Note
The Python installation may require about 100MB of disk space to install. Once you’ve installed Python 3 you can have it alongside Python 2 without having to delete the latter from your Mac.
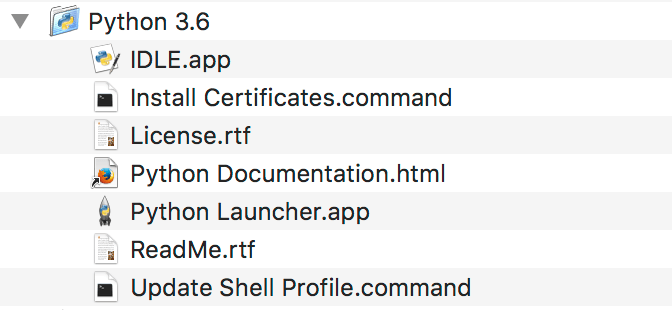
- Great! Now once Python 3 is installed, you’ll be able to find it within the Applications directory of your Mac. You’ll also find here a simple IDE called “IDLE.app” which gives you a basic Python IDE.
Help! Where do I find the Applications directory?
If you can’t find the Applications directory, simply go to Finder by clicking the Finder icon in the Dock (it’s usually the first icon from the left side of the Dock). From there simply, go to the Go menu and select Applications.
Done. If you got yourself lost through the process, you can comment down below.
Next up, I’ll show you how you can install Python 3 using HomeBrew onto your macOS. This is my preferred way and it is just as simple as the method before but it will make your life a whole lot simpler, in the long run, using Python.
2. Install Python 3 on Mac using HomeBrew.
This method is dead-ass simple and a little fun. 🙂
First of all, you’ll need to have this thing called HomeBrew installed on your Mac. Homebrew is basically a “package manager”. A package manager is an application that helps you install the stuff you need that Apple (or even your Linux System) hadn’t installed in the first place for you.
It’s simple, fast and safe.
Second, you will need to have installed XCode onto your Mac. If you’re thinking of learning how to program or creating iOS apps on your Mac, then it’s good to have XCode installed. We will be using XCode to install HomeBrew application.
Note
If you have already installed XCode onto your Mac you can skip step 1 and jump straight to step 3.
Here are the steps to install XCode, HomeBrew as well as install Python 3 using HomeBrew onto your Mac:
- Jump into your Terminal app on your Mac and run the copy/paste the following command into the Terminal to install XCode onto your Mac:
$ xcode-select --install - Simply click through all the confirmation crap that XCode shows. It may take a little while to install XCode since it is a large program.
- Great! Now that you have XCode installed, you can install HomeBrew! To install HomeBrew, simply copy/paste the following command into your Terminal:
/usr/bin/ruby -e "$(curl -fsSL https://raw.githubusercontent.com/Homebrew/install/master/install)"
Note
You can confirm the HomeBrew installed correctly by running the command: below:
$ brew doctor
Your system is ready to brew.- You’ve installed HomeBrew! Now let’s install the Python 3, the reason why you’re here. To install the latest version of Python, just copy/paste the following command into your Terminal:
$ brew install python3
Note
You can confirm which version of Python was installed all by running the command below (the exact same command you tried earlier in this guide). It should show up as follows:
$ python3 --version
Python 3.7.0- Finally, let’s run our new Python 3. Simply enter
python3.
Voila! You have now installed Python 3 successfully if you see something similar in your Terminal:
$ python3
Python 3.7.0 (default, Jun 29 2018, 20:13:13)
[Clang 9.1.0 (clang-902.0.39.2)] on darwin
Type "help", "copyright", "credits" or "license" for more information.
>>>
Bonus
• If you want to exit, type exit() and then hit your Return button on your keyboard. You can also hit both Control and D keys at the same time instead of the Return key.
• Remember I mentioned you can run both your new Python 3 alongside your old Python 2? Yup. Simply type python into the Terminal to run with Python 2.
$ python
Python 2.7.15 (default, Jun 17 2018, 12:46:58)
[GCC 4.2.1 Compatible Apple LLVM 9.1.0 (clang-902.0.39.2)] on darwin
Type "help", "copyright", "credits" or "license" for more information.
>>>
Ok, I used the download from Python.org but now I have two folders: python3.5 and python3.7
Is this going to cause issues?
Upon ‘brew doctor’ I receive this warning:
Warning: Homebrew’s sbin was not found in your PATH but you have installed
formulae that put executables in /usr/local/sbin.
Consider setting the PATH for example like so:
echo ‘export PATH=”/usr/local/sbin:$PATH”‘ >> ~/.bash_profile
How to fix to proceed? Thanks
The python3 command doesn’t work after the brew install. And I don’t want to supersede the python2 version by doing the ‘brew l’nk python’, which I think replace the python command with python3.
python3
-bash: python3: command not found
$ brew install python3
Warning: python 3.7.6_1 is already installed, it’s just not linked
You can use `brew link python` to link this version.
Above instructions for “install python 3 on mac using homebrew” worked perfectly on a new macbook air Feb 2020. Thank you!
Here is my recipe to install Python3.6.9 on macOS Catalina:
1. Dowload zlib from the source at https://zlib.net/
2. Configure, make and make install as usual.
3. Download the source from python.org
4. Configure, make and make install as usual but use the same destination with ./configure –prefix=/somewhere as you did for installing zlib.
Without zlib, pip was giving me errors.
Pip was still giving me errors based on the install method I previously described. It was telling me that SSL was missing. This is needed to install some packages. So here my new method to install Python 3.6.9 on macOS Catalina:
1. Install openssl and zlib using brew.
2. Download Python 3.6.9 from the source at python.org.
3. I use this line for configure: ./configure –prefix=/usr/local/opt/python3.6 –enable-optimizations CFLAGS=”-I/usr/local/opt/[email protected]/include -I/usr/local/opt/zlib/include” LDFLAGS=”-L/usr/local/opt/[email protected]/lib -L/usr/local/opt/zlib/lib”
4. make && make install
You might want to add that this has to be run under bash as the administrator account (not root) for those of us who use tcsh (or other) as their interactive shell.
Warning: The Ruby Homebrew installer is now deprecated and has been rewritten in
Bash. Please migrate to the following command:
/bin/bash -c “$(curl -fsSL https://raw.githubusercontent.com/Homebrew/install/master/install.sh)”