

Wondering how to turn on or off File History in Windows 10?
Don’t you hate it? Unintentionally deleting the perfect, humorous paragraph you came up with in the ‘Think tank’, otherwise known as the toilet, and then accidentally saving the unwanted changes in the document?
We’ve all been there, and not everyone is aware of the fact that the Windows operating system does come with some native backup tools that can bail you out. A good example is File History.
File History takes snapshots of your files as you go, and saves them on external hard drives. Over time, File History builds up a library of the old file versions that can be recovered if required.
Moreover, this feature is customizable, which means you can enable or disable File History in Windows 10 according to your own preferences.
This guide will walk you through the steps of enabling/disabling this feature in detail.
Let’s get started.
1. Modify Windows Settings.
The good part about Windows is that it is a highly customizable operating system.
While there are several tools and programs to help you customize the system according to your preferences, Windows Settings is the easiest to use.
Here is how you can modify Windows Settings to turn on or off file history in Windows 10:
- Press Windows + I keys simultaneously to open Windows Settings.
- Select Updates & Security from the list of options available and in the next window, select Backup from the left pane.
- Now click on Add a drive. This wil display a list of both internal and external drives that can be used for File History backup. Choose the drive you want.
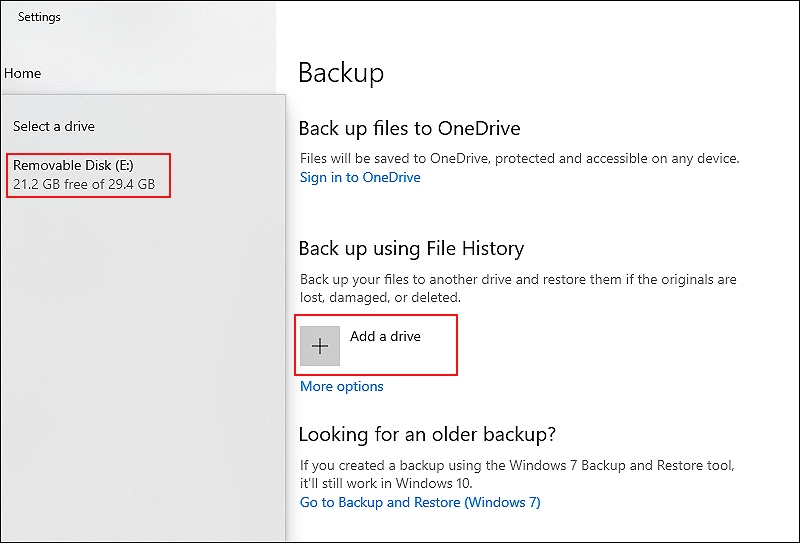
- Once done, your screen will display a toggle button for automatic backup. Turn it off or on according to your preferences. You can also click on More options to check the advanced settings.
That is it.
This should enable/disable File History successfully.
2. Make Changes in the Control Panel.
The Control Panel contains settings that control nearly everything from how your Windows looks to how it works. You can modify these settings to set Windows up in a way that is right for you.
Here is how you can use the Control Panel to enable or disable File History in Windows 10:
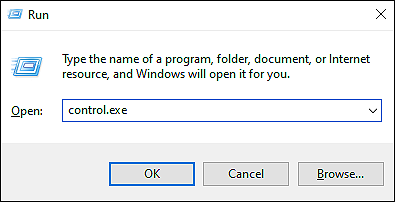
- Open a Run dialogue box by pressing Windows + R keys simultaneously.
- In the text field of the dialogue box, type ‘control.exe‘ and hit Enter. This will launch the Control Panel on your screen.
- In the search bar of the Control Panel, type File History and hit Enter.
- Locate and click on the Turn On/Turn Off button to enable or disable the File History backup.
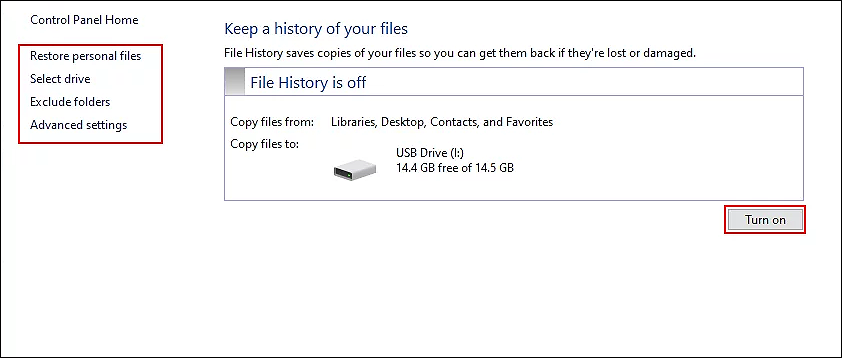
- If you want to access the additional settings for File History after enabling the feature, click on Select drive from the left panel and choose the drive you wish to back up in the next window.
- In case you want to set the backup schedule timing, click on Advanced settings from the left panel.
Hopefully, following the steps mentioned above will allow you to make the desired changes without any issues.
3. Use the Group Policy Editor.
If you’ve delved into Windows’ more technical features, you may have encountered the Group Policy Editor.
With some administrative-level programs included with Windows, you can modify your operating system to fit your needs. One of these tools is the Group Policy Editor, which allows centralized management and configuration of your operating system.
Group Policy Editor stores information about Windows applications and processes in the form of policies. By editing the relevant policies, you can make the desired changes.
Here is how you can use the Group Policy Editor to enable/disable File History:
- Open a Run dialogue box by pressing Windows + R keys simultaneously on your keyboard.
- Inside the text field of the dialogue box, type ‘gpedit.msc‘ and hit Enter. Doing so will launch Group Policy Editor on your PC.

- Once you are inside the Group Policy Editor, navigate to the location mentioned below.
Computer Configuration\ Administrative Templates\ Windows Components\ File History
- In the right pane, locate and double-click on Turn off File History.
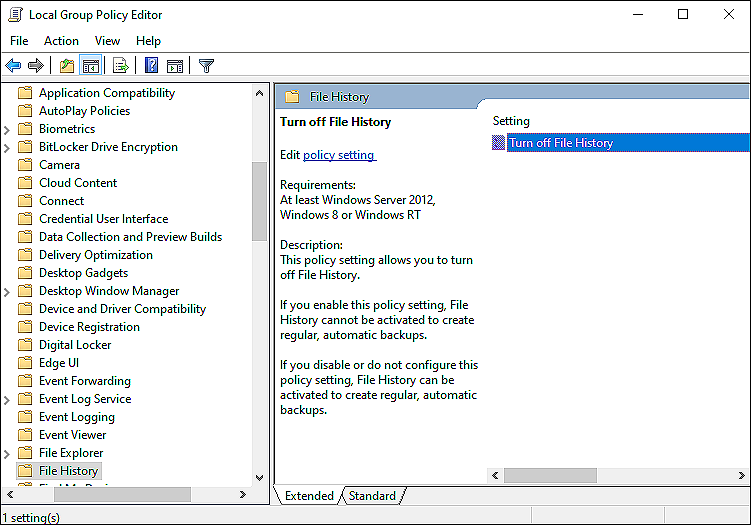
- If you want to turn the file history feature off, click on Enabled. To enable it, click on Disabled.
- Finally, click Apply/OK to save the changes.
Using the Group Policy Editor will allow to enable/disable File History on your computer easily.
4. Try Using CleanMyPC.
If none of the suggested solutions work for you, your system may be infected with a bug or a corrupt file, which is hindering your system’s functionality. In this case, the best course of action would be to remove the junk files before you attempt troubleshooting.
This job can be best performed using an efficient PC cleaner, and if you want a recommendation, we like CleanMyPC.

In addition to removing clutter, CleanMyPC provides a range of system-maintenance tools designed to sort out a variety of PC problems. Upon installing the tool and running an initial scan, it automatically identifies and fixes problems without requiring extensive user input.
It is also quite easy to use, so even if you have never used a PC cleaner before, you will have no problem using CleanMyPC!
5. Use Windows Registry.
Another administrative-level tool that lets users customize the way their operating system works is the Windows Registry.
Register keys hold the information in Windows Registry, and Windows uses the information in the Registry to carry out specific tasks.
Here is how you can use Windows Registry to enable or disable File History in Windows 10:
- Open a Run dialogue box by pressing Windows + R keys simultaneously on your keyboard.
- Inside the text field of the dialogue box, type ‘regedit‘ and hit Enter. Doing so will launch Windows Registry on your PC.

- Once you are inside the Windows Registry, navigate to the location mentioned below.
HKEY_LOCAL_MACHINE\Software\Policies\Microsoft\Windows\FileHistory
- If you cannot locate the FileHistory key, right-click on the Windows key and select the New > Key option.
- Name this newly created key as FileHistory and click on it.
- Now right-click anywhere in the right pane and select the New > DWORD (32-bit) Value option.
- Name this newly created value as Disabled and double-click on it.
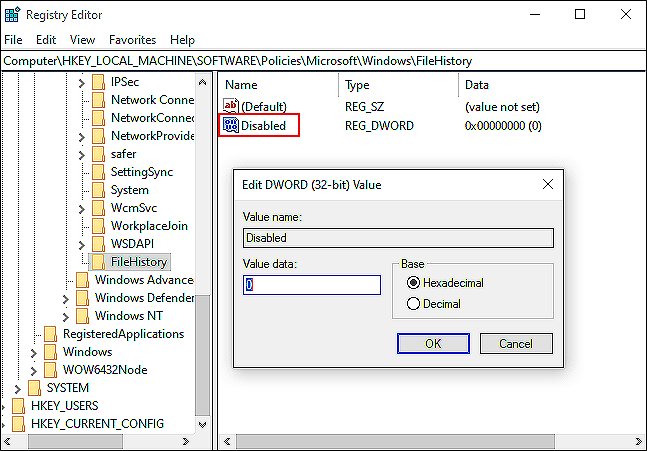
- If you want to disable the file history feature, type 1 under Value data and hit Enter. To enable it, type 0 under Value data and hit Enter to save the changes.
As simple as that!
You can always revert the changes to default settings by deleting the key we created in the steps above.
This brings us to the end of our guide on enabling/disabling File History Windows 10. We tried walking you through all the steps in detail and hope that one of the methods mentioned above did the trick for you. In case you still have any confusion about the methods, please let us know in the comment section below!
If this guide helped you, please share it. 🙂
