

With Microsoft now completely stopping support for Windows 7 once and for all today (14th January 2020 as of the time of writing), it’s vital to understand that continuing on a virtual machine that runs Windows 7 can expose the security of your system just as much as using a machine that runs Windows 7.
The end of support for Windows 7 brings instability to the Office apps as stated by Microsoft in this FAQ thread, and also further prolonging the transition to Windows 10 will only make this harder to rectify since there are no more security updates. So to get the smoothest user experience as possible when trying to set up a Windows virtual machine with VMware, it’s best to upgrade Windows 7 to Windows 10.
This guide will go over how you can upgrade Windows 7 to Windows 10 in VMware step-by-step.
What you’ll need
- Your PC or Mac running VMware with Windows 7
- Made a backup of your Windows 7 virtual machine. This is a recommendation by VMware themselves. We have attached here the complete Virtual Machine Backup Guide provided by VMware (.PDF) for reference until we publish a full guide on the topic soon, which you can subscribe to be notified. 🙂
Without further ado, let’s dive right in. 🙌
How to Upgrade Windows 7 to Windows 10 in VMware: 9 Steps
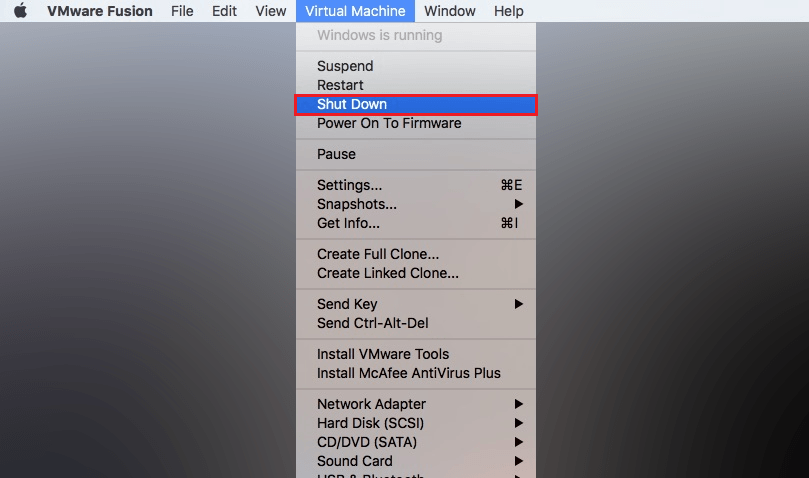
- Firstly, go ahead open up VMware and make sure that you Shut down any running virtual machine. Take note that you do NOT Suspend the virtual machine.
VMware Fusion on Mac Systems
VMware Workstation on Windows/Linux Systems
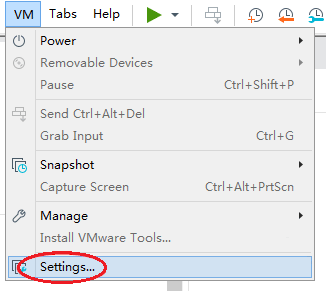
- Now depending on which VMware you have — VMware Fusion or VMware Workstation the following are the steps to change the settings of the OS type for the virtual machine from Windows 7 to Windows 10. This only involves changing the virtual machine properties so that we can then proceed to upgrade to Windows 10 later from Steps 3 to 6 (below).
- If you’re on VMware Workstation, then click on your VM menu > Settings > Options > change the Guest operating system version from Windows 7 to Windows 10 or Windows x64. Don’t know which to decide between Windows 10 or Windows 10 x64? Read more here.
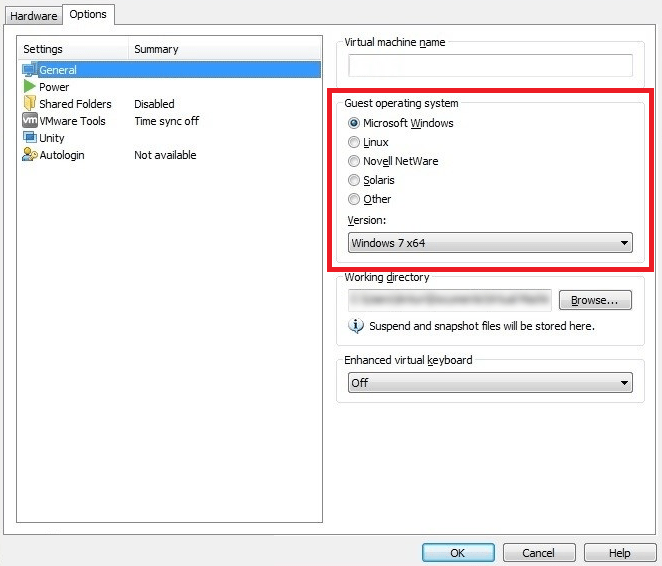
- If you’re on VMware Fusion, then click on your Virtual Machine menu > Settings > General > change the OS Type from Windows 7 to Windows 10 or Windows x64. Again, don’t know which to decide between Windows 10 or Windows 10 x64? Read more here.
Help! I cannot find Windows 10 from the list of operating systems to choose from?
If you cannot find Windows 10 from the available list of operating systems to upgrade to, then you will need to make sure that you’re running the latest versions of VMware Workstation or VMware Fusion, respectively. Make sure to upgrade your VMware first, then come back to Step 2 above and try again.
FAQ: What is the difference between Windows 10 and Windows 10 x64 versions in VMware?
Windows 10 is the 32-bit version, whereas Windows 10 x64 is as its name suggests the 64-bit version. Choosing the 32-bit version will work most architectures as it is the standard de-facto for most users. Windows 10 x64 is more performant and can provide better performances at higher RAM. This is just a simplistic look into the differences between the two, but we do suggest going through this excellent rundown done by GroovyPost.
- Once you’ve done the above, go ahead and power on your virtual machine.
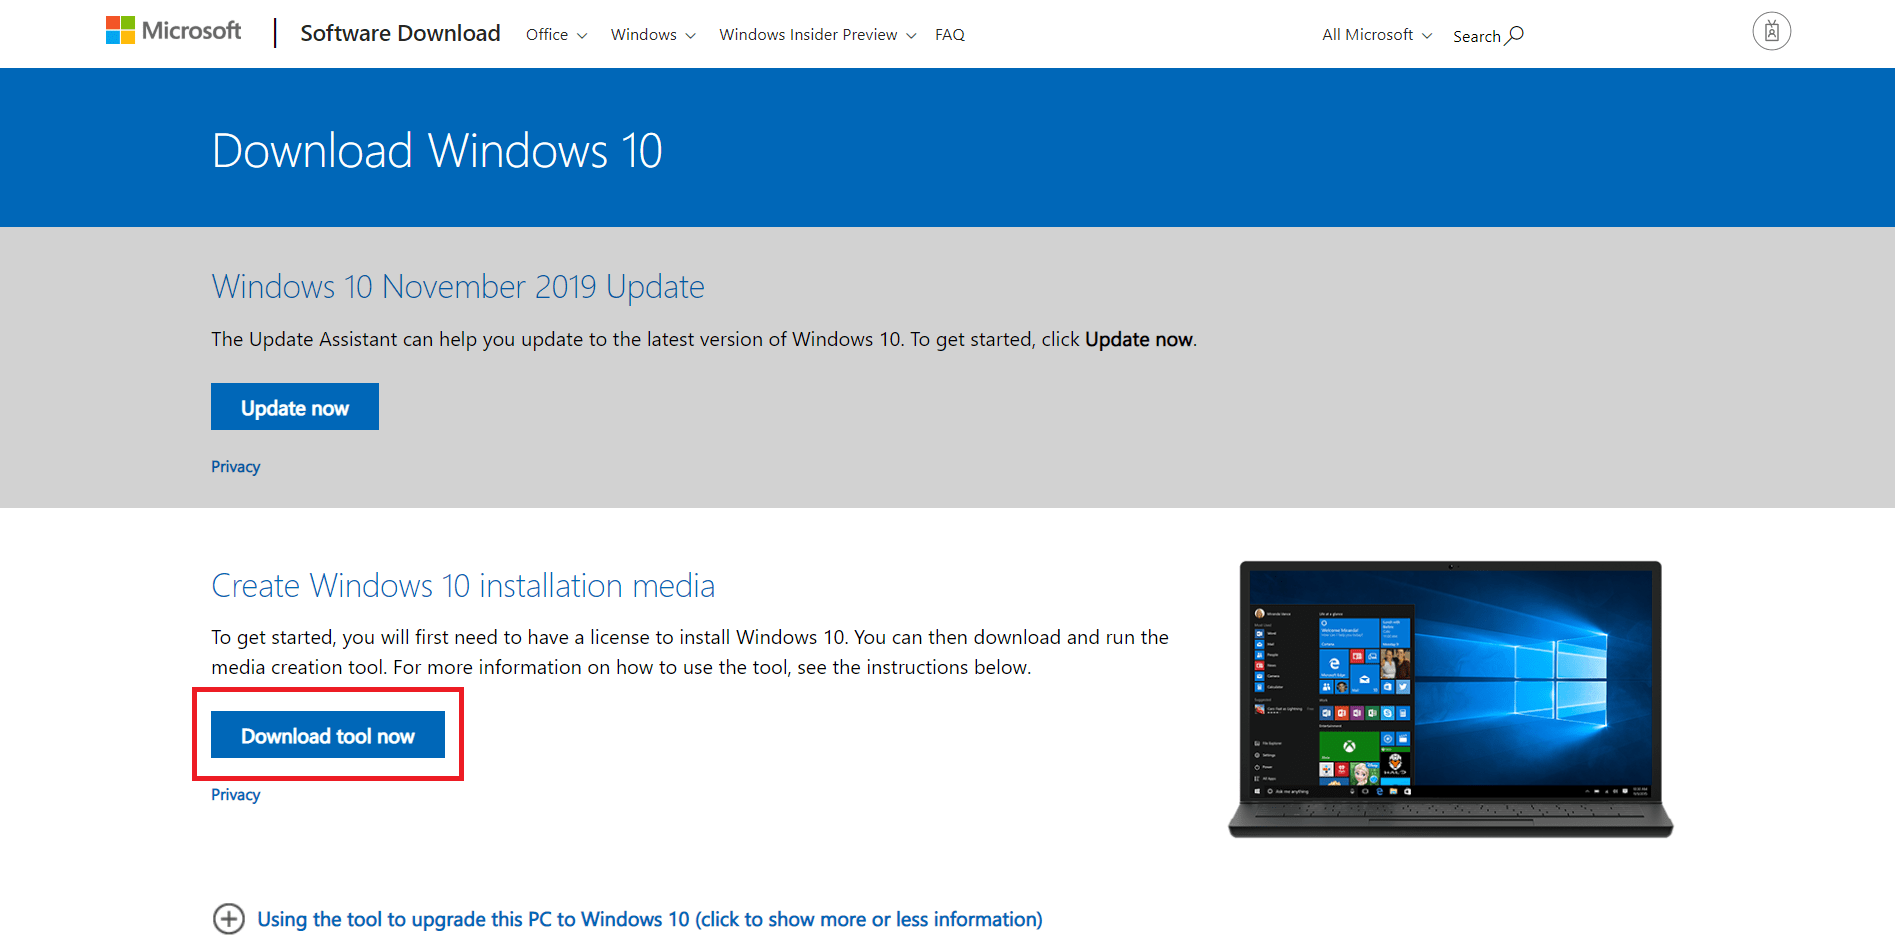
- What you will want to do is visit the official Microsoft Windows 10 Downloads page and then hit the Download tool now button to begin downloading Windows 10 installation media. This will proceed to download the Media Creation Tool, which we will need to upgrade Windows 7 to Windows 10.
- Now, once the Media Creation Tool is downloaded, go ahead and double-click on the MediaCreationTool.exe that is downloaded to launch the Windows 10 setup wizard. You must choose the appropriate version and edition of Windows 10 (32 or 64-bit) based on what you’ve selected in Step 2 (above).
- Accept the licensing terms and select the Upgrade this PC now option.

- You will also need a Windows 10 Product key during the upgrade process, which we will leave up to you. We have written a guide on every possible (legal) ways to get Windows 10 for free, although it is a little outdated it may help provide some ideas. 🙂
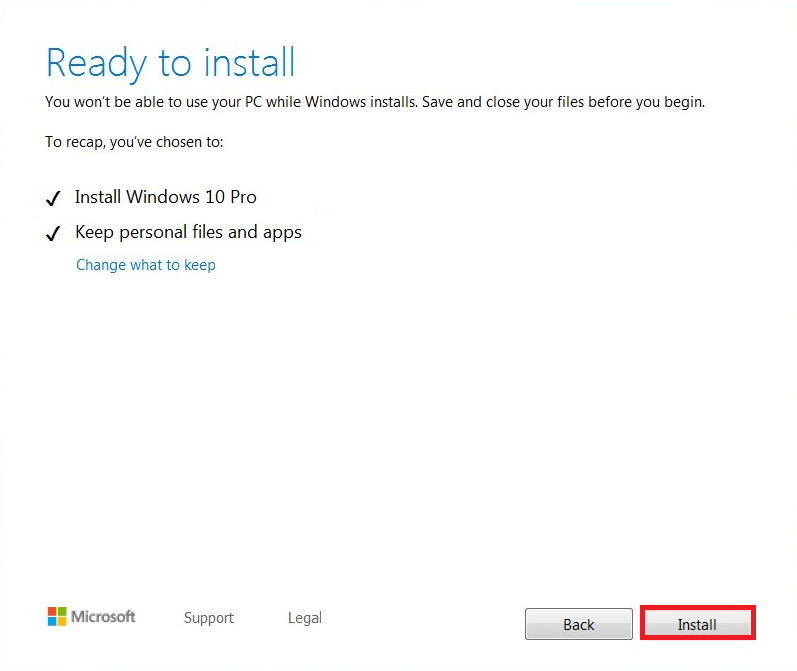
- Complete the Windows 10 installation by hitting Install.
- Lastly, you may go ahead and install the VMware Tools, which you may need on your newly upgraded Windows 10 virtual machine.
That’s pretty much it! 👍
Alternatively – Upgrade Windows 7 to Windows 10 in VMware using .iso Image
You have the alternative option to upgrade your Windows 7 virtual machine to Windows 10 using a .iso image. Make sure that you also have the Windows 10 product key with you too!
Here’s how you can upgrade:
- First and foremost, you will want to mount the Windows 10 .iso image file in your VMware. Now the steps to mount is different for both VMware Workstation and VMware Fusion respectively:
- If you’re on VMware Workstation, then select VM > Settings > CD/DVD drive > select Use. iso image and choose your Windows 10 .iso file. If the Autoplay process doesn’t begin automatically, then double-click on CD-ROM from This PC shortcut on the left-hand side of your File Explorer.
- If you’re on VMware Fusion, then select Virtual Machine > Settings > CD/DVD drive > Choose Disc (or Disc Image) > select your Windows 10 .iso file. Take note that your .iso file name should look similar to “Win10_English_x64.iso” just in case you do not go ahead and mount the wrong file.
- Go ahead and proceed with the Windows 10 installation process and lastly hit Install to complete.
- Lastly, you may go ahead and install the VMware Tools, which you may need on your newly upgraded Windows 10 virtual machine.
And you’re done! 👏
We hope that this guide has helped show and explain how to upgrade Windows 7 to Windows 10 in VMware duly. If you have questions, please feel free to leave a comment below, and we will love to help you out. ❤
If this guide helped you, please share it. 🙂

Thanks massively. A perfect guide. As a Mac user doing anything with Windows is a real pain, but this was very straightforward.