

Need to fix WiFi showing Limited Access on Windows 11?
Many users have encountered the WiFi showing Limited Access issues when updating to or installing the new Windows 11. This problem often frustrates individuals as it prevents them from accessing various websites. Moreover, even restarting the PC doesn’t fix this issue.
Usually, WiFi showing Limited Access on Windows 11 is due to several reasons, such as an outdated driver or any other issue within the network adapter. Although with help of some troubleshooting methods, you can quickly gain unlimited access to your network connection. This guide contains an in-depth review of these various fixes.
So, let’s get started!
What is Limited Access?
If your WiFi is showing “limited access”, it basically means you’re connected to a local network, but cannot access the internet. So, your PC is detecting a network but is unable to receive signals from it to access the internet.
This error usually occurs when the request for an IP address from your computer is denied. Some causes of WiFi showing limited access on Windows 11 can be a faulty internet connection or messed up DNS and gateway settings.
Now, let’s dive into some methods for fixing this error!
1. Toggle Airplane Mode On & Off.
The most basic method to deal with internet problems is to turn Airplane mode on and off. This re-enables all network services on your device giving them a quick refresh.
Here’s how to do it on your Windows 11 PC:
- Click on the Action Center at the right end of the taskbar.
- Then, click on Airplane Mode to turn it on.
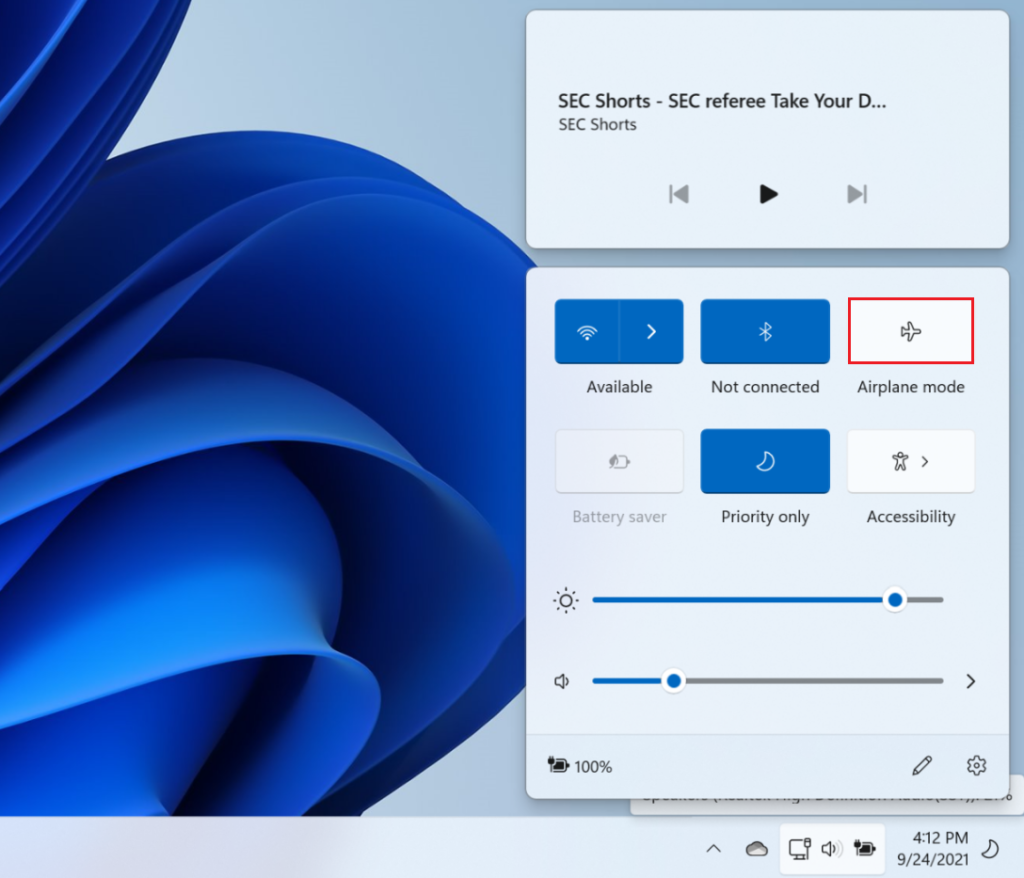
- Wait for a few seconds, then click on it again to turn it off.
This should fix the WiFi showing limited access on Windows 11 issue.
2. Reconnect to WiFi Network.
Your WiFi could also be showing Limited Access if there’s a miscommunication between the WiFi router and your computer. In such instances, forgetting the network and reconnecting to it may work.
Follow the steps below to do it:
- Go to the Action Center from the end of the taskbar.
- Click on the WiFi icon.
- Then, right-click on the WiFi network and select Forget from the options.
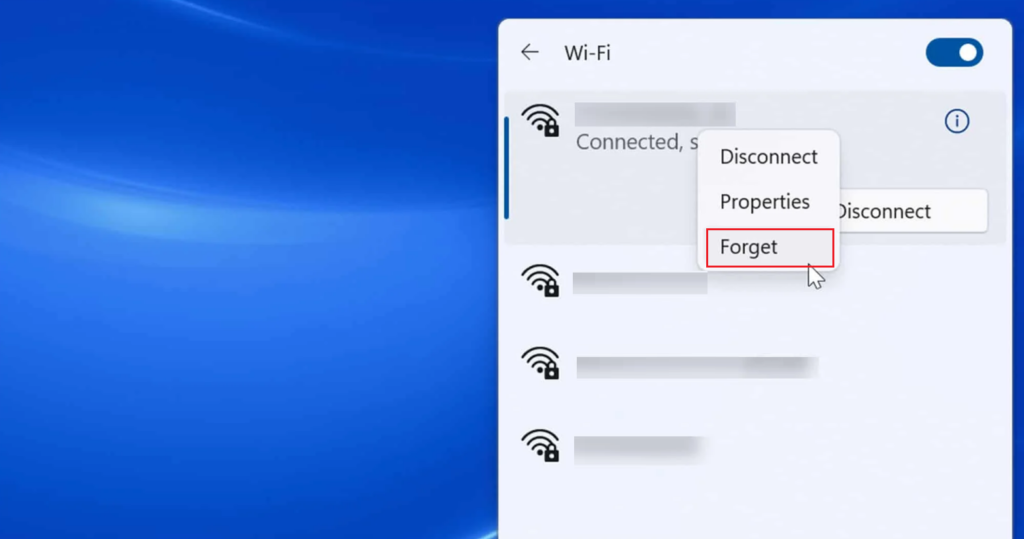
- However, this network will remain on the search list. So, double-click on its name.
- Next, type in the password and click on the Connect option.
Once done, check if the WiFi is still showing limited access. If so, head over to the next method below to resolve your problem.
3. Restart WiFi Adapter.
If the problem is still not resolved by now, it’s about time we dive into some serious fixes. At times, your network drivers may encounter an issue due to which you’re getting WiFi showing Limited Access on Windows 11. Disabling and re-enabling it can fix the issue most of the time.
Here’s how to do it:
- Press the Windows + X shortcut keys to open the Quick Link menu.
- From the list, select Device Manager.
- Then, go to Network Adapters and expand it.
- Right-click on your device and select the Disable device option.
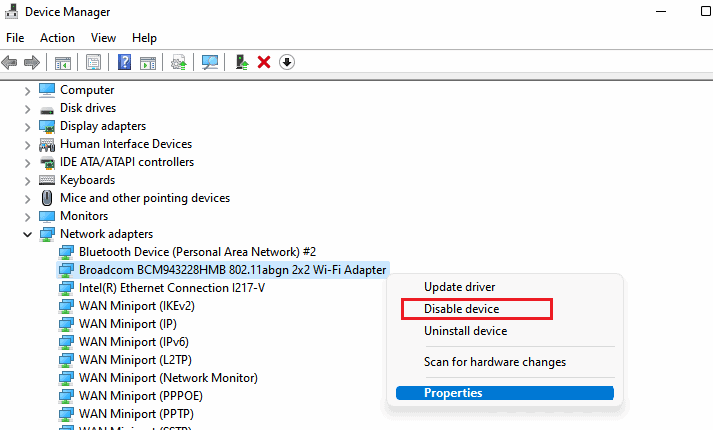
- If a confirmation box appears, click on Yes.
- Wait for a few moments, then right-click on your adapter again and select Enable device.
Once done, the WiFi showing limited access on Windows 11 issue should be fixed.
4. Repair the WiFi Driver.
If the previous method wasn’t successful in your case, it might be that your computer’s drivers are damaged and require repair to work again.
Reinstalling is a common way to repair damaged drivers. However, if the issue occurs due to outdated drivers, then you’ll need to update them to the latest available build. Not to mention that upgrading drivers when their newer build is incompatible may also result in various issues for which you’ll need to roll them back to the previous version.
Follow the steps below:
- First, go to the Start menu and search for Device Manager.
- Click on Device Manager from the results.
- Then, double-click on Network adapters to expand it.
- After that, right-click on your wireless adapter and select Properties from the menu.
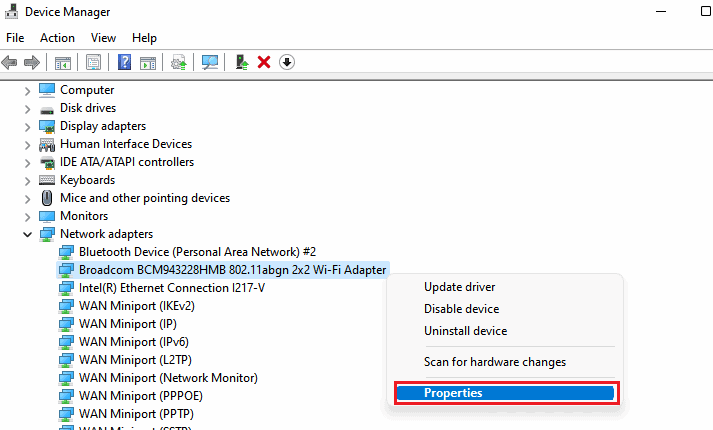
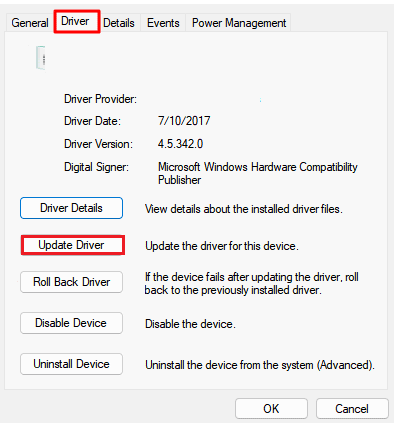
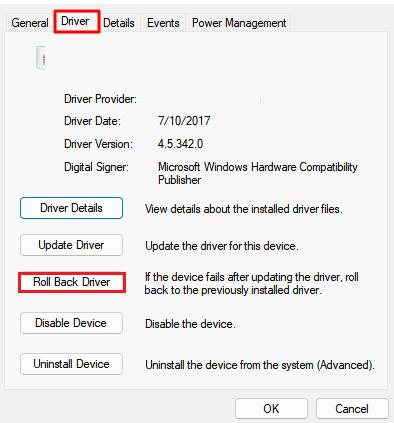
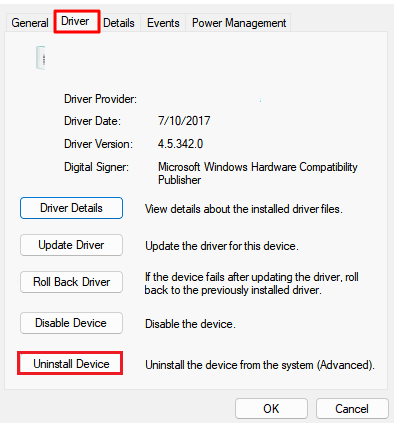
- Once the window opens, go to the Driver tab.
- To update the driver, click on Update Driver, then click OK.
- To roll back the driver, click on Roll Back Driver, then click OK.
- Similarly, to uninstall the driver, click on Uninstall Driver, then click OK. The driver will automatically reinstall upon the next boot-up.
After you boot up your Mac, check if the limited access error is still there. If yes, consider running a Windows Troubleshooter to solve your problem by following the steps below.
5. Run Windows Troubleshoot.
Windows has in-built troubleshooters that can diagnose and fix issues automatically for the most part. So when you’re encountering WiFi showing Limited Access on Windows 11, run the scan and let the troubleshooter do its work.
Use the instructions below to do so:
- Launch Search from the taskbar.
- Type Troubleshoot and click on it from the results.
- Next, choose Internet Connection and click on Run the troubleshooter.
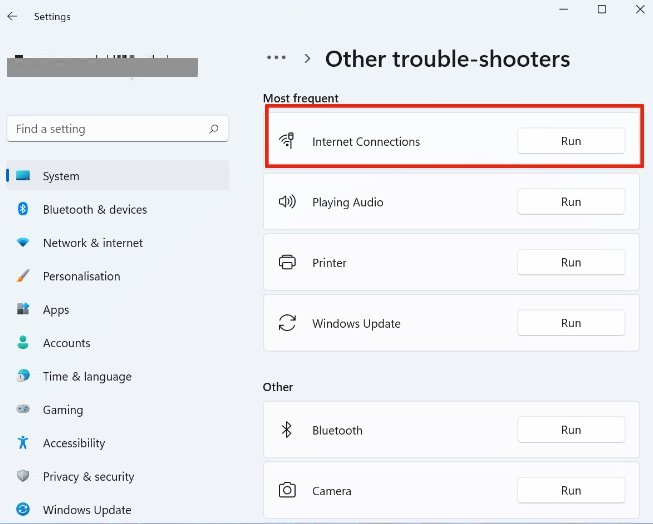
- Follow the on-screen instructions to continue.
This should solve the WiFi not showing limited access on Windows 11. Otherwise, proceed to the next method.
6. Renew IP Address.
Incorrect Internet Protocol configuration is another reason for WiFi Limited Access on Windows 11. One way to go over this is to release your current configuration and renew its instance.
Here’s how it’s done:
- Launch the Start menu and type cmd in the search bar.
- Click on the application from the results to open it.
- Then, copy and paste the following command:
ipconfig /release- After that, paste the command below to renew the IP address:
ipconfig /renewAfter the IP address is renewed, the WiFi should work perfectly without showing the limited access error.
7. Disable Auto-Tuning.
Auto-tuning improves the performance of certain programs when sending TCP data over a network connection. Unfortunately, its default configuration is not optimized for all network types, hence why you could be experiencing issues with your WiFi because of this. Disabling this feature might help you regain the lost connection.
Below are the steps you must follow:
- In the Windows Taskbar Search, type cmd.
- From the results, right-click on Command Prompt and select Run as administrator.

- Then, copy and paste the following commands one by one:
netsh int tcp set heuristics disablednetsh int tcp set global autotuninglevel=disablednetsh int tcp set global rss=enabled8. Change DNS.
When your ISP fails to keep its DNS servers up and running, you’ll experience slow internet performance. To check whether your ISP is the reason behind your WiFi showing Limited Access on Windows 11, changing your DNS is a good option. Your computer will still load websites while using a different DNS address.
Here’s what you need to do:
- Press the Windows + R shortcut keys to launch the Run dialog box.
- In the text bar, type ncpa.cpl and click on the OK button.
- After that, right-click on your adapter and choose Properties from the list of options.
- Under the Networking tab, locate Internet Protocol Version 4 (TCP/IPv4) and double-click on it.
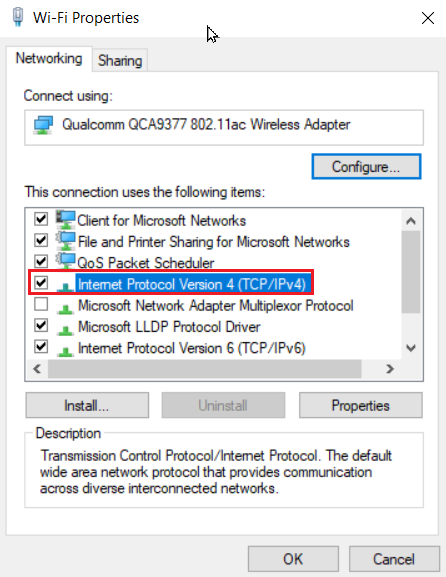
- Then, click on the Use the following DNS server addresses option.
- Type in the digits 8.8.8.8 for Preferred DNS Server and 8.8.4.4 for Alternate DNS Server.
- At last, click on OK.
Now, head over to the WiFi from the taskbar, and it should say ‘connected’ instead of ‘limited access.’
9. Reset TCP/IP.
TCP/IP is responsible for governing your computer’s connection to the internet. Any issue in this network suite would cause your computer’s connection to fail. The only way to resolve this issue is to reset the TCP/IP.
Follow the steps below to do so:
- First, go to the Start menu.
- Search for cmd in the search bar.
- Click on the Command Prompt to launch it.
- Then, type in the following command to reset TCP:
netsh winsock reset catalog- After that, paste the following command to reset the 32-bit IP address:
netsh int ipv4 reset reset.log- Next, copy and paste the command below to reset the 128-bit IP address:
netsh int ipv6 reset reset.logAfter resetting the TCP, the limited access issue on your Windows 11 should be solved.
Conclusion
The WiFi showing limited access occurs when your computer is connected to a network but cannot access the internet. This may be due to an IP address conflict or some issue within the router settings.
Simply restarting the device or setting up a password for your account can help resolve this issue. However, if the error still resides, contact your ISP.
This concludes our guide on how to fix WiFi Showing Limited Access on Windows 11. For more questions, head over to the comment section below. We’ll be happy to provide further assistance on the matter.
If this guide helped you, please share it. 😊
