

Wondering as to why Windows Defender threat service has stopped working on Windows?
Windows Defender might not be as good as most premium antivirus software. Still, it does offer some decent cybersecurity protection and is a good way to keep your Windows safe.
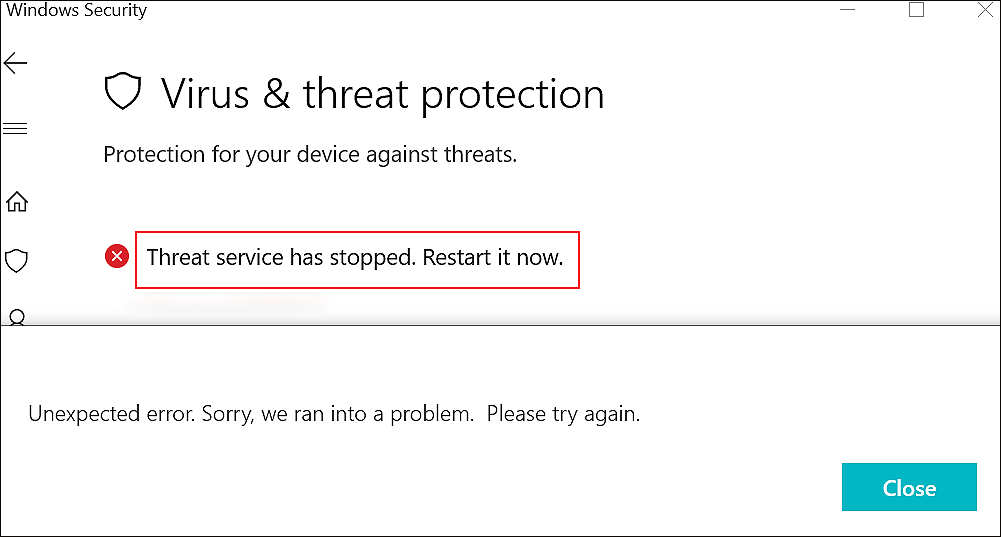
However, recently it was brought to our attention that several users are facing the ‘Windows Defender threat service has stopped’ error code on their PC. The error code asks the users to restart Windows Defender but doing so doesn’t work either.
We looked into this issue and found out that this issue can be caused by several reasons, including outdated Windows and corruption errors.
If you have been facing a similar issue, we got you covered.
In this guide, we have listed some of the most effective solutions that will help you resolve the issue in no time.
Let’s dive right into it!
1. Enable Windows Defender in Registry.
If the Windows Defender Threat Service has stopped working on your Windows, then one of the easiest ways to resolve the issue is by making changes in the Windows Registry.
Windows Registry stores low-level information about the operating system and its related services. This tool is designed for advanced users, and it allows them to tweak Windows operations according to their requirements.
In this method, we will be checking if a Registry value is causing the issue at hand and then attempt to resolve it. However, we highly recommend following the steps mentioned below carefully as a slight error can cause serious issues within the operating system.
Here is all that you need to do:
- Open a Run dialogue box by pressing Windows + R keys simultaneously.
- Type ‘regedit’ in the text field of the dialogue box and hit Enter.

- Doing so will launch Windows Registry. Now navigate to the location mentioned below.
HKEY_LOCAL_MACHINE\SYSTEM\CurrentControlSet\Services\WinDefend
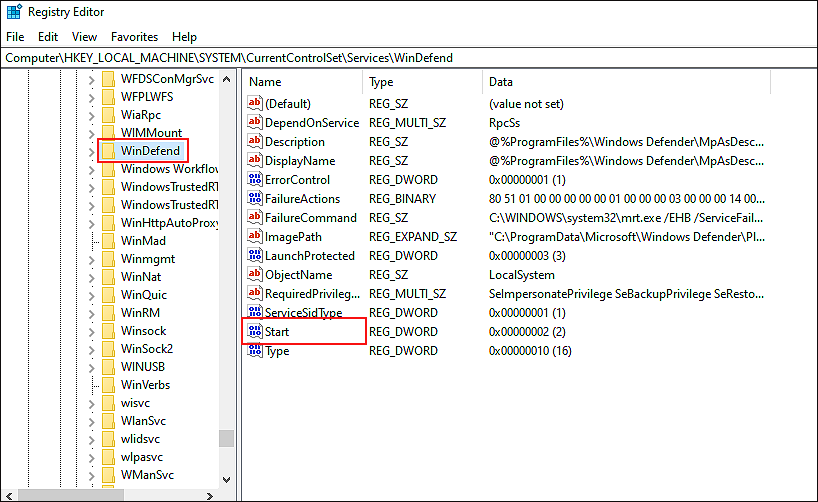
- In the right pane, double-click on Start, and under Value Data, type 2.
- Click on OK to save the changes and then restart your PC.
Hopefully, doing so will resolve the Windows Defender error.
However, if the error persists, then try the steps mentioned below.
Here is what you need to do:
- Open a Run dialogue box by pressing Windows + R keys simultaneously.
- Type ‘regedit’ in the text field of the dialogue box and hit Enter.
- Doing so will launch Windows Registry. Now navigate to the location mentioned below.
HKEY_LOCAL_MACHINE\SOFTWARE\Policies\Microsoft\Windows Defender
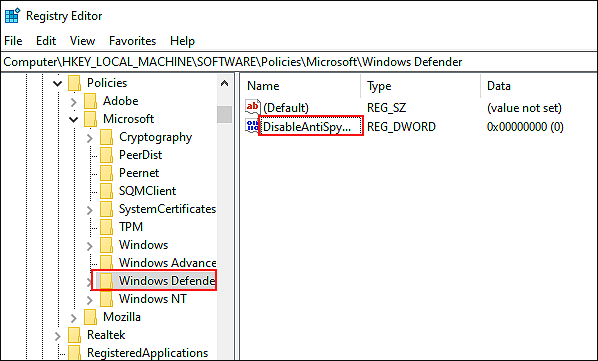
- Locate the DisableAntiSpyware on the right-pane and double-click on it. You can now jump to the 7th step directly.
- If you cannot locate it, then right-click on the Windows Defender folder in the left pane and select New.
- Now click on DWORD (32-bit) Value and name this new key as DisableAntiSpyware.
- Now double-click on this new value and under Value data type 0.
- Once done, click on OK to save the changes and close Windows Registry.
- Finally, restart your PC and check if the issue is resolved.
Windows Defender should work fine after you reboot your PC.
2. Use Group Policy Editor.
Like the Windows Registry, Group Policy Editor is also an administrative-level tool used by advanced users to make Windows operations changes according to their requirements. It helps the users control the Windows working environment as they can perform operations like restricting someone’s access to a specific folder, locking down the computer, and much more.
Here is how you can use the Group Policy Editor to resolve the Windows Defender error on your PC:
- Open a Run dialogue box by pressing Windows + R keys simultaneously.
- Type ‘gpedit.msc’ in the text field and hit Enter.
- Doing so will launch the Group Policy Editor. Now navigate to the location mentioned below.
AdministrativeTemplates/Windows Components/Windows Defender Antivirus

- In the right pane, locate Turn off the windows defender antivirus and click on it.
- Now click on Non-Configured and click on OK to save the changes.
- Finally, restart your PC and check if the issue is resolved.
If the error was caused due to the Group Policy Editor settings, changing them will resolve it.
3. Run DISM and SFC Scans.
There are times when our Windows get infected by a corruption error or bug within the operating system.
Luckily, Windows comes with several troubleshooting utilities that can be used to eliminate these errors. In this method, we would be using the Deployment Image Servicing and Management (DISM) tool and System File Checker (SFC). DISM tool will scan your system for issues, and if any problems are found, it will fix them automatically.
Similarly, SFC will check all the system-protected files, and if it detects any issue, it will resolve them.
Here is how you can run a DISM and SFC scan on your PC to resolve the Windows Defender issue:
- Type cmd in the search field of the taskbar and click on Run as administrator.
- Inside the Command Prompt window, type the command mentioned below and hit Enter.
DISM.exe /Online /Cleanup-image /Restorehealth
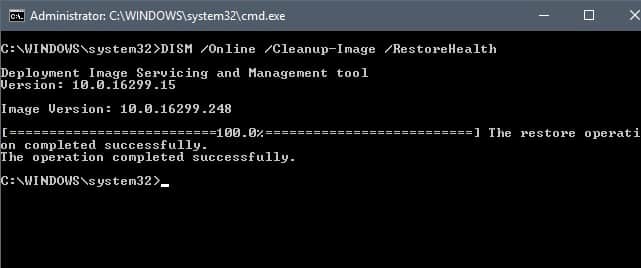
- Once this command is executed, enter the command mentioned below and hit Enter.
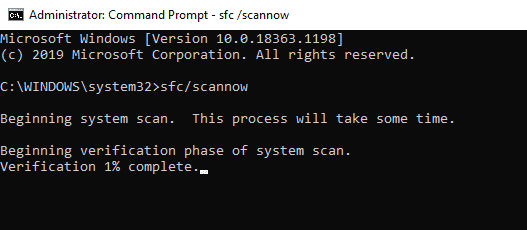
sfc /scannow
- Once done, restart your PC.
If a corruption error within the system was causing the issue, running DISM and SFC scans will hopefully resolve it. If you are still facing the issue, we have listed another easy way to eliminate the bugs and corrupt system files in the 5th Method. Don’t forget to check it out!
4. Restart the Security Center Service.
If the Security Center Service is disabled or not working properly in your Windows, then you will not be able to use the Windows Defender.
If you haven’t been able to resolve the issue by our troubleshooting methods mentioned above, then maybe it’s the Security Center Service causing the issue. In this case, we recommend restarting the service, as doing so will help you fix the problem.
Here is what you need to do:
- Open a Run dialogue box by pressing Windows + R keys simultaneously.
- Type ‘services.msc’ in the text field of the dialogue box and hit Enter.
- Doing so will launch the Services window. Now locate the Security Center in the list of services available and right-click on it.

- Choose Restart and then reboot your PC. If the Restart option is greyed out, click Refresh.
If there was an issue within the Security Center service, then restarting it will resolve the issue. You should now be able to use Windows Defender without any issues.
5. Try Using CleanMyPC.
When was the last time you deep cleaned your PC and eliminated all the junk files? If it’s been long enough, then now might be the right time to do so as these corrupt files have the potential to wreak havoc in your system. Moreover, there is also a high chance that these junk files are preventing Windows Defender from working correctly.
The best way to get rid of these files and the issues caused by them is to deep clean your PC using a reliable PC cleaner.
PC cleaners generally are more efficient and can not just do the cleaning job faster but better too. We recently tested some of the top-rated online cleaners and found CleanMyPC to be the best.

CleanMyPC comes with a wide range of system maintenance tools that can take care of everything from the junk files to the slow speed and sluggish performance of your system. All that you need to do is run a scan using CleanMyPC. It will detect the issues within minutes and attempt to resolve them with little to no user input.
Install CleanMyPC now and give your PC a much-needed performance boost!
6. Repair Windows With In-place Upgrade.
If none of the methods mentioned above has worked for you, this implies that the corruption error infecting your operating system cannot be resolved using the conventional troubleshooting methods.
In this scenario, we encourage you to perform an in-place upgrade, as it will repair all the issues within the Windows without damaging any of your files.
Here is what you need to do:
- Download Media Creation Tool.
- After successful installation, open the app and click on Upgrade this PC now.
- Follow the instructions on the screen.
- In the Ready to Install window, select the items you want to keep on your PC after installation.
- Click Next and follow the instructions visible on the screen to start Windows installation.
That’s it.
This should resolve the issue once and for all.
This wraps up our guide on fixing the Windows Defender Threat Service has stopped error on Windows. We hope that one of the troubleshooting steps did the trick for you. If you have any questions regarding the methods, please let us know in the comment section below. We will try to assist you as much as we can!
If this guide helped you, please share it. 🙂
