

Is the Windows Snipping Tool shortcut not working on your PC?
Using the Windows Snipping Tool is one of the easiest ways to take and annotate screenshots of all or parts of your screen. You can capture an entire window, a small part of your screen, or draw on the screen and capture only one uniquely shaped part of the screen.
Moreover, you do not have to go through the tedious process of opening the tool every time you want to capture a screenshot, thanks to the Snipping Tool shortcut.
Recently, some users reported that the Windows Snipping Tool shortcut is not working on their PC. If you find yourself in a similar situation and cannot use the shortcut key, you’re in the right place.
This guide will walk you through the process of fixing the issue on your PC in a few simple steps.
Let’s get started.
- 1. Relaunch the Snipping Tool.
- 2. Run an SFC Scan.
- 3. Check Shortcut Key Properties.
- 4. Identify and Remove the Conflicting Program.
- 5. Reset Snip & Sketch Application.
- 6. Use Windows Registry.
- 7. Disable Focus Assist.
- 8. Try Using CleanMyPC.
- 9. Use the New Snip & Sketch Tool.
1. Relaunch the Snipping Tool.
If the Windows Snipping Tool shortcut is not working, the first thing you should try is relaunching the Snipping Tool.
Most of the time, programs such as the Snipping Tool fail to respond because of a temporary bug within the application. You can resolve this issue easily by relaunching the Snipping Tool.
Here is what you need to do:
- Type Task Manager in the search bar and click Open to launch the Task Manager window.
- Locate the Snipping Tool and right-click on it.
- Select End task.
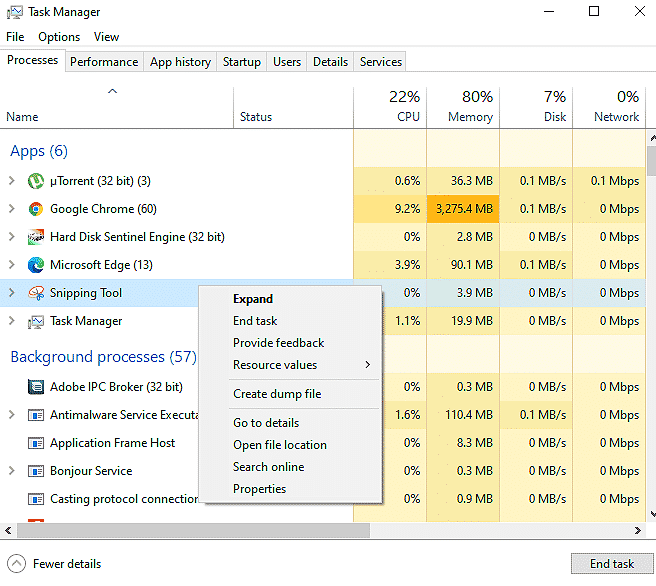
- Once done, click on File at the top-left corner of the window and select Run new task.
- Type ‘snippingtool.exe’ in the Create new task window and hit Enter.
That’s it. Doing so will relaunch the Snipping Tool, and hopefully, the error will be resolved.
2. Run an SFC Scan.
Windows programs are prone to errors, and their developers acknowledge it. If you have been using Windows for quite some time now, you might have come across troubleshooting utilities such as System File Checker (SFC), Windows Troubleshooter, and Deployment Image Servicing and Management (DISM).
These tools identify the system’s errors and attempt to fix them automatically, with little to no user input.
If the Windows Snipping Tool shortcut is not working on your PC, we recommend running an SFC scan. System File Checker (SFC) will scan through the system’s protected files and fix corruption errors if found.
Here is how you can run an SFC scan:
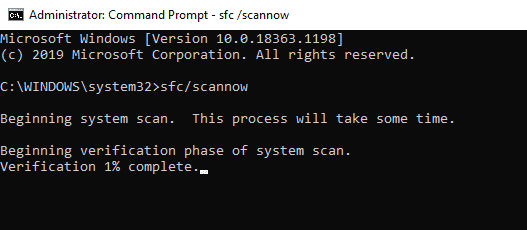
- Type cmd in the search bar and click on Run as administrator to launch elevated Command Prompt.
- Inside the Command Prompt window, type the command mentioned below and hit Enter to execute it.
sfc /scannow
- If the System File Checker detects issues, it will resolve them. Once the scan is completed, open a Run dialogue box by pressing the Windows + R keys simultaneously.
- Type ‘snippingtool.exe’ in the text field and click on OK to check if running an SFC scan resolved the error.
If a corruption error was causing the issue, running an SFC scan will fix it. However, if the Windows Snipping Tool shortcut is still not working, try running a DISM scan. Running DISM scans typically fix the issues which the System File Checker (SFC) cannot.
3. Check Shortcut Key Properties.
If the Shortcut key settings are set to ‘None’ in your Windows Snipping Tool, you will be unable to use it on your PC.
If you face the Snipping Tool error on your PC, we suggest checking the Shortcut key properties and making the necessary changes.
Follow the steps mentioned below to check and adjust the Shortcut key properties:
- Type Snipping Tool in the search bar and click on Open file location.
- Locate the Snipping Tool from the list of programs available on the screen and right-click on it.

- Select Properties.
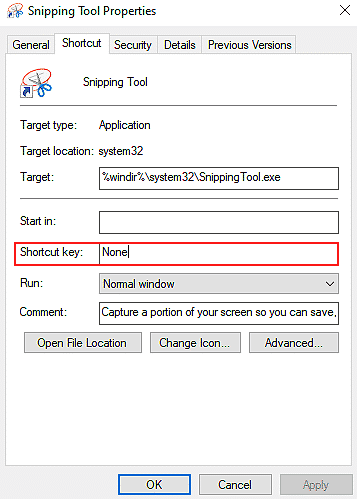
- Inside the Properties window, click on the Shortcut tab.
- Locate the Shortcut key and check the text field against it. If the text field contains ‘None’, remove it and press any key from on your keyboard to set it as a Shortcut key.
- Finally, click Apply and check if the issue is resolved.
By setting a Shortcut key, the issue will resolve on your PC. However, if a Shortcut key was already set, proceed to the next troubleshooting method below.
4. Identify and Remove the Conflicting Program.
There is a high chance that one of the programs installed on your PC is preventing the Snipping Tool shortcut from working properly. In this case, we recommend starting your PC in a clean boot state. A clean boot will help you identify the problematic app. You can then remove it manually.
Follow the steps mentioned below to remove the conflicting program from your PC:
- Start your system in a Clean Boot state and check if the Snipping Tool works fine. If you don’t face any issues while using the Snipping Tool, follow the steps mentioned below.
- Now begin enabling the apps one by one that you disabled during the clean booting of the system. The best way to identify the conflicting application is to look for the apps you recently installed. For instance, if you cannot use the Snipping Tool shortcut since the morning, check for the apps you installed yesterday or the day before.

- If you face the Snipping Tool error again after enabling a particular application, now is the time to uninstall it.
- To uninstall the faulty application, press Windows + R keys simultaneously to open a Run dialogue box.
- Type ‘appwiz.cpl’ in the text field and hit Enter.
- Inside the Programs and Features window, locate the conflicting application and uninstall it.
Hopefully, after uninstalling faulty applications, you will not face issues while using the Snipping Tool shortcut again.
5. Reset Snip & Sketch Application.
Another easy yet effective method to resolve the Snipping Tool shortcut issue is to reset the Snip & Sketch application on your PC. If you do not already know, Snip & Sketch application is the successor of Snipping Tool in Windows. If you do not have the Snip & Sketch application on your PC, you can skip this method.
Resetting the Snip & Sketch application will revert the tool to its default settings and resolve the error in the process.
Don’t worry. The process is not as complicated as it sounds.
Here is all you need to do:
- Open Settings and click on Apps.
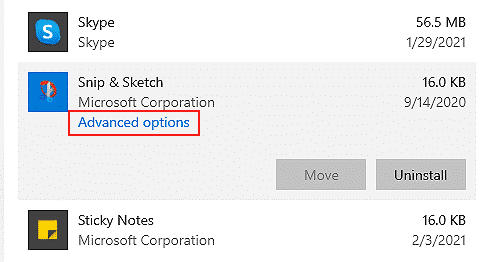
- Select Apps and features from the left panel, and locate Snip & Sketch on the screen.
- Click on Snip & Sketch and select Advanced options.
- Now first click Terminate and see if doing so resolved the error.
- If the error persists, follow the first three steps again and this time, click on Reset.
- Once done, restart your PC and check if the error is resolved.
You should now be able to use the Snipping Tool without any issues.
6. Use Windows Registry.
Windows Registry contains configuration settings for the applications and programs running on your PC. It is also a great place to perform troubleshooting steps to repair a damaged program.
You can use the Windows Registry to fix the Snipping Tool shortcut issue on your PC.
Here is how you can perform troubleshooting steps via Windows Registry:
- Search Notepad in the search bar and open it.
- Copy the code mentioned below and paste it in Notepad.
Windows Registry Editor Version 5.00

[HKEY_CLASSES_ROOTAppID{7F429620-16D1-471E-A81A-114992148034}]

@=”wisptis”

“RunAs”=”Interactive User”

“LaunchPermission”=hex:01,00,14,80,64,00,00,00,74,00,00,00,14,00,00,00,30,00,00,00,02,00,1c,00,01,00,00,00,11,00,14,00,04,00,00,00,01,01,00,00,00,00,00,10,00,10,00,00,02,00,34,00,02,00,00,00,00,00,18,00,1f,00,00,00,01,02,00,00,00,00,00,05,20,00,00,00,20,02,00,00,00,00,14,00,0b,00,00,00,01,01,00,00,00,00,00,01,00,00,00,00,01,02,00,00,00,00,00,05,20,00,00,00,20,02,00,00,01,02,00,00,00,00,00,05,20,00,00,00,20,02,00,00
- Once you have copied the file, save the file as SnipT.Reg and close Notepad.
- Double-click on the saved file to merge it with your Windows Registry.
- Finally, restart your PC and check if doing so resolved the error.
Windows Registry will help you fix all the Snipping Tool application issues, including the Shortcut error.
7. Disable Focus Assist.
Focus Assist is similar to the Do Not Disturb mode on phones. It helps the users stay focused by minimizing or completely stopping notifications from appearing on your screen. However, it can sometimes interfere with the features of other Windows programs such as the Snipping Tool.
If you cannot use the Windows Snipping Tool shortcut on your PC, it might be because of the Focus Assist feature. You can solve this issue by simply disabling Focus Assist on your PC.
Here is what you need to do:
- Press Windows + A keys simultaneously to open the Action Center.
- Locate Focus Assist and right-click on it.
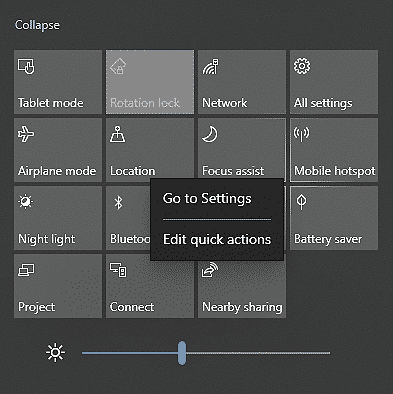
- Select Go to settings and inside the Settings window, click on Off to disable Focus Assist.
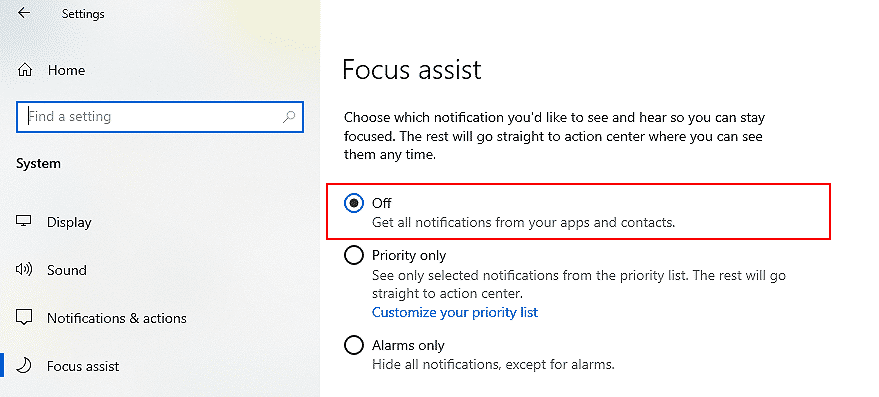
That’s it. If Focus Assist was causing the hindrance, disabling it will resolve the issue on your PC.
8. Try Using CleanMyPC.
As mentioned earlier, temporary errors like the Snipping Tool error can be caused by corrupt files in your PC. An easy and quick way to remove such corruption errors caused by junk files is to use a reliable PC cleaner.
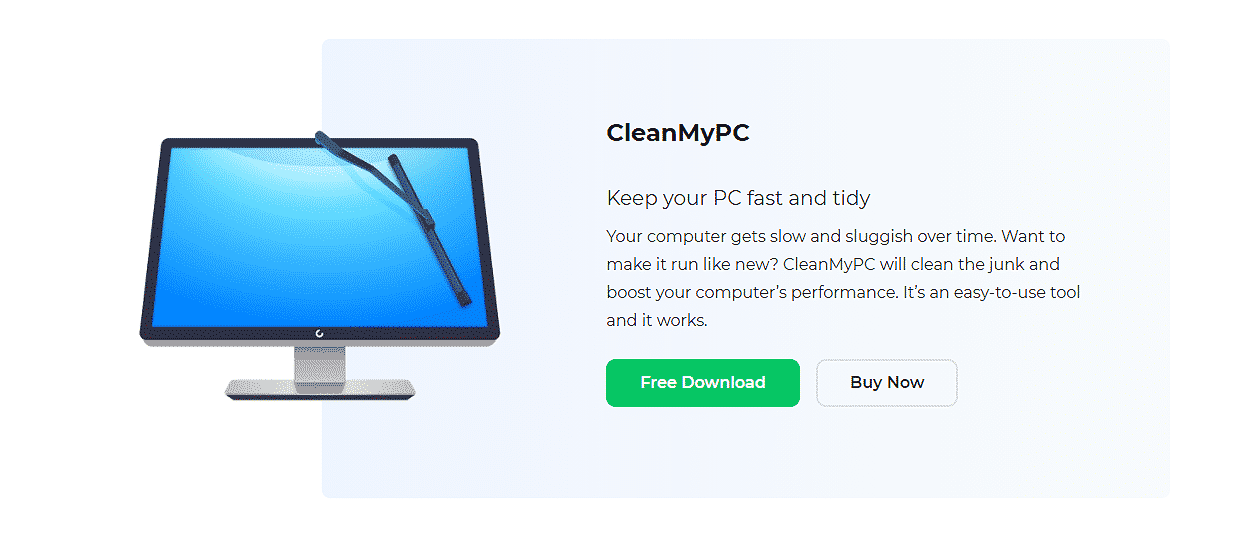
If you are tired of using your old PC cleaner that promised a lot but never delivered the results, shift to CleanMyPC now and give your PC a much-needed performance boost.
Cleaning your PC can be as hectic and tedious as doing your laundry, but CleanMyPC makes it easier. It comes with a full package of system maintenance tools that can take care of everything from speed to organization and removing the junk files. Not just this, but it also helps the users protect their online privacy by securely removing cookies and login data.
Get CleanMyPC now and improve the performance of your PC in no time!
9. Use the New Snip & Sketch Tool.
As mentioned earlier, Snip & Sketch is the successor of the Snipping Tool. If none of the methods mentioned above works for you, go ahead and try using the new Snip & Sketch tool.
Using Snip & Sketch is as simple as using the Snipping Tool, and you’ll become a pro at it in no time.
Here is how you can do it:
- Press Shift + Windows + S keys simultaneously, and the new Snip & Sketch will be launched.
However, if you do not want to use the keys mentioned above to launch the Snip & Sketch tool, you can enable the PrtScn button to open screen snipping.
For that, follow the steps mentioned below:
- Type Ease of Access keyboard settings and click on Open.
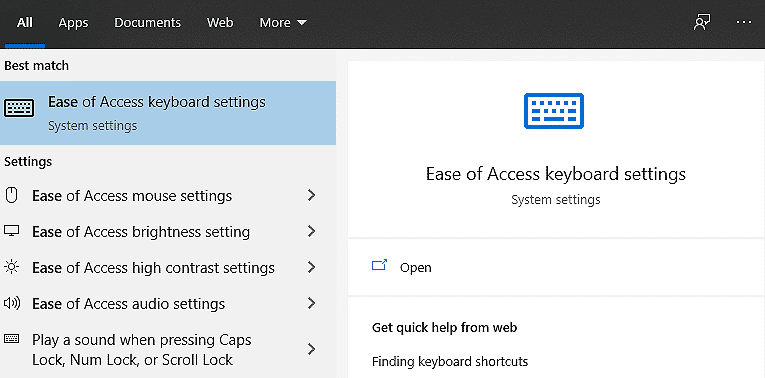
- Scroll down the window and locate the Print Screen Shortcut option.
- Enable Use the PrtScn button to open the screen snipping option and restart your PC.
This should fix the shortcut issue on your PC once and for all.
This wraps up our guide on fixing the Windows Snipping Tool error. We hope that our troubleshooting steps helped resolve the issue. If you have questions regarding the troubleshooting methods, please let us know in the comment section below.
If this guide helped you, please share it. 
