Are you facing a microphone issue on Zoom on Windows 10?
If you are one of the millions of people working or studying from home during the pandemic, you probably realize the significance of teleconferencing software like Zoom.
Zoom is no longer just a productivity tool. It is where families connect, and friends organize virtual get-togethers. And with all that’s going on, imagine running into a microphone issue and not being able to hear anything during a meeting that you waited days for.
If you are reading this guide right now, it is safe to assume that you have run into such an issue on Windows 10 and are looking for quick solutions to get back on track.
Luckily, we have compiled a list of the most effective workarounds that will help you fix the issue in no time.
Let’s get started.
1. Adjust Settings on Windows.
If your microphone is not working on Zoom, then the first thing you should do is check if Zoom has permission to access your microphone on Windows 10.
Desktop apps require permission to access microphones to work as intended, and if this feature was previously disabled in your PC, enabling it will resolve the issue.
Here is what you need to do:
- Go to the Settings app and click on Privacy.
- Locate Microphone from the left panel and click on it.
- First, click on the Change button under the ‘Allow apps to access your microphone’ option and enable it.
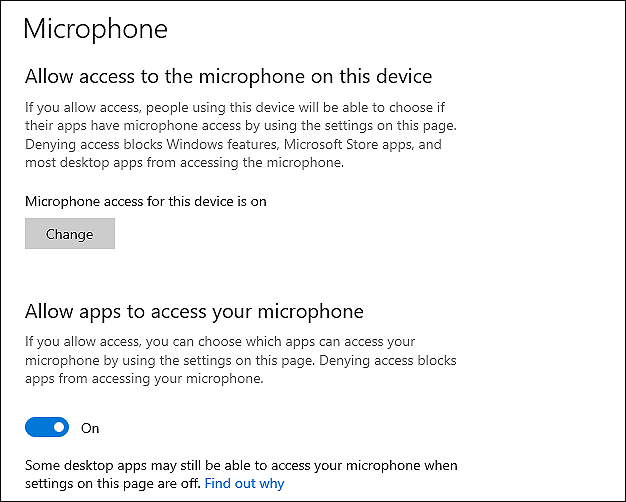
- Now toggle on the ‘Allow desktop apps to access your microphone’ option and check if the issue is resolved.
If the desktop apps on your PC were not allowed to access the microphone, changing the settings will resolve the issue.
However, if the method mentioned above did not do the trick for you, then try changing the settings using the steps mentioned below:
- Locate the Speaker icon on your taskbar and right-click on it.
- Select Open Sound settings and inside the newly opened window, click on Manage Sound Devices right under the Troubleshoot button.
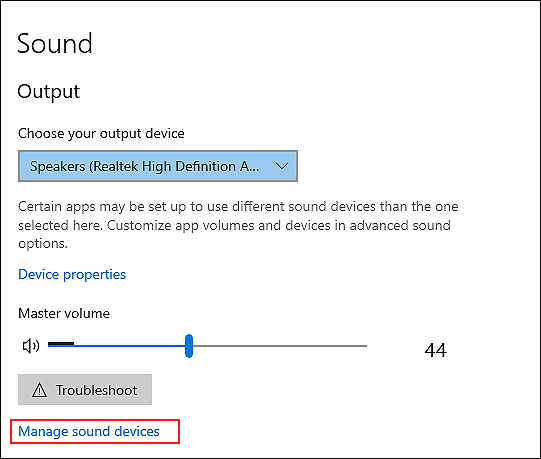
- Locate your active microphone under the list of disabled devices and click on it.
- Now click on the Enabled button and go to the Sound settings window again.
- Try speaking inside your microphone to check if it is working correctly. If you notice any movement in the bar under Test your microphone option, this means that your microphone is working.
You should now be able to use the microphone on Zoom. However, if you do not notice any movement, proceed to the following method mentioned below.
2. Use the Sound Control Panel.
One more straightforward way to fix Zoom microphone issues on Windows 10 is by adjusting the Microphone settings via Sound Control Panel. There is a possibility that the microphone you are trying to use is disabled in the Control Panel, which, as a result, is causing the issue at hand.
Here is how you can enable your microphone in the Sound Control Panel and resolve the issue:
- Locate the Speaker icon on your taskbar and right-click on it.
- Select Open Sound settings and click on Sound Control Panel under Related Settings in the newly opened window.

- Go to the Recording tab and right-click on the microphone you want to use.
- Select Enabled and hit Enter.
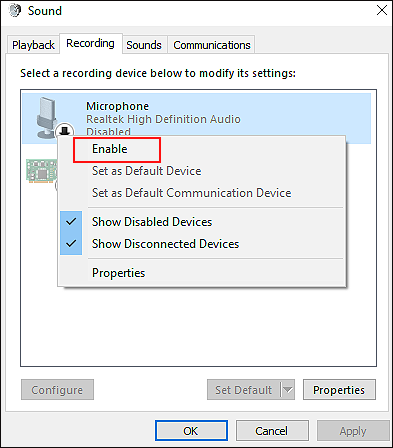
- Now select the microphone you want to use again and click on the Properties button located at the bottom of the window.
- Go to the Listen tab and checkmark the box against Listen to this device.
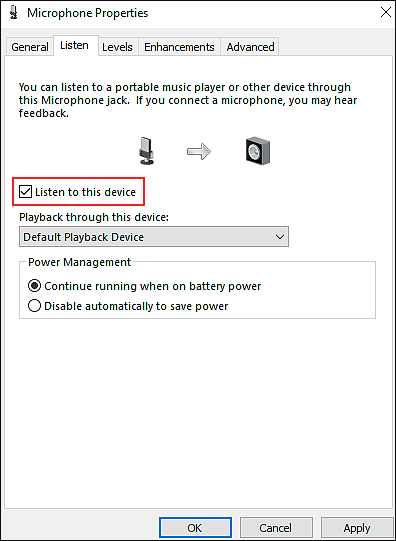
- Click on OK and then switch to the Levels tab in the same window.
- Adjust the intensity level according to your preferences and click on Apply to save the changes.
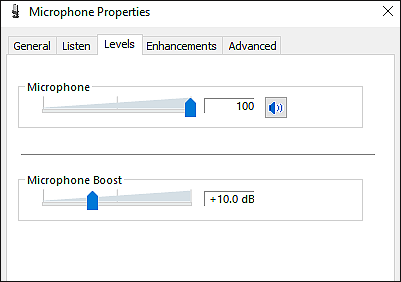
- Now select your microphone again like you did in the 5th step and this time, click on Set Default.
- Try speaking something in your microphone to see if it’s working fine. If you see any movement in the bar, click on OK.
This should fix Zoom microphone issues on Windows 10.
3. Modify Zoom’s audio settings.
Another possible reason behind the Zoom microphone issue can be the audio settings of Zoom itself. In this case, changing the Windows sound settings would not work for you, and to resolve the issue at hand, you must tweak Zoom’s audio settings.
Here is how you can do that:
- Open Zoom and click on the Settings icon (cogwheel).
- Locate the Audio tab from the left panel and click on it.
- Now expand the drop-down menu against Microphone and checkmark the box against ‘Automatically join audio by computer when joining a meeting’.
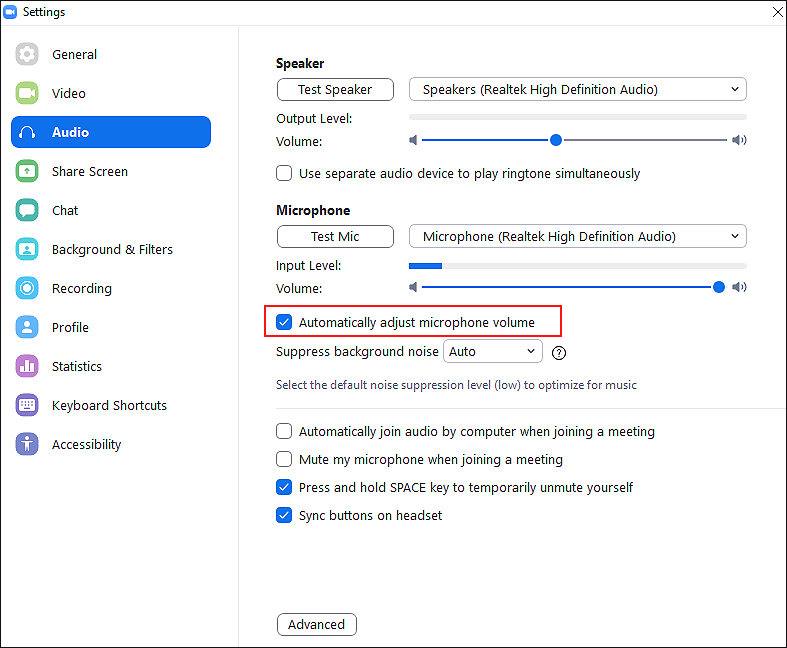
- Once done, click on the Advanced button located at the bottom-right of the window and disable the Suppress Persistent Background Noise and Suppress Intermittent Background Noise options. If you do not want to disable them, you can also set them to Moderate.
- Now set the ‘Echo cancellation’ feature to Auto and try joining a Zoom meeting to check if the microphone is working fine now.
If Zoom’s audio settings were causing the issue, adjusting them according to your preference will fix it.
4. Try Using CleanMyPC.
When was the last time you deep cleaned your PC and removed all the junk files from the system? If that was a long time ago (or never), then now might be the right time because it is common for issues like the one at hand to occur due to corruption errors within the system.
The best way to eliminate corruption errors and viruses from the operating system is by using a reliable PC cleaner. If you are looking for a suggestion, we highly recommend using CleanMyPC.

CleanMyPC comes with a wide range of system maintenance tools that will not just remove the junk files but will also take care of other issues like slow speed and sluggish performance of your PC. All that you need to do is install the application and run the scanner. The rest will be taken care of!
Install CleanMyPC now and get your PC up and running like new!
5. Reinstall Zoom.
If none of the methods mentioned above has worked for you, this implies that the corruption error causing the issue cannot be resolved using the conventional troubleshooting steps.
In this scenario, it is best to reinstall Zoom, as installing a fresh copy of this program will resolve all the application issues.
Here is how you can reinstall it to fix Zoom microphone issue on Windows 10:
- Go to the Control Panel and click on Uninstall a program.
- Locate Zoom from the list of programs available and right-click on it.
- Click Uninstall and follow the on-screen instructions to uninstall the program.
You can now reinstall Zoom, and hopefully, your issue will be resolved once and for all.
This brings us to the end of our guide on fixing Zoom microphone issue on Windows 10. We tried walking you through all the steps in detail and hope that one of the methods helped you resolve the problem once and for all. If you have any questions regarding the troubleshooting steps, please let us know in the comment section below!
If this guide helped you, please share it. 🙂


