Want to customize and change icons on Windows 11?
Windows 11 is known to bring numerous changes in the user interface to enhance the user experience. Visually the first thing you’ll notice is the difference in icons. While previous default icons were not too exciting as well, they gave a little preview of the content inside. Therefore, some end up wanting to change their icons.
While the default icons on Windows 11 work just fine, you may want to put a personal touch on your PC. Not only that but customizing the icons also makes things more exciting. Fortunately, you can change all types of icons on Windows 11, including desktop icons, taskbar icons, folder icons, shortcut icons, etc.
If you don’t want to choose from the built-in options of Windows, you can always download some high-quality and impressive icons from online resources and convert them to ICO format. The best ones are offered by Flaticon, GraphicBurger, Findicons, DeviantArt, and IconArchive.
Once you have the icons, proceed with the methods below to change them.
1. Change Folder Icons.
Before you jump to the steps to customize and change icons on Windows 11, it is recommended to create a restore point. This will help you revert changes in case anything goes wrong.
Then follow these steps to change the folder icons on your PC:
- To get started, navigate to the folder location you wish to change the icon for.
- Once there, select the folder and right-click on it.
- From its context menu, choose Properties. Alternatively, you may select the folder and press the Alt key + Enter from your keyboard.
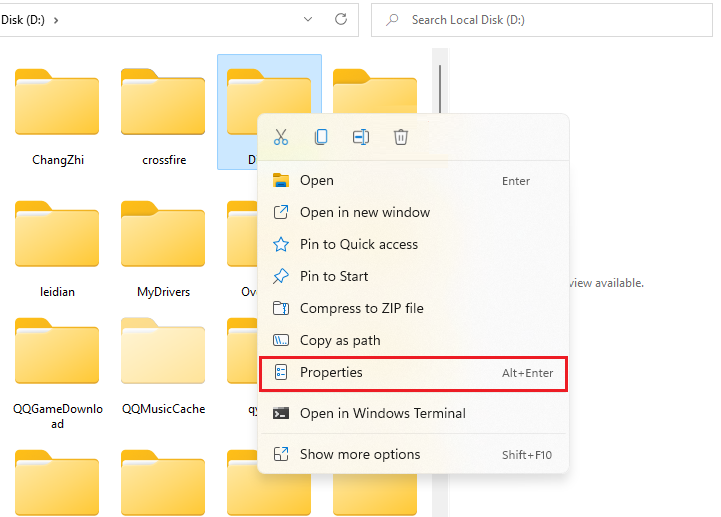
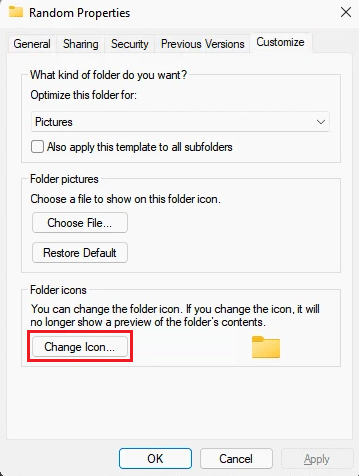
- When the Properties dialog box appears, go to the Customize tab.
- From there, click on the Change Icon button.
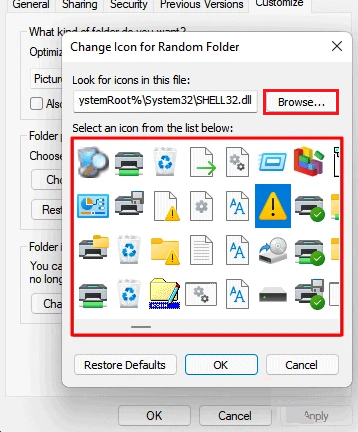
- Next, Windows will show you the default icons. If you like one from there, select one. Otherwise, click on Browse and select the custom icon by navigating to its location on your local storage.
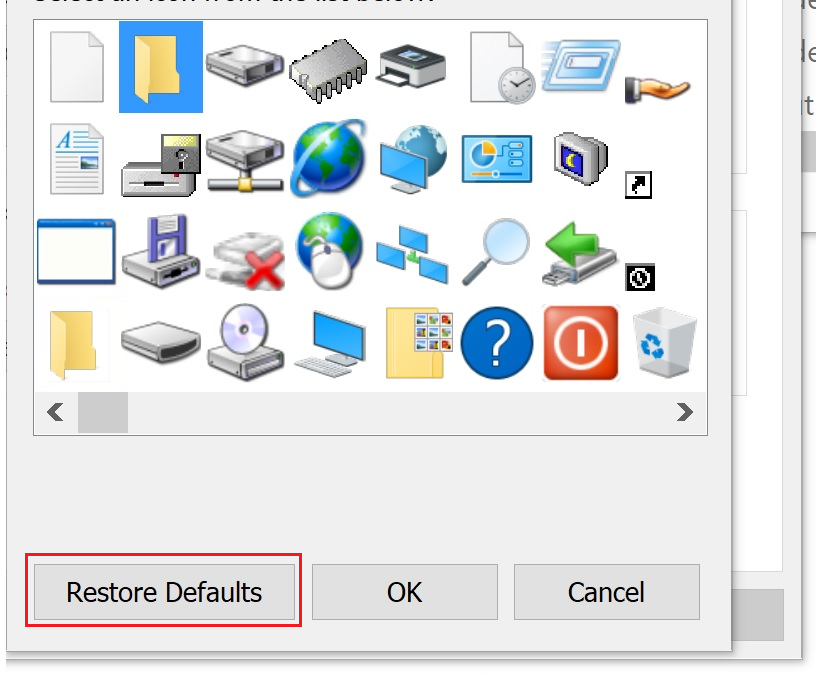
- Also, if your current icon is not the default one and you would like to go back, simply click on the Restore Defaults button.
- After that, click on OK.
- Again, click on OK on the Properties to apply and save the changes.
The selected desktop icon would have been changed by now. If it doesn’t, refreshing your PC once will do the job.
2. Change Taskbar Icons.
In some places, you will learn that editing the icons in the taskbar is not possible. However, that’s not entirely true. Icons in the taskbar are shortcuts you have knowingly pinned. But it also displays programs that are currently running on your PC.
So it’s important to know that you will only be able to change the icons for the programs pinned to the taskbar and not the ones that are appearing for the time that the application is running on your system.
Here’s how:
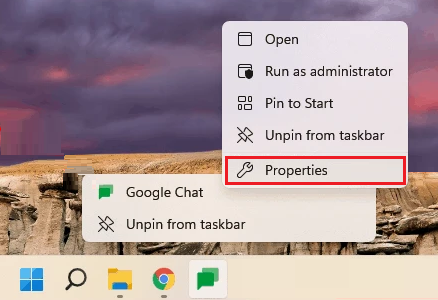
- To begin changing the icons, right-click on the pinned icon.
- Again right-click on the name of the program.
- Then, select Properties.
- This will display the dialog box. From there, go to the Shortcuts tab.
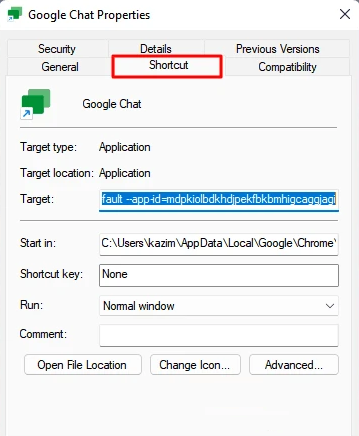
- Now, click on the Change Icon button.
- Select the icon you like. Windows looks for icons in the System 32 folder by default, but you can look elsewhere by clicking on the Browse button.
- Click on OK to apply the changes.
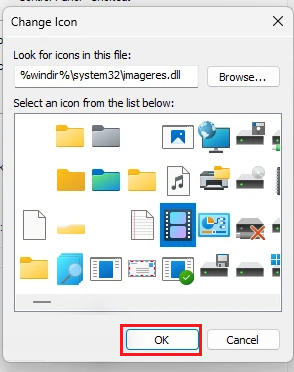
- Again, click on OK to close the window.
Note that the same method should be followed if you want to change icons for programs or their shortcuts on the Desktop.
3. Change Desktop Icons.
If you want to change the icons for key items on the Desktop like This PC, User folder, Recycle Bin, Quick Access, and so on, then this method is for you. The steps are a bit less simple than the ones explained above, but it’s worth all the effort.
Some users may not have these icons on their Desktop simply because they’ve disabled their shortcut. If that’s the case for you as well, you need to restore them first before going ahead with changing their icons.
Then, follow the steps below:
- Start by right-clicking on the Start menu or pressing Windows key + X. Then choose Settings from the options. Alternatively, you may press the Windows key + i on the keyboard to launch the Settings app directly.
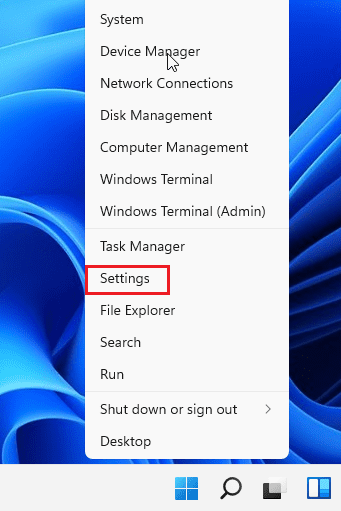
- When the window opens, go to the Personalization tab from the left pane.
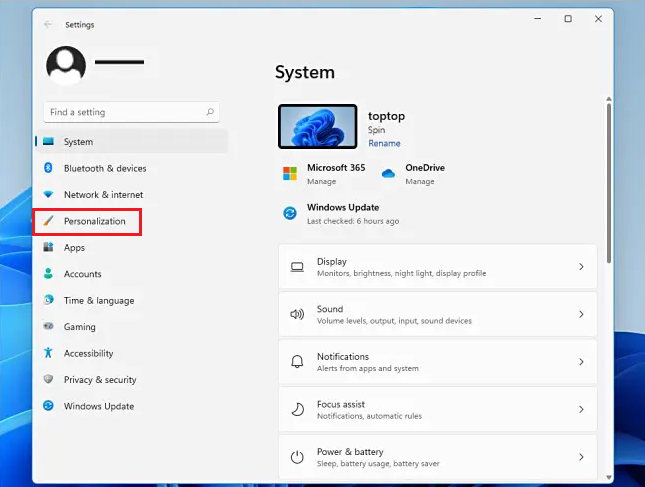
- Then, click on Themes on the right pane of the window.
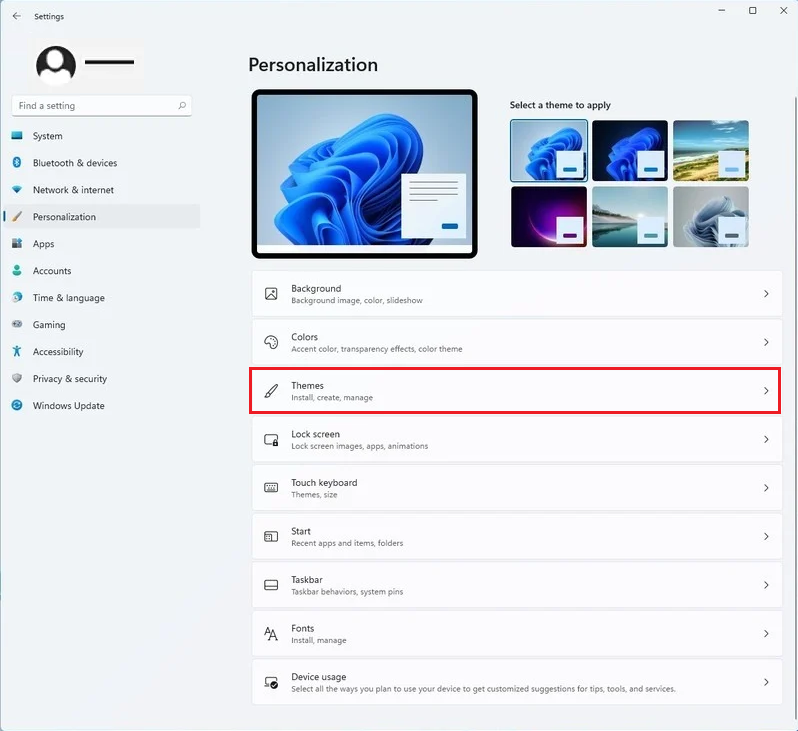
- Next, scroll down to Related settings and click on Desktop icon settings.
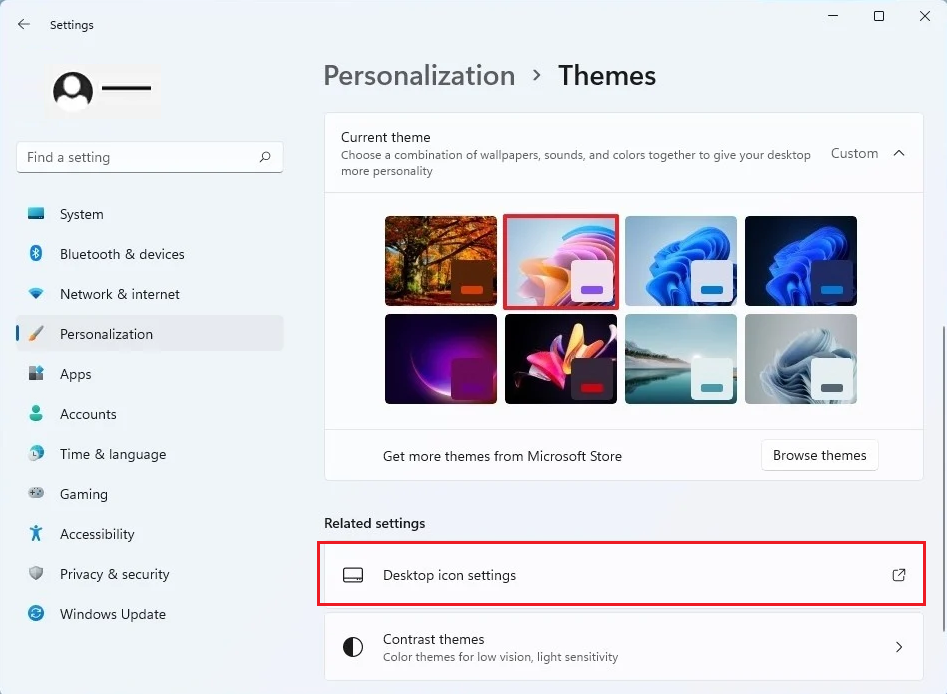
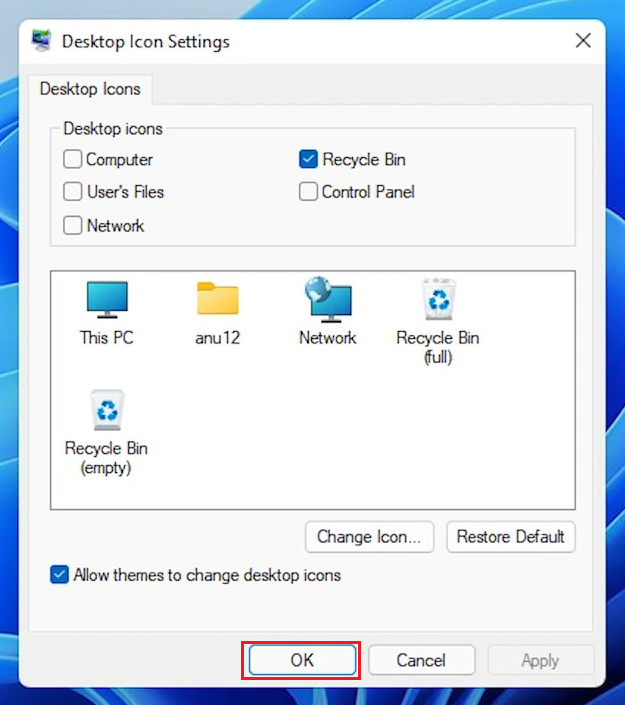
- This will launch a dialog box. If you have a missing desktop icon, check the box next to it under Desktop icons.
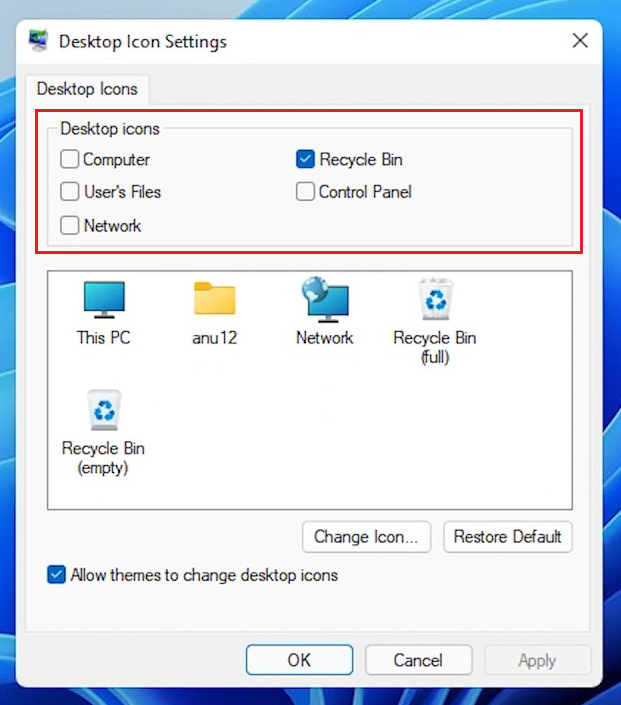
- To change the icon, select it and click on the Change Icon button.
- After that, choose the desired icon from the list of options or click on Browse to select the one you downloaded.
- Once done, click on OK.
- Again, click on OK to save the changes and close the window.
4. Change Drive Icons.
Apart from the icons mentioned above, you also have the option to customize and change drive icons on Windows 11. Users often do this by referring to a third-party application, but if you don’t prefer this method, you can use Windows Registry to perform the task.
However, before moving forward, we recommend you Create Backup and Restore Registry on Windows 11. That way, if anything goes wrong while editing, you can revert the changes by restoring the registry.
Then, follow the steps below:
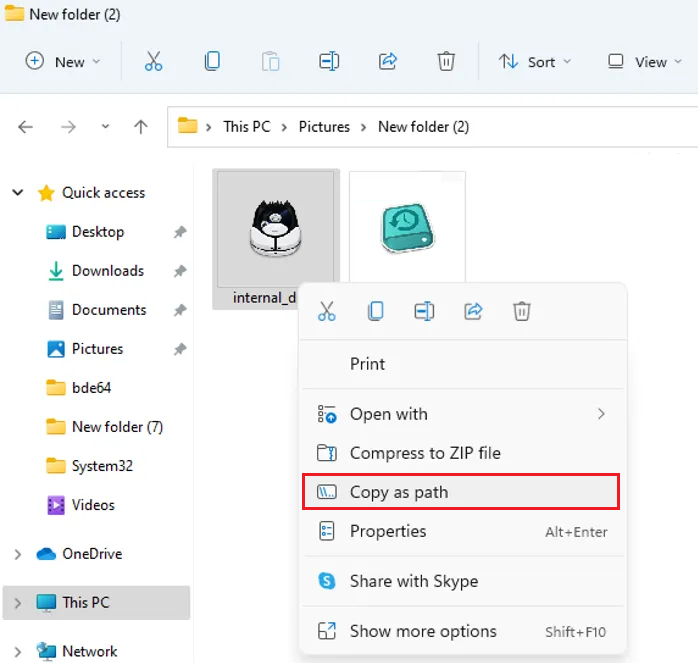
- Firstly, open File Explorer and navigate to the location of the ICO file you want to make the icon for the drive.
- Right-click on it and choose Copy as path.
- Now, press the Windows key + R to open the Run dialog box.
- There, type ‘regedit’ and click on OK to launch the Registry Editor.
- When the window opens, type the following in the address bar:
HKEY_LOCAL_MACHINE\SOFTWARE\Microsoft\Windows\CurrentVersion\Explorer\DriveIcons- Next, right-click on DriveIcons from the left pane.
- From the context menu, go to New and select Key.
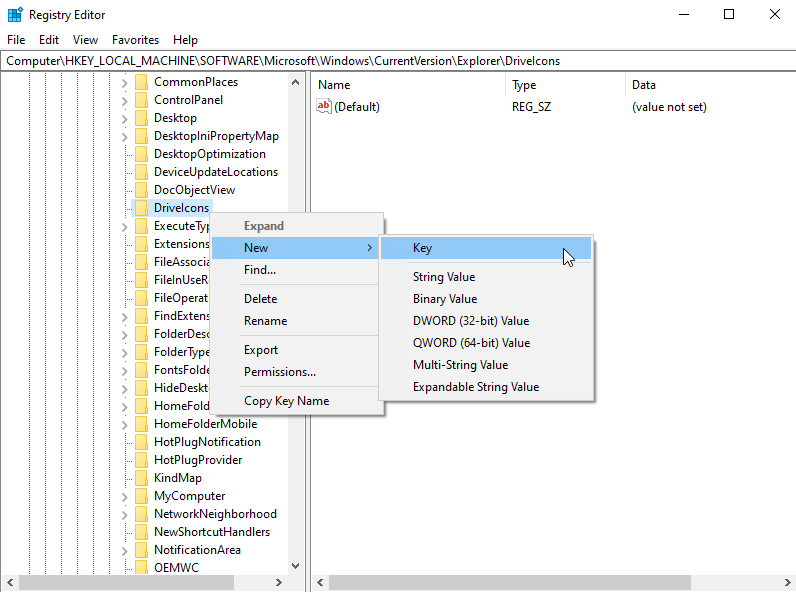
- Change the name of the key with the letter of the drive you want to change the icon for.
- Then, right-click on the key you just made. Again go to New and click on Key. This time, name it as DefaultIcon.
- Open DefaultIcon and double-click on Default on the right pane.
- Once the Edit String dialog box appears, paste the ICO file path you copied earlier in the Value data text box. If you don’t like the icon later on, simply erase all text in this box.
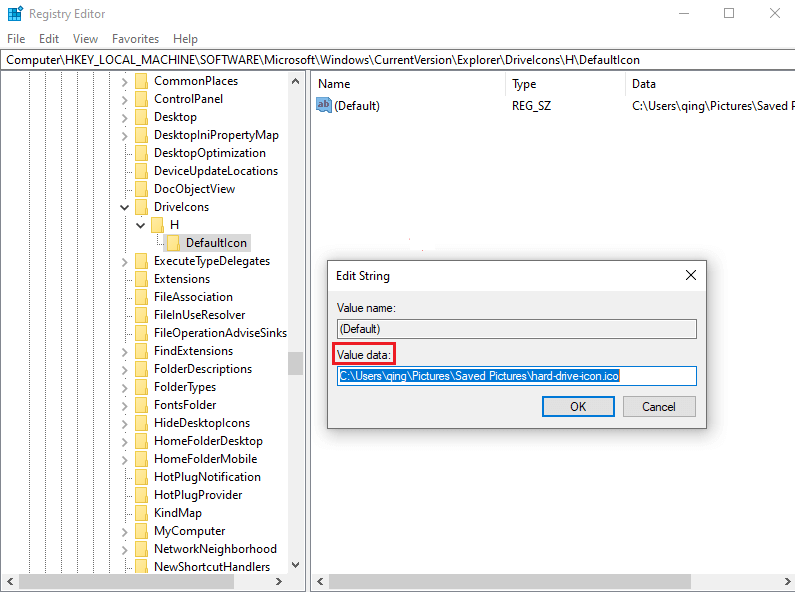
- Select OK to make the changes.
The changes will be applied immediately.
With that, we end our guide on how to customize and change icons on Windows 11. By now, you’d be well aware of the different types of icons and ways to customize them. For more questions, head over to the comment section. We’ll be happy to provide further assistance.
If this guide helped you, please share it. 🙂


