

Want to know how you can stop Google Chrome from closing inactive tabs?
Google Chrome is notorious for consuming a lot of system resources. As a response to user complaints, Google introduced a new feature on the most popular browser.
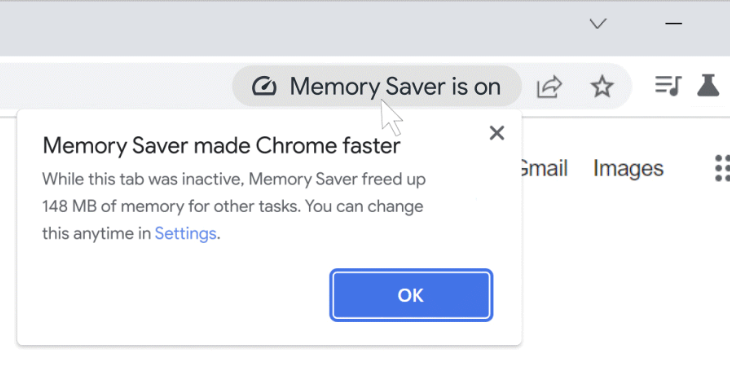
Chrome’s memory saver feature frees up memory from tabs you are not using so active websites can run smoother.
However, this can be a problem if you switch between 10 or more tabs while browsing.
With memory saver enabled you’ll find some tabs on Chrome to refresh if you stay on one tab for some time.
If you are annoyed by this feature, we got you covered. Today, we will show you how to stop Google Chrome from closing inactive tabs.
Let’s begin!
Stop Chrome from Closing Inactive Tabs
As mentioned above, Google introduced a memory management feature on Chrome to address performance concerns.
However, the feature isn’t for everyone.
If you normally browse with multiple tabs opened at the same time, the memory saver feature can get in the way of your workflow.
You’ll need to disable the memory saver on Chrome if you don’t want your inactive tabs to get closed.
Here’s what you need to do:
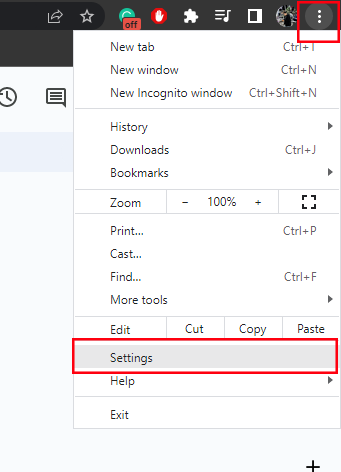
- On Chrome, click on More in the upper left corner. The three vertical dots beside your profile.
- Now, click on Settings.
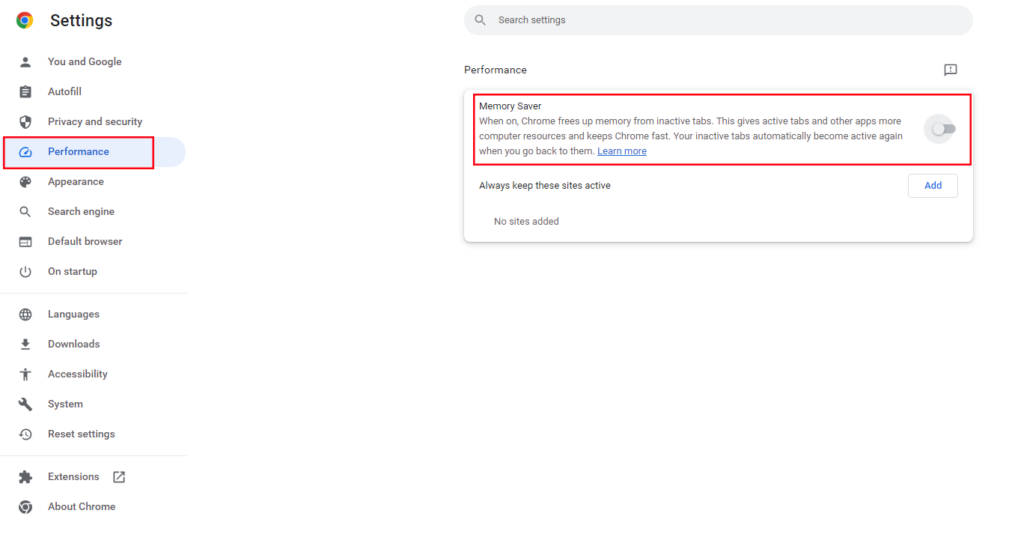
- In the side menu, click on Performance.
- Look for the Memory Saver option and turn off the toggle switch.
- Restart Google Chrome to apply the changes.
Stop Specific Websites from Getting Closed
If you don’t want to fully disable the memory saver feature, you can add exceptions to specific websites.
This will tell the memory saver to keep specified websites active.
Here’s what you need to do:
- First, open Chrome and go back to Settings.
- Access the Performance tab from the side menu.
- Enable Memory Saver.
- Now, click the Add button.
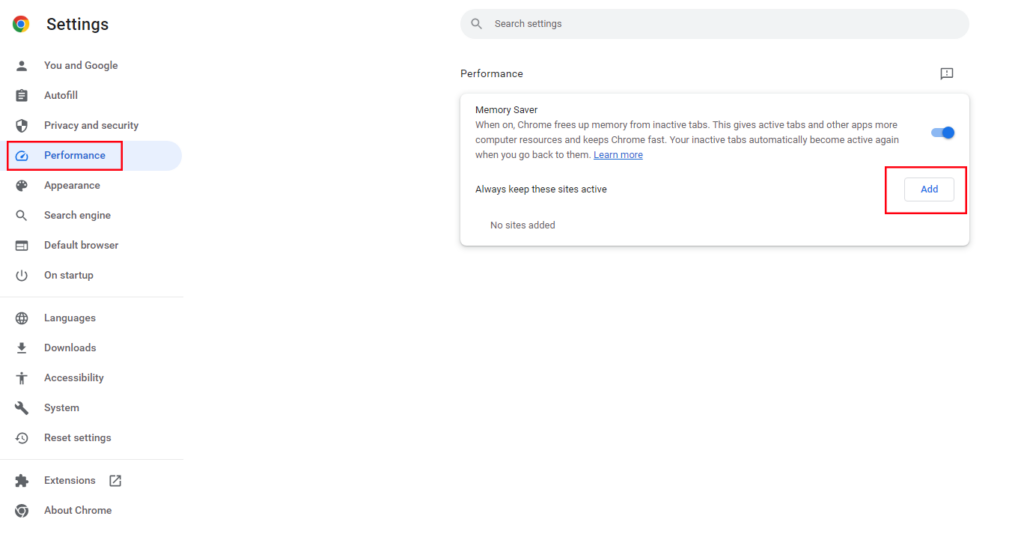
- Enter the website you want to add to the exception list and click Add.
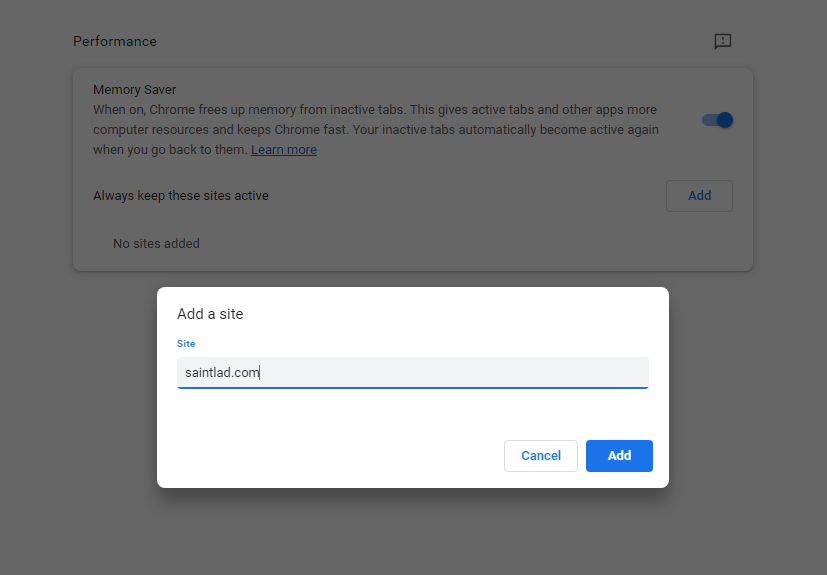
Google Chrome should now keep your preferred websites active.
Stop Chrome from Closing Specific Tabs
Another way to prevent your tabs from getting discarded by the memory saver is through the discards page.
From here, you can set if a tab is discardable or not.
Here’s what you need to do:
- On Google Chrome, type ‘chrome://discards/’ in the URL box.
- Hit Enter to load the page.
- Now, find the tab you want to keep active.
- Look for the ‘Auto Discardable’ column and click Toggle.
- An ‘X’ mark should appear on the tab indicating that Chrome can’t discard it.

Note
- Keep in mind that this only applies to that instance of the tab and not the website or domain opened to it.
- If you open the same URL in a new tab, it will still be set to ‘Auto Discardable’ if the memory saver is enabled.
Monitor Discarded Tabs
Once you’ve configured Chrome’s memory saver, you must check if your preferences are working.
See the steps below to monitor which tabs get discarded or uploaded:
- Launch Google Chrome on your computer.
- Now, type ‘chrome://discards/’ in the URL box.
- Hit Enter to load the page.
- Check the list of tabs open on your browser. The ‘discard count’ tab should indicate how many times a tab is discarded for being inactive.
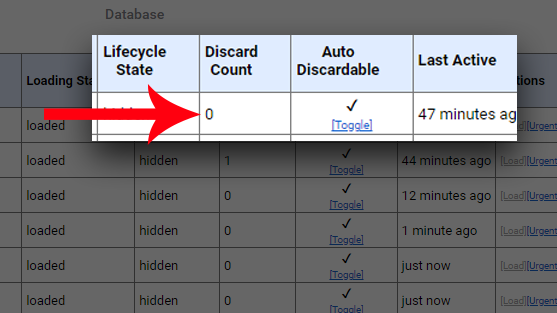
The ‘discard count’ value should be 0 for the websites you added to the exception list.
Additional Tips
Google Chrome’s memory saver doesn’t pointlessly close your tabs if you haven’t used it for some time.
If there are activities going on in that tab, Chrome will not discard them. You can take advantage of this if you don’t want to disable the memory saver.
Here are some activities that prevent tab deactivation:
- Playing Audio or Video
- Page Notifications
- Screen Sharing
- Partially filled forms on websites
- Connected Bluetooth or USB devices
- Active Downloads
Improve Google Chrome Performance
With some tweaks, you can improve Google Chrome’s performance without using the memory saver feature.
This way, you can enjoy fast browsing without having to deal with the annoying closing of inactive tabs.
Update Google Chrome
Google Chrome performs best if you are using the latest version. This has the latest patch for known issues with previous versions of Chrome.
Keeping Chrome updated should also ensure that it is optimized for all the websites you visit.
Here’s how you can update Chrome:
- On Chrome, click on More beside your user icon in the top right corner.
- Now, go to Settings.
- Click on About Chrome. This should prompt your browser to check for updates.
- If there’s an available update, follow the instructions to install the latest version.

Your browser should now manage resources better, giving you improved performance.
Close Unused Applications
Having a lot of software running in the background can decrease your system performance. Not only will Google Chrome suffer, but also other applications you use.
To keep your system running smoothly, close any apps or programs you’re not using. This should free up some system resources, giving your other apps more room to operate.
See the steps below to manage your apps:
- Press CTRL + SHIFT + ESC on your keyboard to open the Task Manager.
- Go to the Processes tab and look for applications that you are not using.
- Select the app you want to close and click on End Task in the lower right corner.
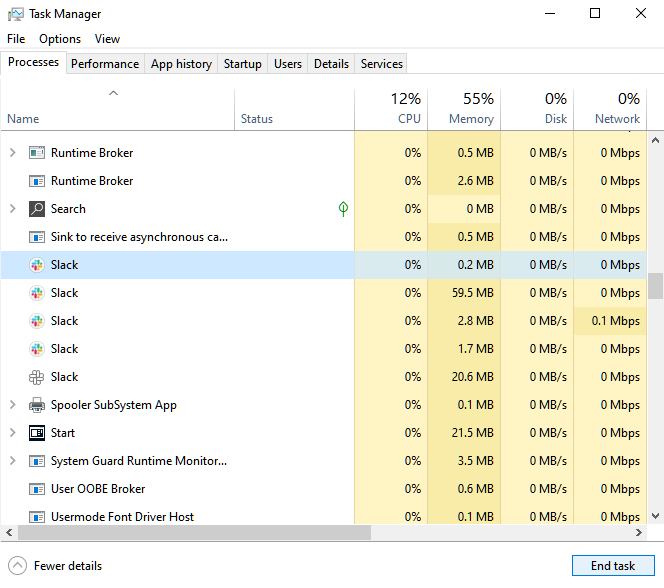
Google Chrome and other apps should run smoother now that you have less load on your system.
Disable Browser Extensions
Having multiple tabs and extensions opened all at the same time can cause Chrome to use more memory.
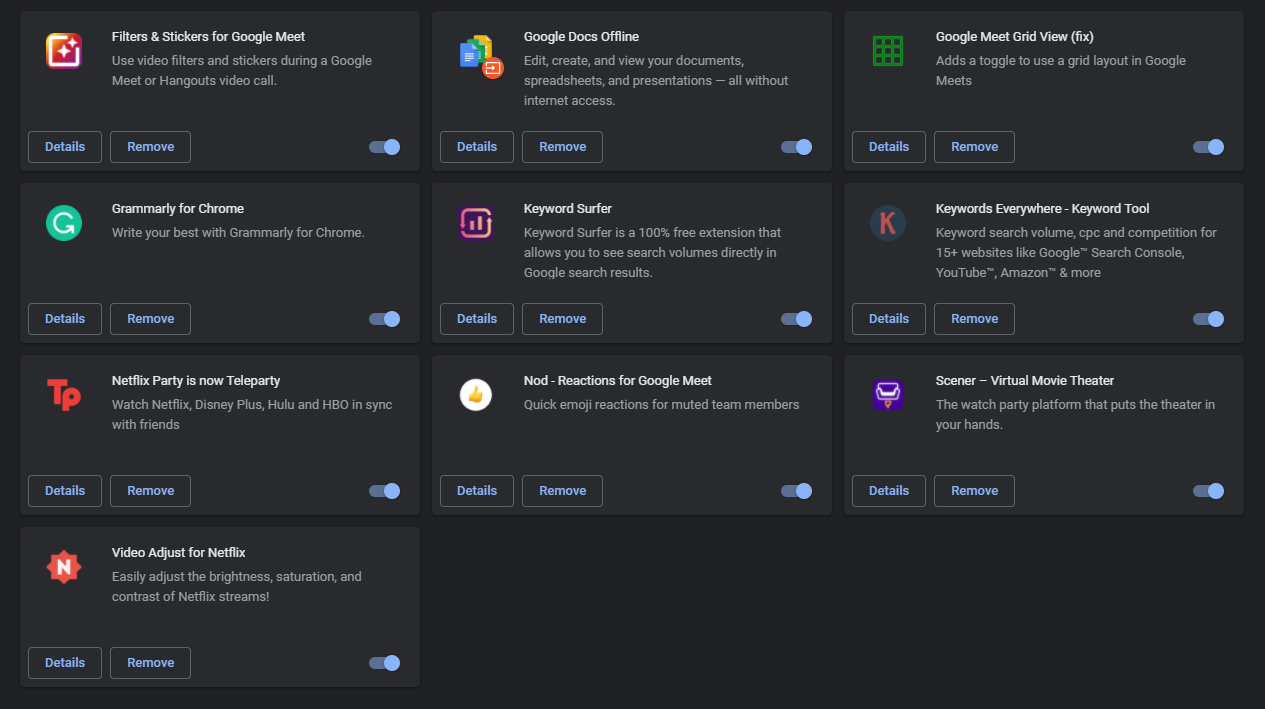
See if you have unused extensions on Chrome and remove them.
Here’s what you need to do:
- Open Google Chrome and go to Settings.
- Now, click on the Extensions tab in the side menu.
- Look for extensions you’re not using and click the toggle switch beside them.
- Restart your browser to apply the changes.
Fire up the Task Manager and see if Google Chrome’s RAM usage has improved.
Let Chrome Load Pages Faster
Google Chrome has a page prefetch feature that can help load websites faster.
With this feature, Google Chrome will preload the links or websites that you often visit. This can include social sites, search engines, or even your company’s website.
Here’s what you need to do:
- Open Google Chrome.
- At the top right corner, click on More and select Settings.
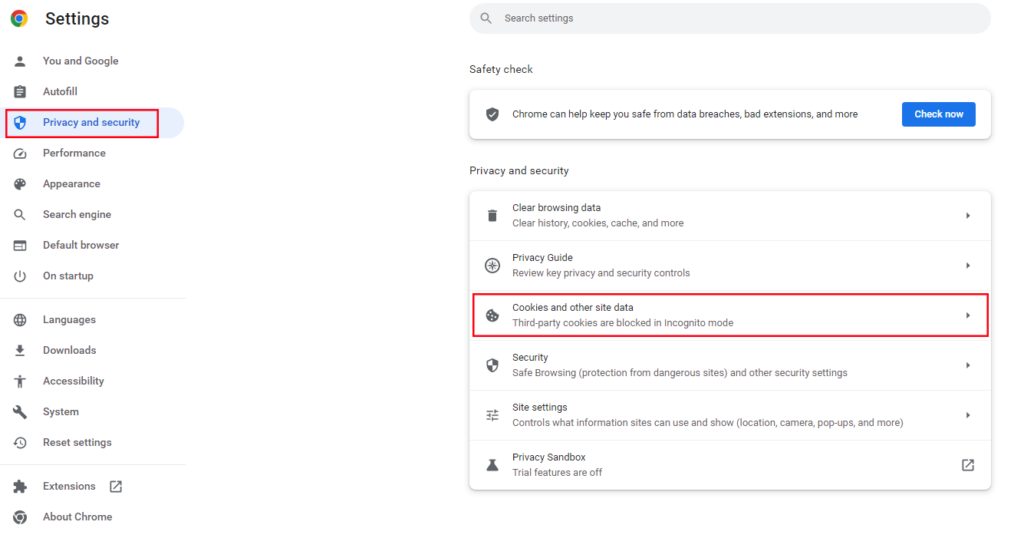
- Now, go to Privacy and Security.
- Click on Cookies and Other Site Data.
- Look for ‘Preload Pages for Faster Browsing and Searching’ and enable it. Click the toggle switch beside it.
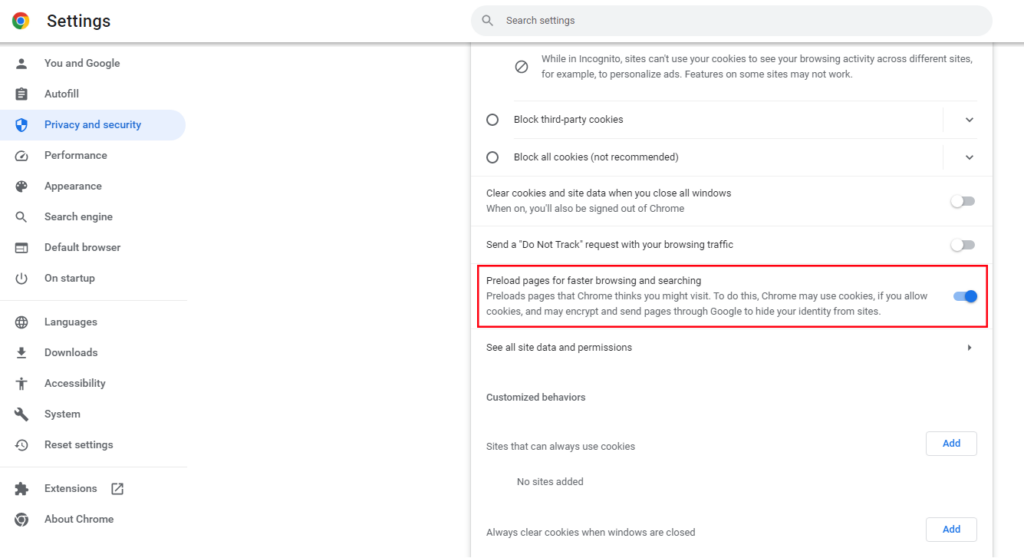
Restart Chrome and it should now preload websites you often visit.
That’s everything you need to know on how to stop Google Chrome from closing inactive tabs.
If you have other concerns, please let us know in the comment section, and we’ll do our best to respond.
